My DIY wood slat wall is the perfect modern accent wall. It looks SO professional, but is such an easy beginner project! There aren’t many fancy cuts. Plus it’s a great budget project! You can complete this for $150-$200. Read below for for the 7 steps on how create this!
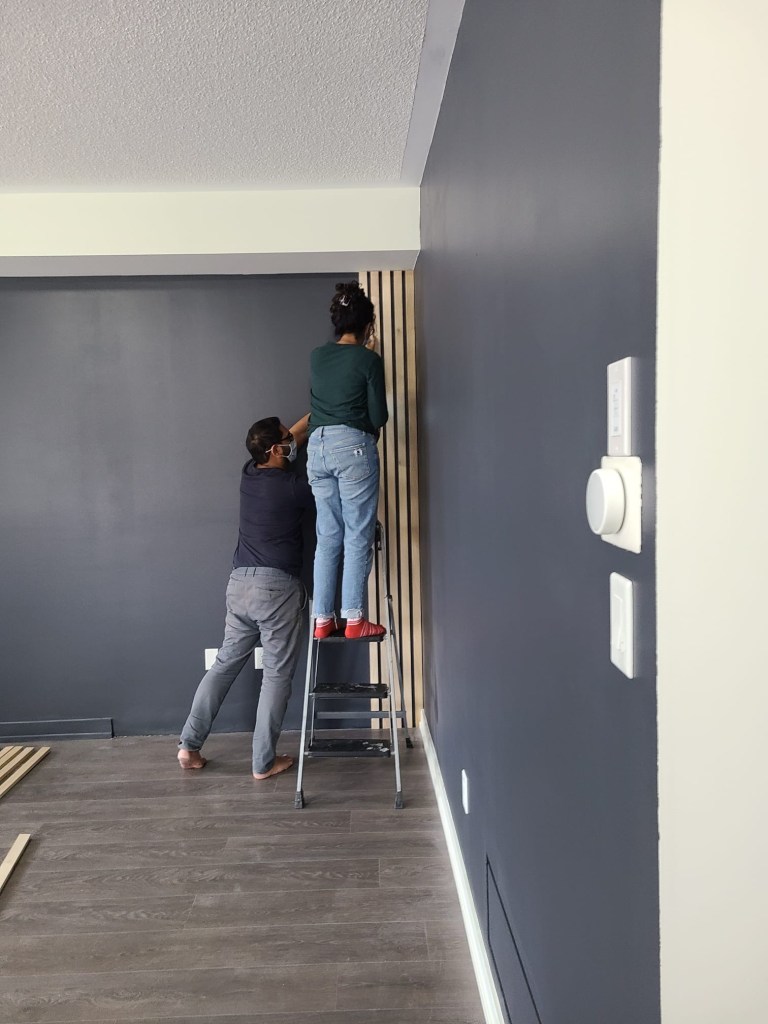
My friend Leena reached out to ask if I would help her and husband create an accent wall in their living room – and of course I said yes! She had moved into a builder grade home with her husband, 5 years ago. It’s still a blank slate. But they have a vision for this space and it’s time to make it a modern, dark living room. We created a really fun vision board. We started off by tackling the vertical DIY wood slat wall.
If you’re looking for a more traditional style of feature wall, check out my living room wainscotting tutorial or my elevated board and batten hallway.
What is the Best Wood to Make a Slat Wall?
The easiest option is to buy 1×2″ pine wood from a lumber store. This is the size that we used so you only need to cut it to the right length. It can be stained to any wood tone and takes stain very nicely.
You can also use hardwood like poplar or oak. We used poplar because it doesn’t have the yellow undertone that pine has. Plus, it’s a beautiful wood that doesn’t require any sanding or staining. It is more expensive than pine, but for the entire wall, it was a small difference. Each poplar slat was $10.50 vs pine at $8.
What is the Cheapest Way of Making a Slat Wall?
You can purchase a large 8×4′ piece of plywood and use a table saw to rip it down to 1×2″ dimensions. This is only a less expensive option if you have a table saw. However, it will take more time as you have to cut down each individual strip of wood, and sand them as well.
Plywood doesn’t absorb stain as nicely as pine or poplar does. And, if you look at plywood from a side angle, you don’t see a beautiful wood grain. Instead you see the raw edges which looks like sheets of wood glued on top of each other (after all, that’s exactly what plywood is – wood glued together). Can you tell I’m not a fan of plywood for a slat wall? If you’re looking for a flawless high-end finish, I would recommend getting pine or poplar.
What Nail Gun is the Best for Slat Wall?
A nail gun is the most important tool for an accent wall. You need a good quality nail gun that is going to drive the nails into the wood and the wall so the slats don’t fall off the wall. You also want a nail gun that is safe and easy to use so that you can complete this project quickly.
I prefer to use a cordless brad nailer. This nail gun does not require a compressor. There is no long hose attached to my nail gun. A cordless nail gun is preferable as I was getting up and down off a ladder for EVERY single slat. I imagine a hose would be dangerous to climb over on the ladder.
With a cordless brad nailer, I attached my battery and got to work. I completed this slat wall on a single battery charge. Plus, its really lightweight which is perfect for me as I am a smaller framed person.
Table of contents
- What is the Best Wood to Make a Slat Wall?
- What is the Cheapest Way of Making a Slat Wall?
- What Nail Gun is the Best for Slat Wall?
- Step 1. Cut the pieces
- Step 2. Prep the wood
- Step 3. Remove your baseboards
- Step 4. Work out the spacing of your slats
- Step 4. Paint your wall a dark color
- Step 5. How to Attach Slat to the Wall
- Step 6. Working around easy outlets
What you’ll need:
Power tools
- Mitre saw (or have the store cut them for you)
- Level
- Jigsaw
- Brad nailer with 1.5″ nails
- Sander with the 220 grit sandpaper
Materials for your slat wall
- 1×2 poplar slats. We used 24 for this wall. You can also use Pine as a cheaper alternative
- Wood conditioner
- Wood Stain (optional)
- Paint brushes. This is my favourite rubber handled brush
- Paint. We used Sherwin-Williams Cyberspace SW 7076
- Painters tape
- Drop cloth
- Adjustable roller frame (for 12-18″ rollers)
- 18″ rollers
- 18″ roller tray
- Paint extension roller pole (you can also use a broom stick if yours screws off)
- Regular paint rollers (9″ rollers)
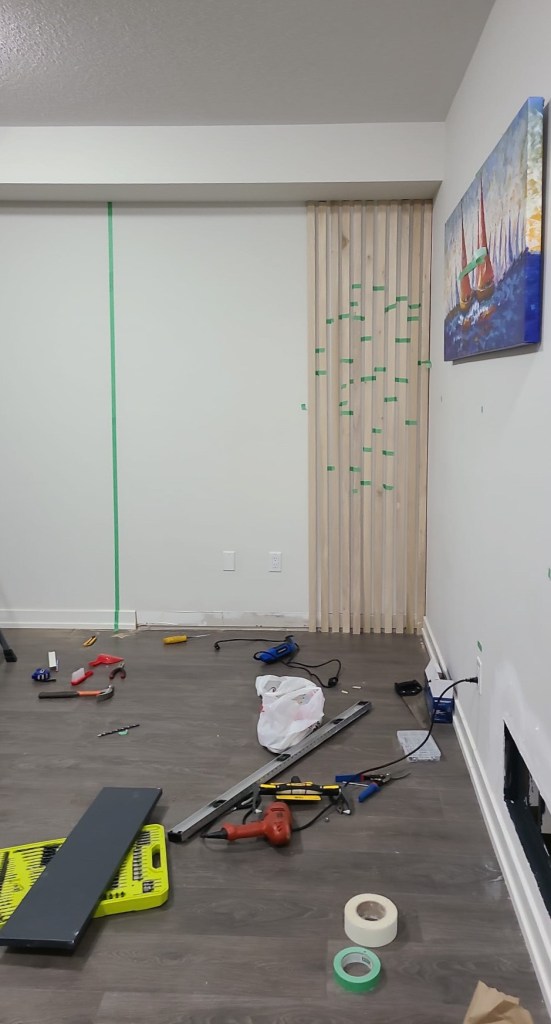
The space that my friends chose for their accent wall was nearly a perfect blank canvas. No complicated corners. Just a 20x 10 white space for us to work with. This space was ready for a makeover, so we set to work! If you prefer to watch YouTube videos, check out slat waill installation

Step 1. Cut the pieces
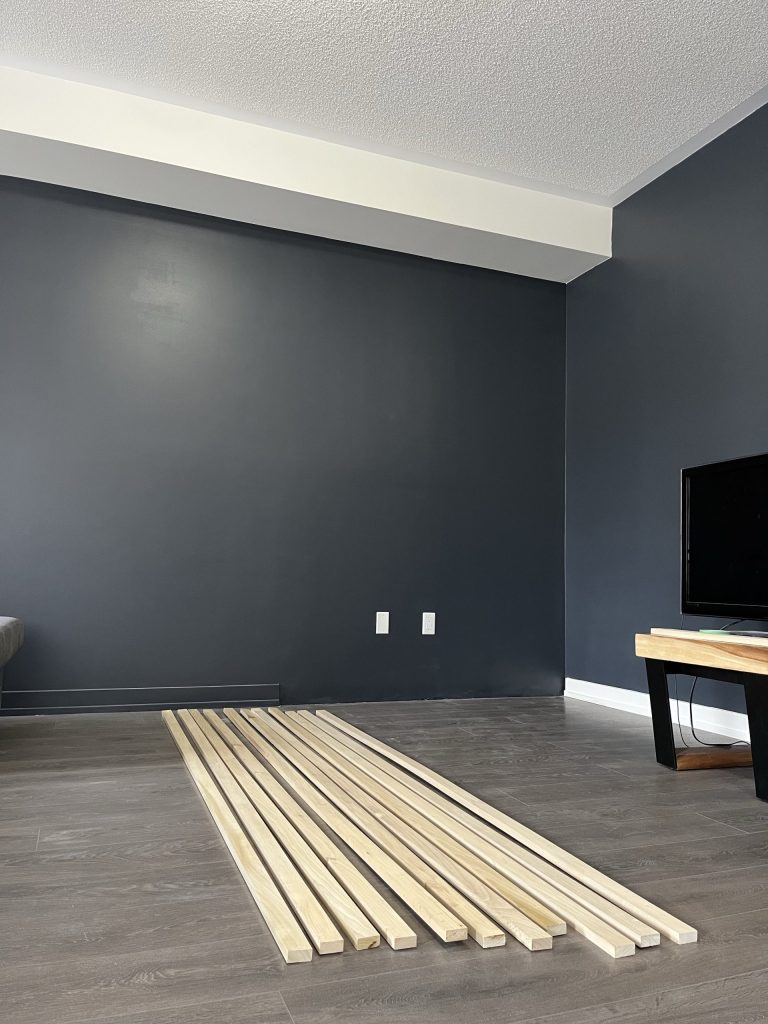
The first step in this DIY wood slat wall is to get the wood. While I would normally have opted for pine wood on a project like this, Leena chose to use poplar. Yes, it is a more expensive option, but it is such a gorgeous wood! There are so many different types of wood for all kinds of budgets so use what works for you. Pine has a yellowish undertone which poplar doesn’t have. Try to get the wood slats are the most straight and not warped for the most linear wall.
Once the planks are picked, it’s time to cut them to size. Since we want the slats to go from floor to ceiling, we measured the height of the wall. If you have access to a mitre saw, you can of course cut the pieces to length yourself.
If you don’t have a saw, you can ask the store to cut them using the measurements provided. This is also a great option. Your material will be cut to measure and there’s way less mess for you! In either case, please keep the wood scraps! We’ll want those for later.
Step 2. Prep the wood
Since we were working with poplar for this project, there was no need to sand the wood. It was already so beautiful as it was. If you use pine, you’ll want to sand them with p220 grit.
Once that’s done, you can stain it. Originally we had a few stain options they were considering but ended up going for unfinished slats because their natural colour is just so lovely.
Finally, we coated the slats with a quick layer of polyurethane to seal the wood.
Step 3. Remove your baseboards
This step is optional, but since we wanted the boards to go from floor to ceiling, we used a multi-tool to cut off the baseboard. Once we removed the baseboard, we realized the bottom of the drywall was a huge mess, so we patched it with drywall compound. Then sanded with p220 grit after it was smooth.
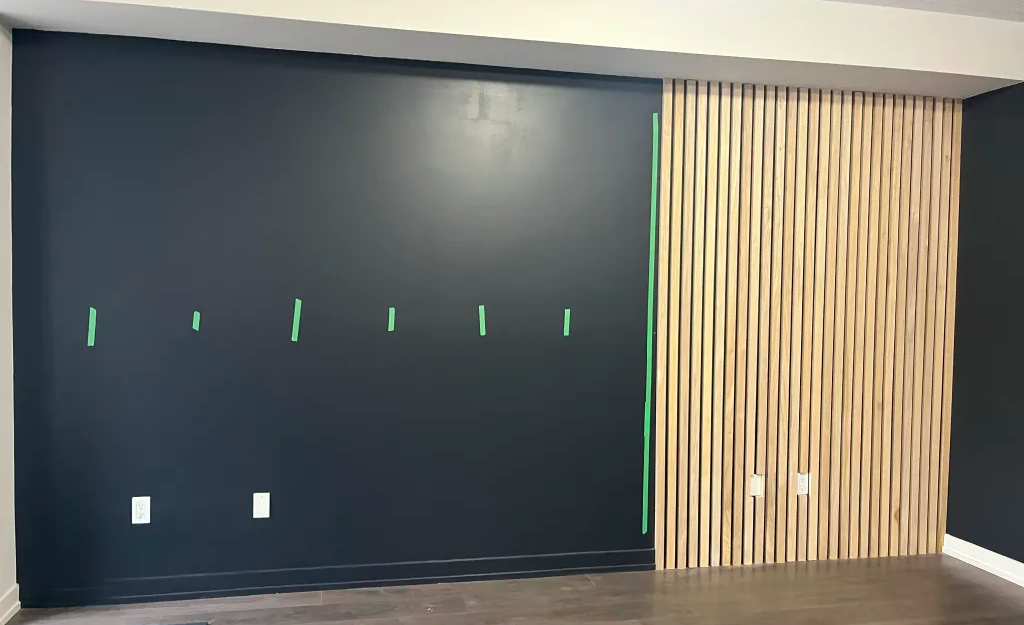
Step 4. Work out the spacing of your slats
Next is to figure out how much spacing you want between the slats once they’re on the wall. You know how much I love using painters’ tape to visualize my designs, so that’s exactly what I suggested they use. I had them tape the slats against the wall to work out what they prefer and get an idea of the end result. The distance they liked between each slat turned out to be exactly the depth (the shorter width) of the wood slats, so we used our scrap pieces as spacers for the project. We turned them on the short edge. The spacing is approx 1″. See, I told you they’d come in handy!
Step 4. Paint your wall a dark color
Now that there’s a concrete plan for the design of the DIY wood slat wall, it’s time to paint the walls. We used Sherwin Williams Cyberspace SW 7076. It’s a gorgeous deep black with blue undertones. Since there was so much surface area to paint, we used an 18” roller which really helped speed things up – we were able to do the whole wall in only 15 minutes. We applied 2 coats.
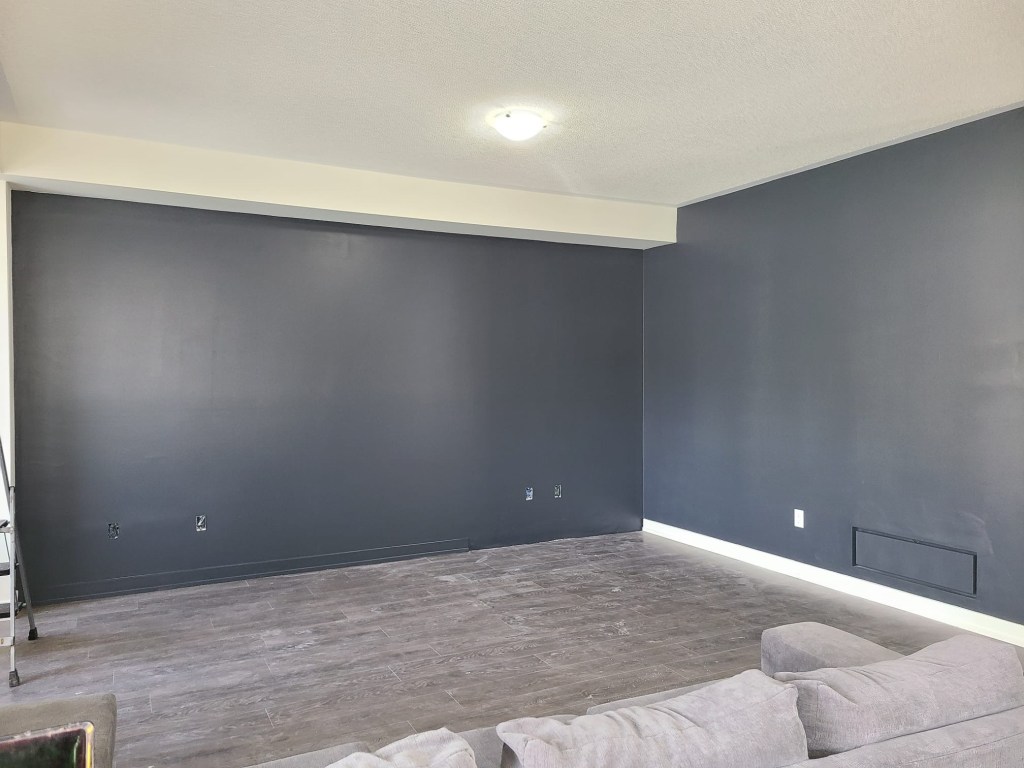
This colour really accentuates the natural hue of the poplar. The slats look so good against it. You might even say they POP(lar… haha- get it?)
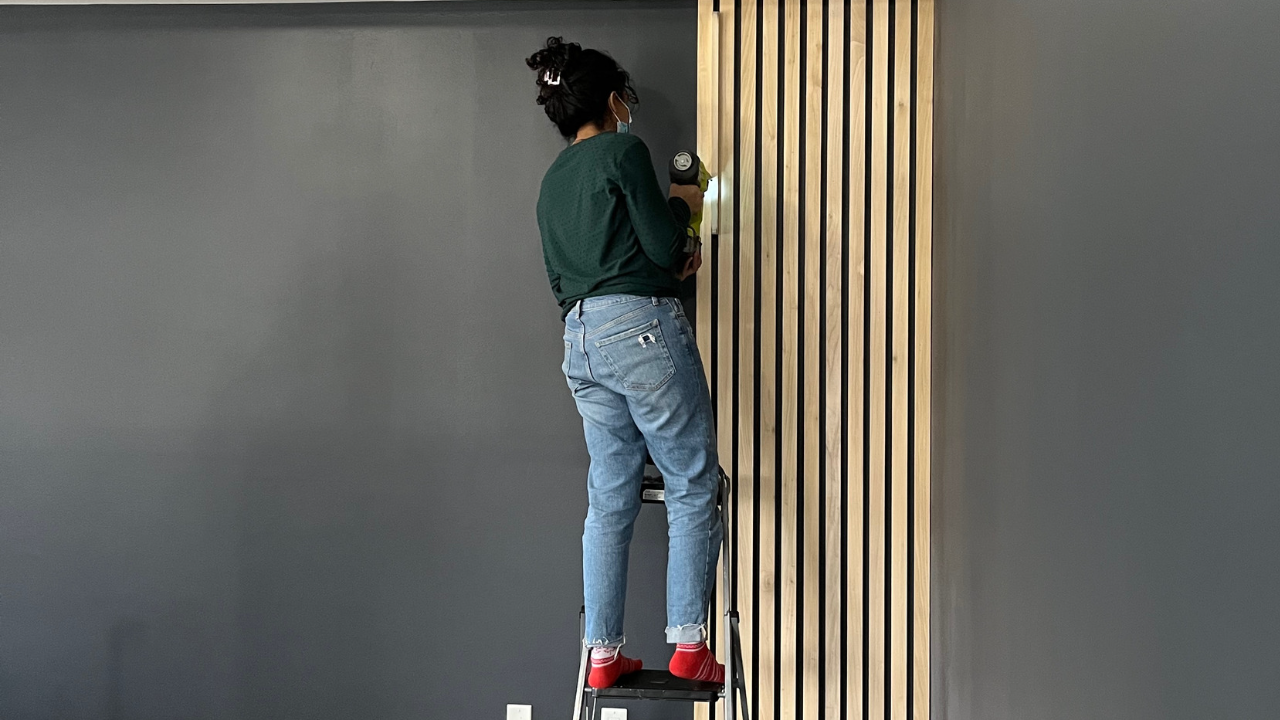
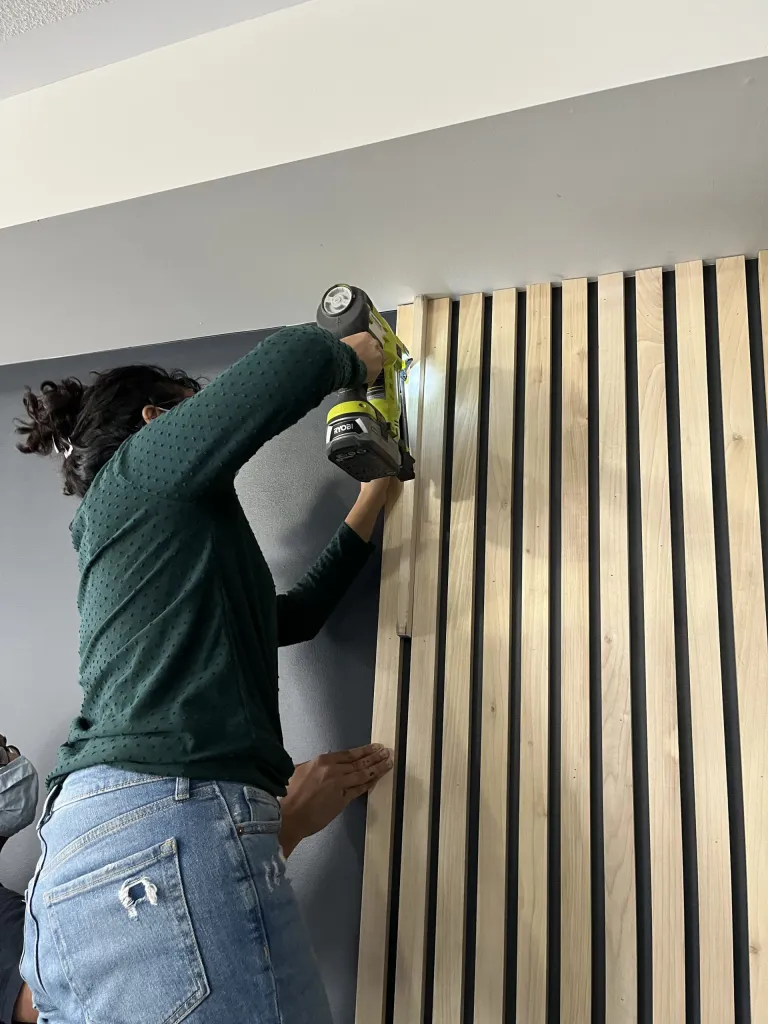
Step 5. How to Attach Slat to the Wall
It’s time to put those slats up! Put on some fun jams, grab your scrap wood spacer and your Brad nailer, and let’s get to it. Can you tell I’m really pumped for this part?
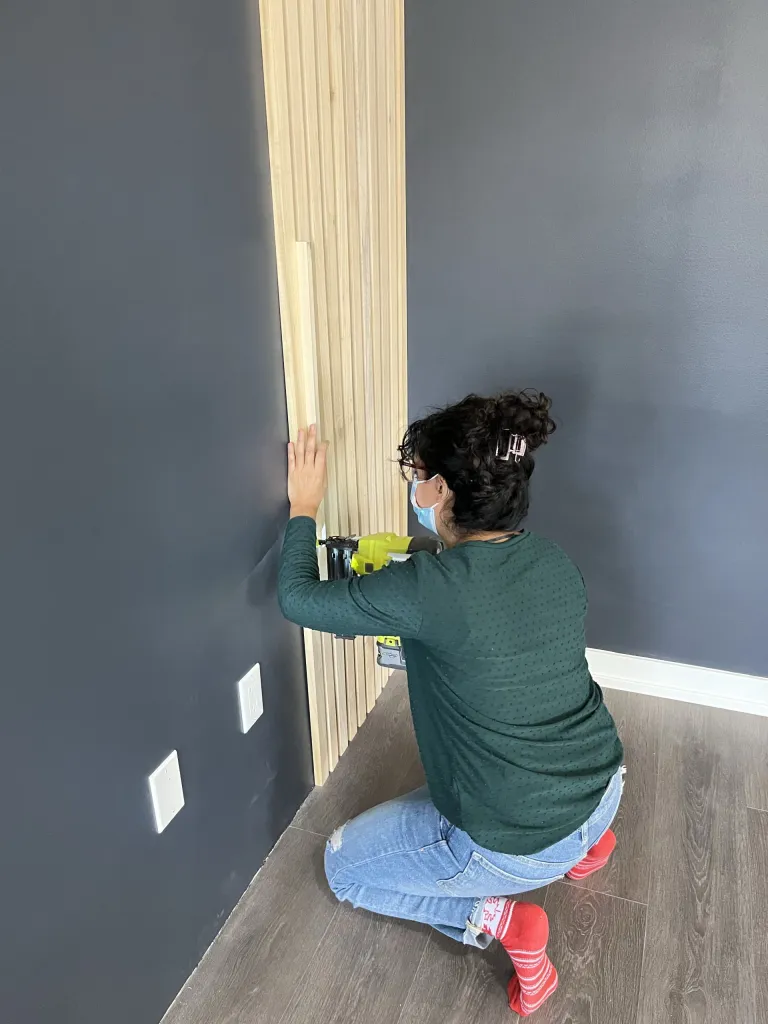
Installing the first slat is the most critical. Do not line it up to the edge of the wall. Instead, ensure that it is level, even if your walls are not. If you nail it flush against the wall, but your walls are not level, your entire design will end up crooked! I try to use as few nails as possible. 3 nails total: bottom, middle and top.
Working with the spacer
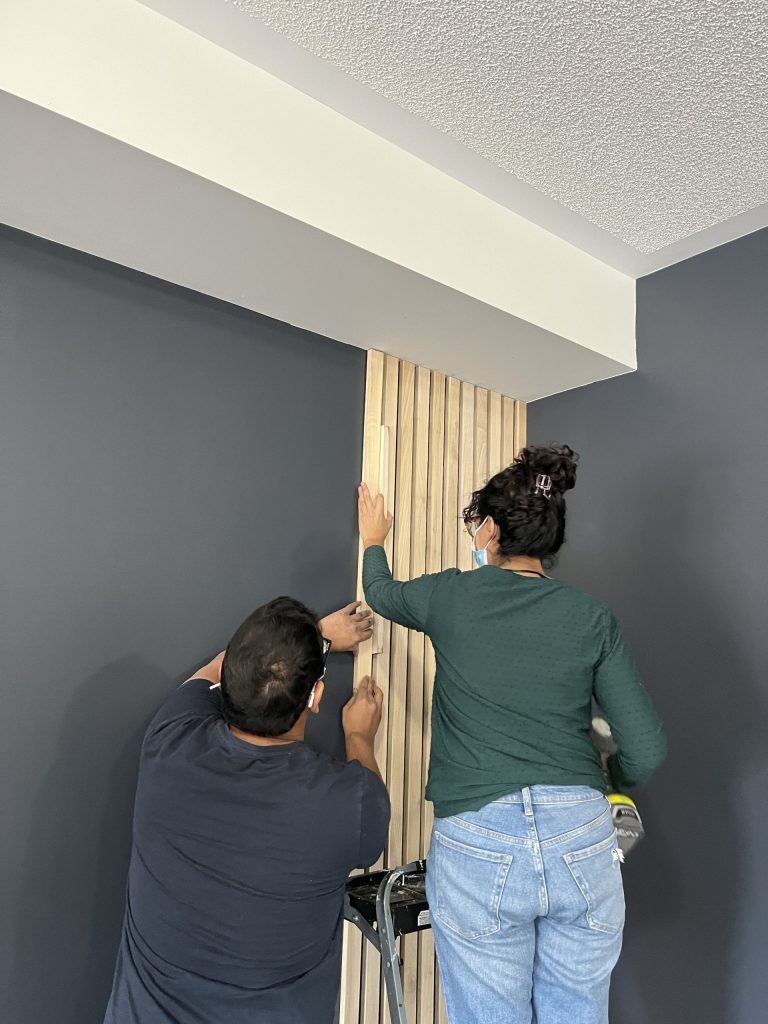
With that first slat installed, we used our spacer to place the next piece. You really want to make sure that the slats are evenly spaced so using that spacer is important. Plus, it goes really quickly with the spacer!
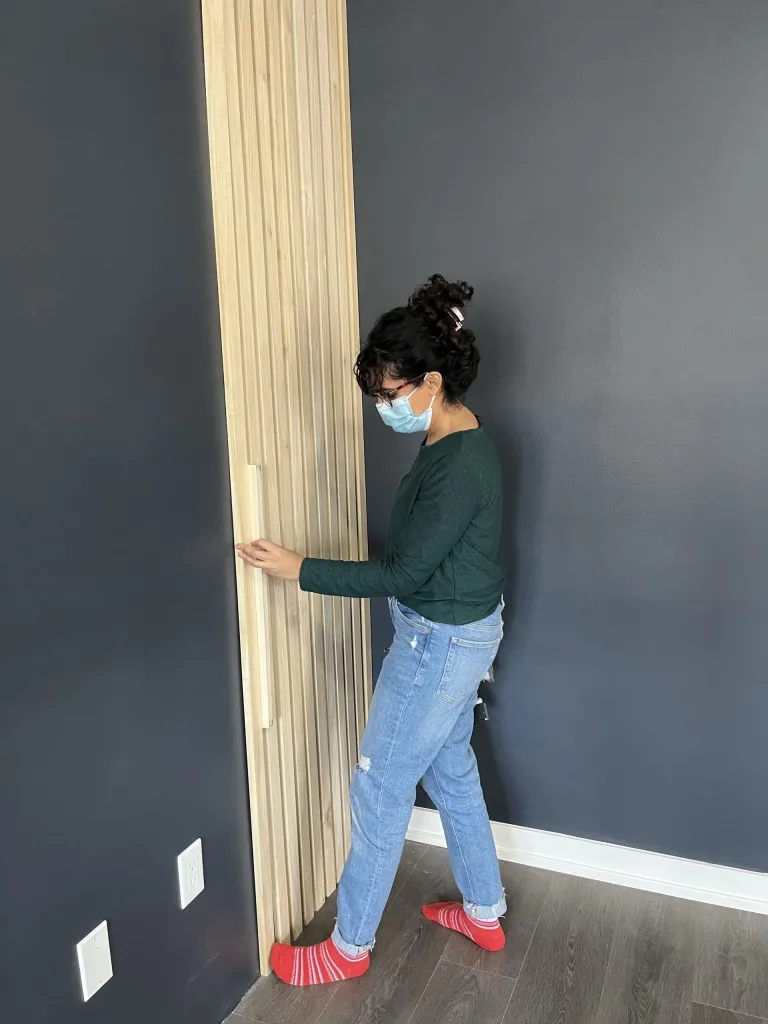
Place the spacer on the wall, right up against the first slat (A), and put your next slat (B) next to the spacer. Now, push against the new slat (B) to really make sure it’s a tight fit for the spacer. Then, nail the slat (B) in place. *Do not remove the spacer yet*
Slide the spacer down (lower “section”) and repeat the same steps: push a bit against the slat (B) to tighten around the spacer and put a nail in the slat.
Now slide the spacer up to a higher section (use a ladder if needed) and repeat again. Tighten, then nail.
Despite being absolutely beautiful, we noticed quickly that the poplar slats were a bit warped. This wasn’t really an issue, but it was something to keep in mind as we worked. We just had to push against the wood to make it flush and level against the wall as much as possible and pin it with 1.5” Brad nails to keep it in place.
You don’t need to nail into studs. Simply criss cross the nails to make an X shape with them. To do this, shoot one nail upward, and then right above it, shoot another nail downward. This makes an X behind the surface of the wood and a strong bond with the wall
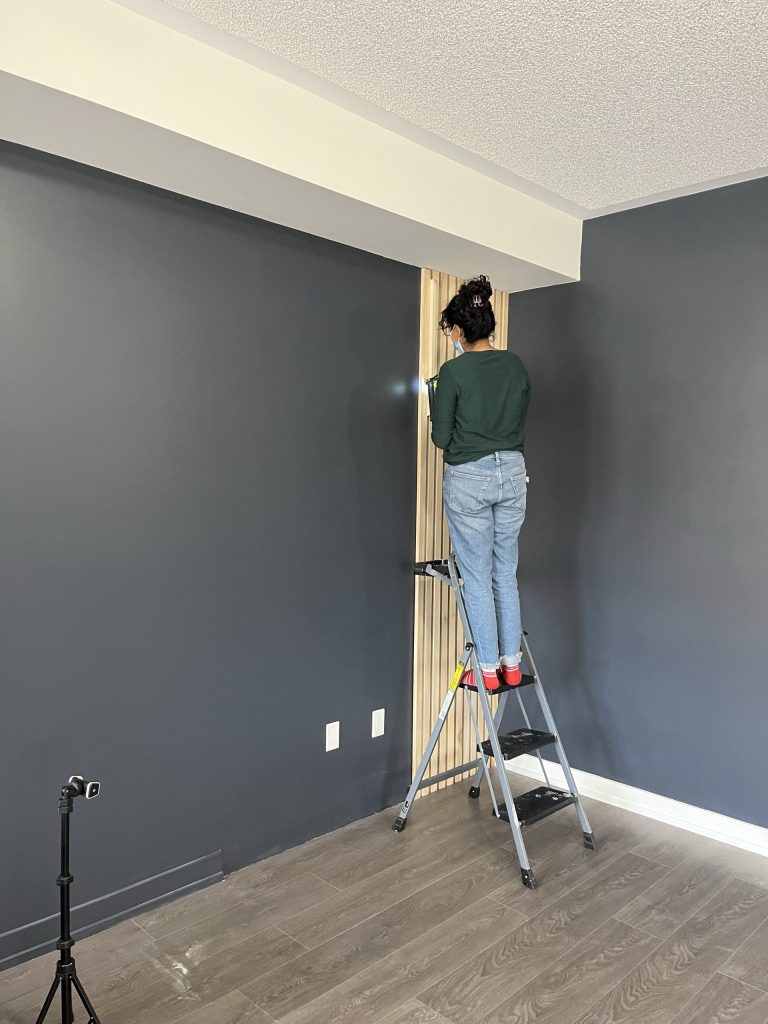
Keep doing these steps for each slat piece you add. You’ve got this!


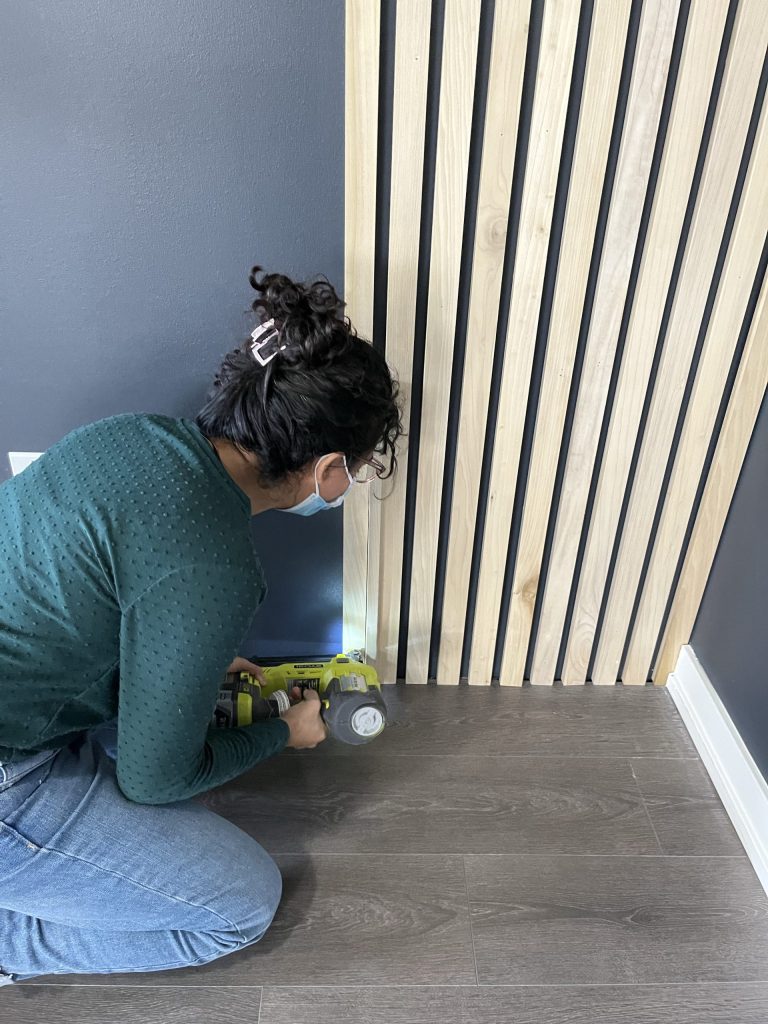
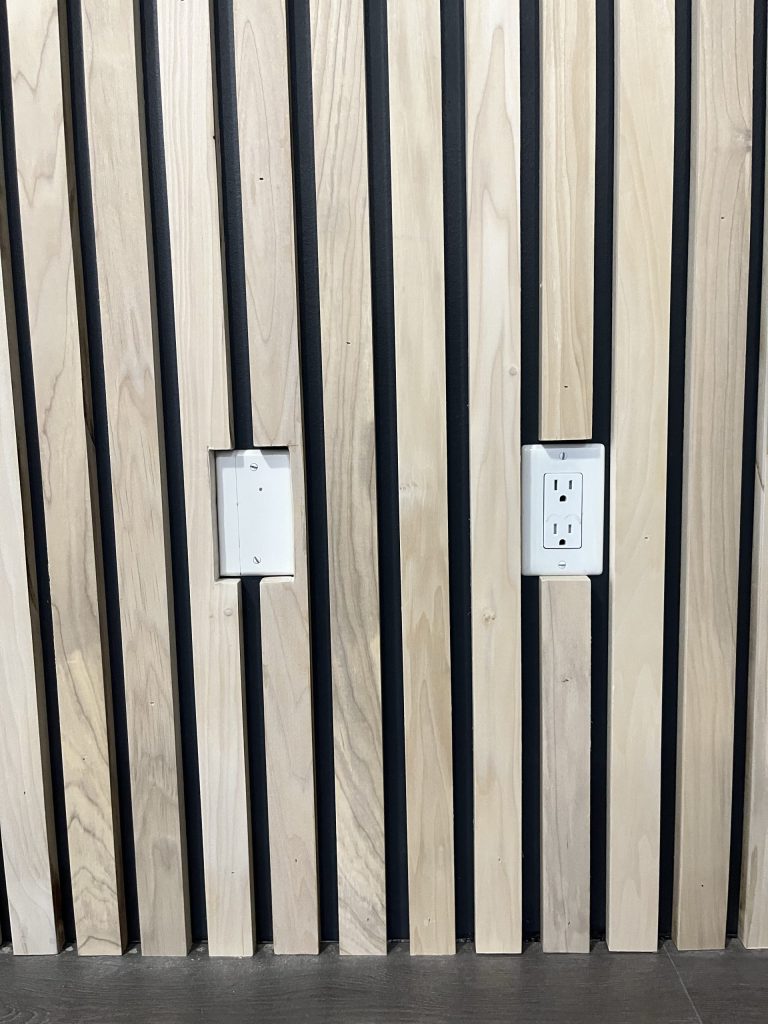
Step 6. Working around easy outlets
If you’re working on a wall with no outlets, you’re golden. No problems to anticipate. Congratulations! Keep going until you’re done.
We weren’t so lucky. There were two outlets on our wall, so we knew we’d have to figure out how to work around these when we got to them.
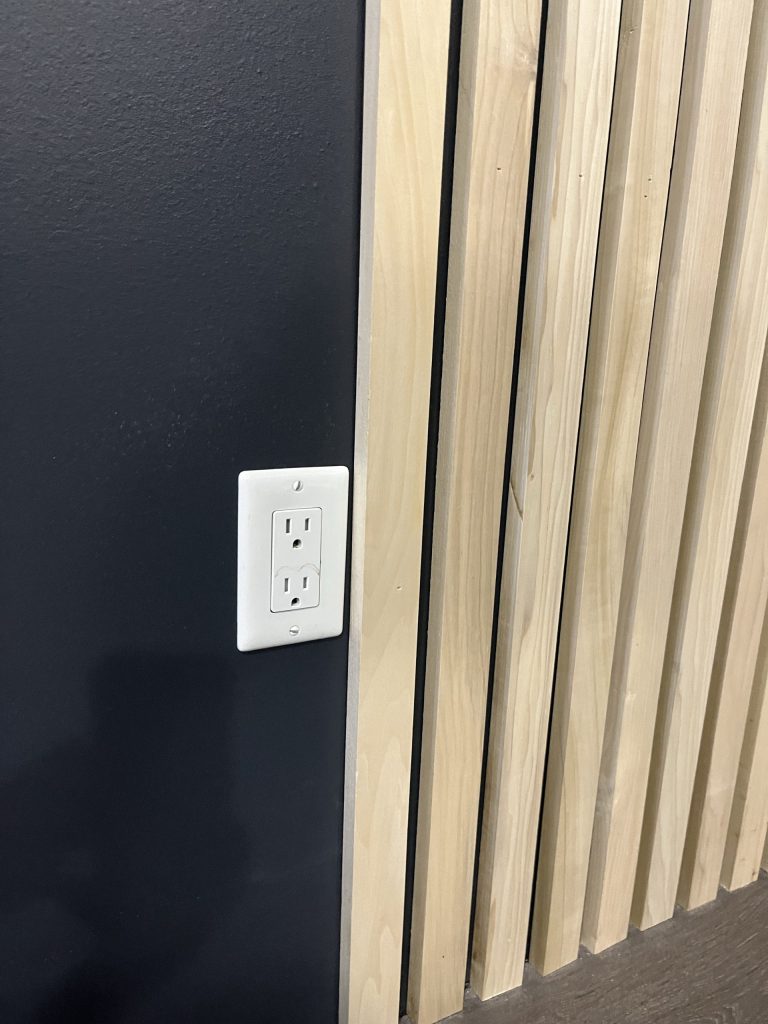
Outlet #1. By some very lucky coincidence the first outlet ended up being exactly lined up with the slat piece so that we could simply cut our slat to have one piece above the outlet and one below. To measure this, We lined up the board to the wall and marked it. You can also measure the distance.

When I say it all lined up perfectly, I mean it lined up perfectly. The slat even lines up with the middle of the outlet. I mean *chef’s kiss* flawless.

Step 7. Cutting around electrical outlets that are complicated
Outlet #2. This one wasn’t as straightforward. While there was the option of closing it up to simplify things, Leena wasn’t comfortable with that, and that’s totally OK. The best way to do this is to create a template on paper and transfer it to scrap wood for your first attempt.
Using a piece of paper, I traced the outlet, and cut out the small rectangle. I used the paper around the cut-out rectangle as a template for the wood.

*For this part I also used our good ole’ scrap wood to practice. Poplar is quite expensive, so I didn’t want to be making any mistakes on the actual slat pieces.
I did place the paper against the spacer when I traced. This way, I could simply place the paper template on the slat with the edge of the wood and of the paper lined up and that would show me exactly how much into the wood to cut.

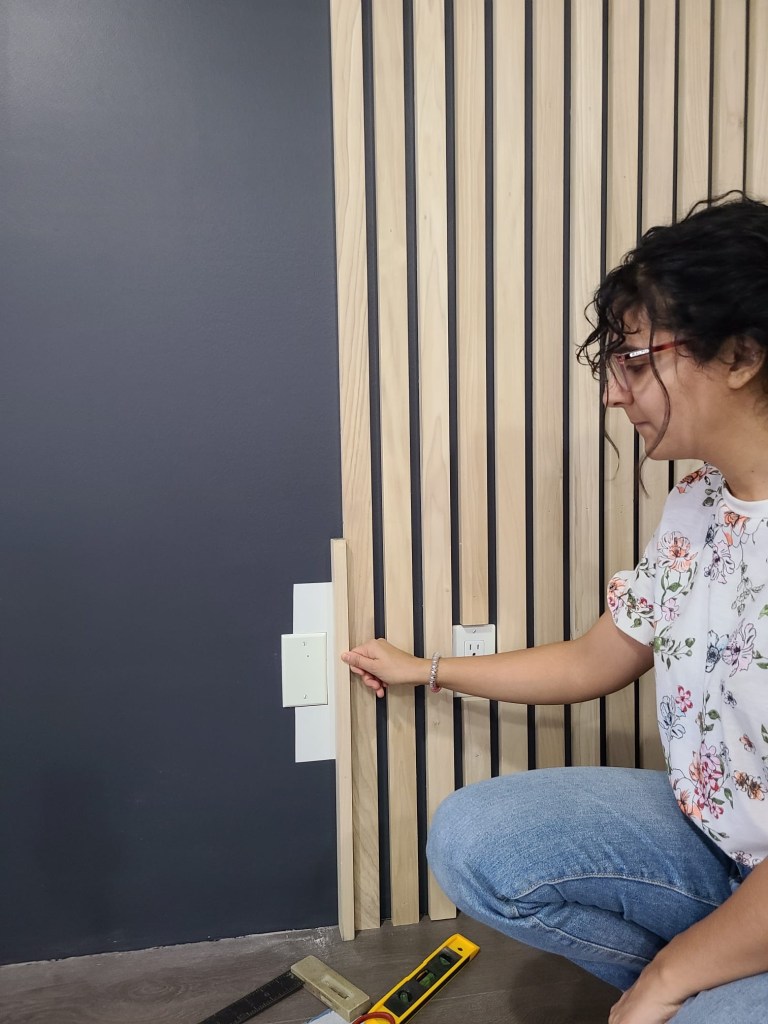
On your piece of wood, mark where the top and bottom of the outlet would be. If you’re at the point of using your slat piece, just be sure it’s resting flat against the floor so you can mark the height of the outlet correctly. And don’t forget to use the spacer! We want everything to line up.

Place the piece of paper on your slat, matching up the marks on the wood to the cut-out rectangle in the paper for the height of the outlet. Also align the edges of the wood and the paper on the outside to get the width of the outlet correctly too. Make your marks – trace the template into the wood.

Use a jigsaw to cut out the shape. In my practice attempt, I cut ¼” too big – This is why we practice! Thank you scrap wood!

It’s less of a big deal if you cut it too small, since you can just use a sander to shave off some of the wood. This is what we ended up doing on the 2nd attempt. After cutting, we used a sander with p120 grit to slowly enlarge the space until it was a perfect fit.
Because the position of the outlet was so that it would have slats hugging it on either side, we had to repeat these steps for a second piece of slat wood.

Once you’re past the outlets, you can keep going the way you started. It feels even easier after that particular challenge.
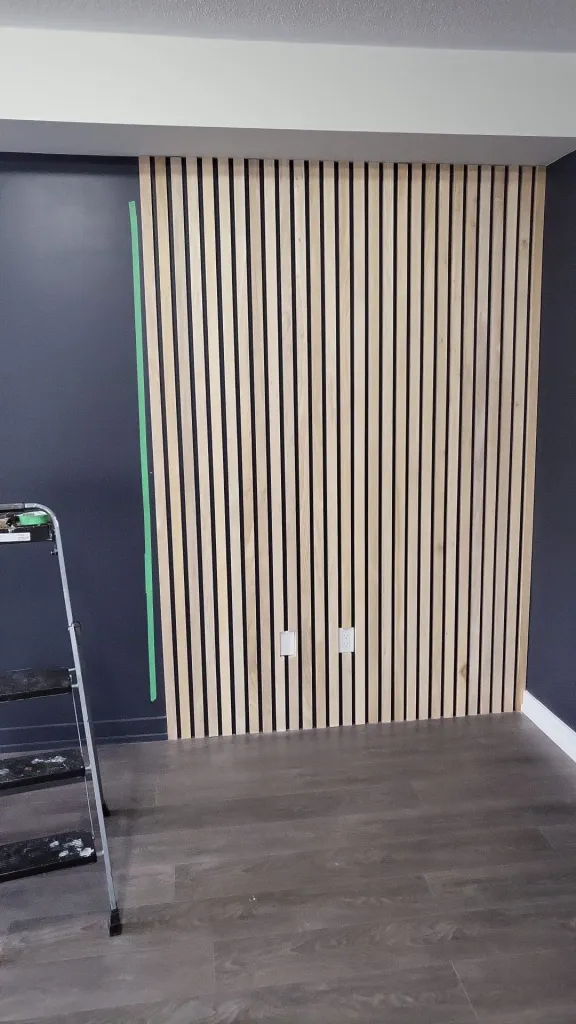
And voilà! The natural finish was definitely the way to go. Don’t you love how this looks?
Your living room is probably a more important space in your home than you realize. It’s where you spend your downtime, watching Friends reruns to unwind from your day. You’re probably spending a lot of time there, so why not make it a space you love being in? I hope you like this DIY wood slat wall as much as we do.
Stay tuned for how we designed and completed the geometric accent wall in this living room wall in part 2. I would love to see you build this. If you do, be sure to share with me. And don’t forget to follow me on instagram for more budget projects!
Here’s a little sneak peek of how the room turned out!

If you love this project, Pin it!


I don’t see any nails on the front of slats in your pictures. Were these edited out? Or how do you get a finish without nails
The nail heads are really small and they sit below the surface of the wood. No magical editing here!
Nope, they will so tiny they are barely visible. With a brad nailer they sit below the surface of the wood
What a beautiful wood slat wall! I LOVE the color of the poplar, great choice not to stain it. I also love that you removed the baseboards. I think it makes a more modern, striking statement when the slats go floor to ceiling. My partner and I are doing a slat wall now and we chose douglas fir since it was readily available and cheap(ish). My staining attempts to reduce the pink-orange have been unsuccessful. But I’m going to figure it out before we commit to nailing them up! Wish me luck! Thanks so much for your post!
Thank you so much!! I hope it worked out !! You can try sanding to remove the yellowing too
That’s amazing!!! You got this!
How do you cross cross the Brad nails???
“pin it with 1.5″ Brad nails to keep it in place. You don’t need to nail into studs.
Simply criss cross the nails to make an X shape with them.”
Hey! You have to hold the brad nailer and shoot at an angle downwards into the wall. And then shoot another one upwards so they cross behind the surface of the boards.
Shoot one nail upward, then right on top, shoot the other downward. So they cross and hold tighter to the wall
Hello… first I would like to tell you that A PROFESSIONAL JOB, congratulations… question: what did you put on the geometric figures (wood-Tripley) to cover the slots… thank you –
I’m not sure I understand but we attached them with nails
What was the total price for the slat pieces?
About $180