I transformed this small bathroom with a simple $50 DIY board and batten project that anyone can do. Board and batten is a beginner DIY project. It’s a great way to get started on your DIY journey!
A few years ago, I upgraded this small bathroom. Since then, my style has evolved, and I don’t love it anymore. I had added some wall molding and a contrasting wall stencil on top. Because this bathroom has no windows, the wall color didn’t turn out as I hoped, and it looks drab.

I had previously installed board and batten accent walls on my hallway. I love it so much I want to replicate it in this space. Board and batten is a class wall treatment that won’t be going out of style, as long as you install it on all the walls in the space.
Tools & Materials
- Mitre Saw
- Pin nailer (you can also use brad nailer or glue)
- 10-pack of baseboards
- Construction adhesive or wood glue (optional, for additional attachment of boards)
- Level
- P220 grit sandpaper
- Spackle and spackling knife
- 12” spackle knife
- Caulk and caulking gun
- Baby wipes
- Paint roller, paintbrush, Painters Tape
- Paint (I used Pewter Green by Sherwin Williams Emerald line, in Satin Finish)
- Tape measure
- Caulk gun
- Stud finder
Prepare the walls

You can skip this step if you have a blank slate bathroom. I filled all the nail holes and sanded any imperfections with p220 grit sandpaper.
If you’re going to install wallpaper, do it before installing the board and batten wall treatment.
Plan your board and batten measurements
To DIY a board and batten bathroom, I started by measuring the width of every wall. The are no strict rules, but you want the spacing between the vertical boards to be similar, but it doesn’t have to be exactly the same. It’s okay if the spacing is different by a few inches on each wall. No one will be able to tell.
There’s an online board and batten tool that you can use to figure out the spacing between each board. You can also use painters tape to tape the design if you’re having a tough time figuring out the measurements.
Also remember that the board may say 1×3, but the width is ½” less. Don’t ask me why! So a 1×3” is usually closer to 2 ½” wide when measured.
It is so important that when planning your board and batten wall design you consider things like outlet placements, vents, and light switches. It is a lot of work to put a board directly where an outlet is placed and make it look good. You’ll have to cut your board around the outlet, pull the outlet forward, and in the end it won’t look as polished. To avoid all that extra work, making sure that there’s no board going directly through an outlet will help a lot.
The height of the batten is personal preference. I think it looks best when it is about ¾ up the wall or higher.
For reference, I have 9ft ceilings and my vertical boards measure 62″. My horizontal boards have a distance of 12-14″ between each board.
The secret to buying budget board and batten

There are 3 main types of wood that are used for board and batten: 1×3 pine, 4x8ft plywood sheet that you can cut down to strips, or primed MDF. Cutting down the plywood sheets is the cheapest, but requires the most work, as you have to cut the strips. I always prefer to use primed MDF for all my accent walls so I don’t have to prime the trim.
Here is the secret on how to shop for a $50 board and batten wall:
Head over to your hardware store and avoid the millwork, do not go to the trim section. Instead, go to the baseboard section and get a value pack of baseboards. This is just 1×4 primed MDF. A 10 pack was $55 at my local hardware store. That is all you need to do a board and batten in a small space.
One more factor to consider is the thickness of your baseboards and thickness of the boards. In an ideal world, the thickness is the same. This is not always possible. If you butt up the vertical board on top of the bathroom baseboards and they are thicker, you can either cut them on a slight bevel, or use cove molding to act as a transition.
I was so lucky in this case that the boards were the same thickness as my bathroom baseboards. It doesn’t happen often, but I definitely did a happy dance! If you love the seamless look that my bathroom has, you can also remove your baseboards and install the new boards in their place.
Cut the boards

I cut all the top wall pieces on a bevel. A bevel cut makes an angle and when you join two boards together it looks nice and tight. This gives you that nice professional finish.
Don’t be intimidated by this cut, all you need is to set the bevel to 45 degrees on your saw to get this angle. The bevel just makes the angles in the corner come together a lot nicer. If this is too intimidating, you can also do a straight cut. The boards will still fit together nicely in the corners.
I also cut all my vertical boards to size as well. It’s really important that you measure precisely and that they are the exact same height. Otherwise you’ll have gaps in your board and batten.
Paint the bathroom wall and baseboards

Before installing my board and batten, I gave the bathroom wall a fresh coat of paint. I never really loved the previous color.
I chose the same paint color I’ve used in other places in my home. I think this gives a good continuity in your home. It makes it feel more designer because you’re using less random colors. I used Pewter Green by Sherwin Williams.
When you’re picking a paint color for the bathroom, make sure you choose something that’s wipeable. Dark paint tends to show a lot more water marks. An eggshell or satin finish makes it easier to wipe off. I used a Satin finish in the Emerald line.
I painted the baseboards the same color too. I don’t love the look of white trim on a dark contrast wall. A tip when painting baseboards is to use a wide spackle knife where the baseboard meets the floor. This will help protect your floors and save you some tape and time!

I taped the edge where the wall meets the shower, around the vanity, and the door trim. The first coat of paint will always look splotchy. This is where the second coat magic comes in.
Paint the boards

You can paint your boards before installing or when they’re on the wall. I’ve done it both ways but I think painting beforehand is a little bit faster. You can lay them out on the floor next to each other and roll the paint on them.
Start painting only the surfaces and do the edges after. I leave the edges to do once they’re up since I have to caulk the boards once they’re on the wall.
Install the board and batten

Now we are ready to start the board and batten.
The first thing I did was bring all my boards up to the bathroom. I laid them out on the wall to see how they would go. In a bathroom there won’t be exactly perfect spacing amongst each wall. You want to try and get it within a couple of inches difference on each wall.
I used painters tape to mark the spacing on the wall. I wanted one vertical board to be centered behind the faucet and one behind the toilet for symmetry.

Which tool should you use to attach board and batten?

The best option to attach trim is to use a nail gun. One of the most common questions I get is: Should I use a pin nailer or a brad nailer? What about all the pipes in this washroom? Should I be worried about puncturing a pipe? That is a legitimate concern.
In this bathroom I used a pin nailer, which has really thin nails. I also used short nails, so they would go through the board and the top layer of drywall, but not beyond that. Since my boards are ½” thick, I used 1” nails.
If you want to use a brad nailer, make sure you use short nails. Consider how thick the board you will be attaching is. Then, drywall is usually half inch thick, so don’t go thicker than 1” brad nails.
The nails for either pin nailer or brad nailer don’t need to be too long because you’ll also use caulk to act as a glue to secure the boards to the wall.
Another option is to use construction adhesive. I typically don’t like to use glue in case you change the design, but in a washroom I totally understand. It can be stressful to put nails behind the toilet.
How to install a board and batten?
When starting off your board and batten you want to make sure that all your boards are level and plumb. Grab your level and start attaching all your boards.
As I moved around the room I knew that every single spacing between the boards was not the exact same. It’s ok if it’s 1” or 2” different. When you step back and look at it is not noticeable and no one will be able to tell. I mean, who’s going to come to your bathroom with their measuring tape?
You can decide whether you want to attach the vertical or the horizontal boards first. I think that it’s easier to attach the vertical boards first and then put the batten on top.
Now time for this project little “oops!” I ended up cutting every single one of the boards around the sink short. One of them was right but seven were too short. I don’t know why that happened!
I didn’t have enough leftovers to do all the cuts again, and I was not going to go and buy a whole new pack of boards. I ended up installing what I had and just filled the gaps later. That’s just the real side of DIY projects. Sometimes you make mistakes and you just roll with it.
Dealing with walls that are not level
It is normal if your walls are not level. Some of your boards might sit a little bit further back than the batten or vice versa. To fix this, just grab some playing cards that you might have lying around. I used my kids’ Pokémon cards and just shimmed them underneath until the boards were level. Then you can spackle and sand and you’ll have a really nice and even finish when you paint them.
Spackle where 2 boards meet

I also spackled anywhere that 2 boards met. I spackled where the baseboards met the vertical boards, and when the vertical board met the top trim. After drying, use a p220 grit sandpaper to get a really smooth finish.

With a pin nailer, the holes are really tiny. They can usually be covered with paint. If you used a brad nailer, apply a small amount of spackle over the nail hole too.
Get a great finish by caulking the boards

Then caulk all your seams anywhere where the trim meets the wall. Caulk will help to close the small gaps between the wall, and act like a glue so your boards adhere to the wall.
When cutting open the tube of caulk, do not use the cutter on the caulking tool! It’s so easy to make a big hole which causes a big goopy mess. What I like to do instead is to put my caulking tube on a cutting board and make a small angled cut with a sharp knife.
Load the caulk into the caulking gun. Squeeze the trigger to get a thin bead of caulk. Then use your finger and a baby wipe to remove any extra caulk and make it look nice and clean.
Work on small sections. If you apply caulk on all the walls, it will dry before you have a chance to clean it up.
I also caulked all the corners of the wall where the horizontal boards met each other.
Add the final paint coat
After the board and batten was installed, I gave the wall a final coat of paint. I used my paint brush to paint anywhere where I had caulked or spackled. Then, I rolled another coat on the entire wall just to give it that third coat magic.

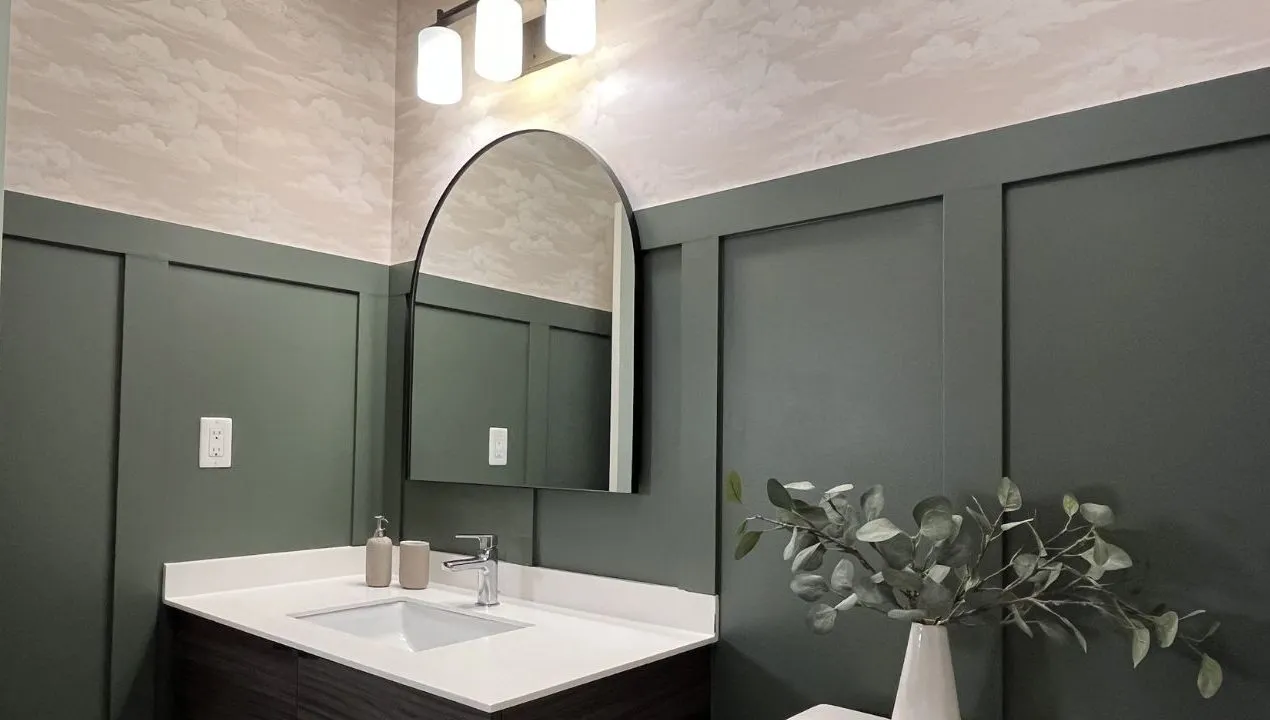
DIY bathroom board and batten reveal!
This is how our bathroom looked before. While it wasn’t horrible it just wasn’t my style. I didn’t feel like it was elevated.
With so many amazing budget makeovers in the space I love how it turned out! The green paint color in this DIY board and batten bathroom is so much more muted and more my style. It’s a lot more mature than the bright green that was in here first.

I also changed out the mirror, updated the light fixture, and hung the shower curtains high. The star of this bathroom will be the wallpaper. I picked up a cloud print wallpaper that I love. It’s really pretty, subtle, and super affordable. Read all about how I updated this bathroom on a $400 budget.

Remember I didn’t do any demolition. We didn’t replace the vanity or the tiles. I just did really simple upgrades like this peel and stick wallpaper and this board and batten. It totally transformed this entire bathroom!

If you also love this easy DIY board and batten bathroom let me know in the comments what your favorite part was. Also, are you team hooks or team towel bar?
Make sure you follow along for more budget DIYs.
Leave a Reply