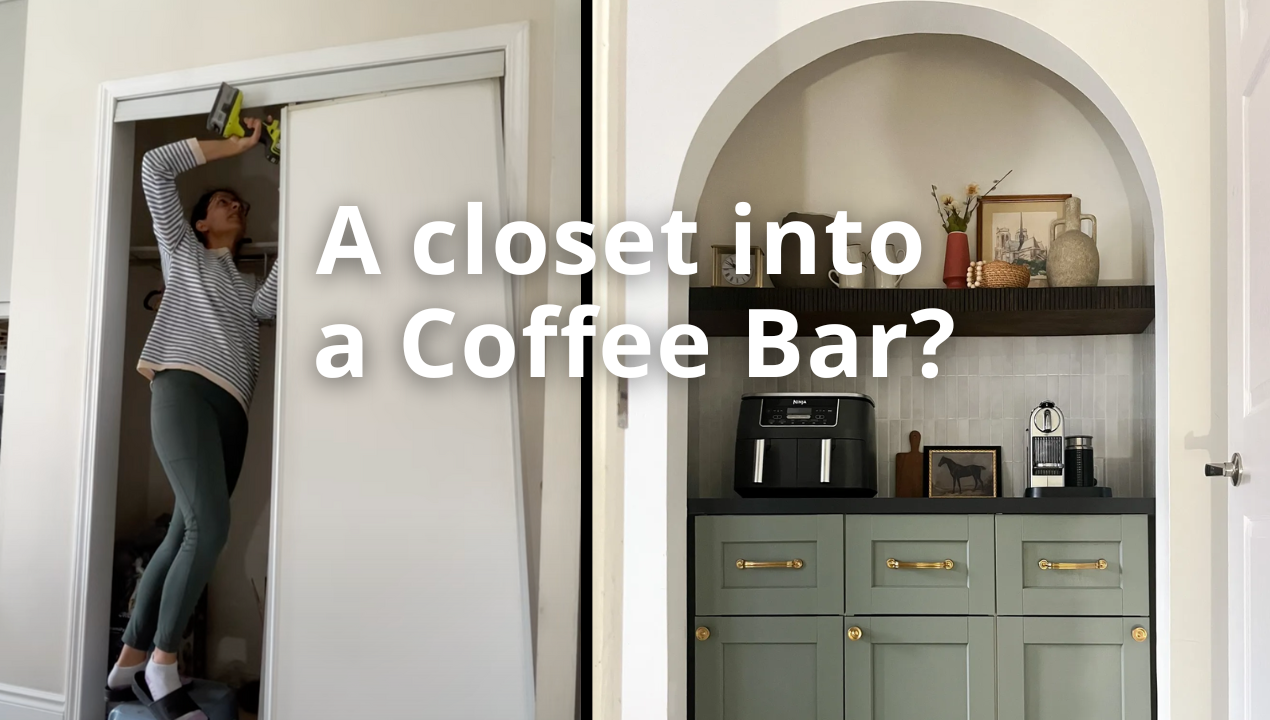
I had this awkward extra closet right next to my kitchen. I am not one to complain about extra storage space, but this closet didn’t fit right beside the kitchen. When I looked at it, all I saw was the potential to make a coffee bar and store small appliances.

I knew I had to make this aesthetic! I saw potential for an arch doorway. I love arch doorways and over the last few years, that have come back in style. Actually, they are a classic architectural feature that has seen a new interest.
The plan for this DIY Coffee Bar space:
I want this coffee station to be beautiful but also very functional. Here’s the plan:
- Transform the doorway into an archway
- Install electrical outlets to make this closet functional
- Add kitchen cabinets and drawers for more storage. You can never have enough storage
- Painted the IKEA doors to a moody green
- A countertop to hold all my small appliances like an air fryer, coffee machine and blender. Since the closet is off to the side, it keeps the kitchen counters clear with more space for food prep
- A faux zellige tile with a super simple install using peel and stick tiles
- A floating shelf for a gorgeous styling moment
- Give it a dark and moody vibe
Step 1 – Make an arch doorway
I have a detailed blog post on how I created the arch doorway. I started by removing the sliding closet doors and ripping off all the trim that was on the doorway. Then, I used a combination of MDF and drywall to build the arch shape. That was the easy part.
Getting the arch perfect with the joint compound as the hard part! It took me 3 rounds of smoothing joint compound and sanding to get a smooth finish.

Step 2 – Install the outlets
I hired an electrician to install the outlets. He used 20V outlets for the small appliances. He ran a wire from our electrical panel, through the floor and into this closet. Luckily our basement is unfinished.
I don’t think running electrical wires is a DIY that I feel safe tackling. I recommend hiring a professional.
Step 3 – Customize the depth of the IKEA cabinets for the coffee bar
I am using IKEA Sektion Kitchen cabinets to add affordable storage to this arch appliance pantry. IKEA Sektion base cabinets only come in the depths of 14 ¾ or 24”. I needed cabinets that were 22” deep for the coffee bar. If I opted for the 14 ¾ cabinets, I would be missing out on a lot of storage. I could also build my own cabinets, but I am considering using IKEA kitchen cabinets so I thought this is a good opportunity to test out the IKEA Sektion base kitchen cabinets.
Note: If you’re trimming down cabinets with drawers, you need to make sure that the drawer slides will still fit inside the cabinet, and on the drawer sides.
I need to trim down the depth of the cabinets, and drawers. Make sure to trim down from the back of the cabinets, otherwise you’ll have an unexposed edge at the front of the cabinets.
For the cabinet box, trim the sides of the cabinet, and the bottom panel too. Repeat for the drawers.
To assemble the cabinet and drawers, I had to drill a few extra holes in the back of the cabinet. Then, I used screws to attach the MDF backing to the cabinet, and assembled the cabinets.
Step 4 – Install the Cabinet Base
IKEA cabinets are usually hung on the wall with a metal rail, and have plastic feet to help level them out. Since I trimmed down the cabinets, it would be easier to attach them to a base.

I created a simple base using 2x4s that the cabinets can sit on. Measure the cabinets depth and length when positioned in a row. Then cut and and assemble the base using 2” screws.
Step 5 – Install the IKEA Cabinets and Secure them to the base
I placed the cabinets on top of the lumber base. I checked to ensure they were all level. If they aren’t place playing card or shims to ensure they are level. Doing this quick check now will help ensure that all the cabinet doors and drawers line up!

I clamped the cabinets on the sides and screwed them together. I installed 1 screw on each corner. Then I also screwed the cabinet to the lumber frame. From the bottom cabinet panel, I screwed downwards into the base.
Step 6 – Cut and Install the countertop for the coffee station
I was so excited for this step! Installing the counter means that this arch closet is almost functional!
I got a black laminate countertop to coordinate with the granite counter in my kitchen. I won’t be replacing that soon, even though it is dated. The benefit of using laminate is that it’s cheap and easy to cut and install on your own.
Before you cut the counter, measure the length that you need at the front and back of the closet. The walls can be slightly crooked which will make fitting the cabinet very difficult if you assume it’s level.
I cut this using my Kreg Jig rip guide and a circular saw. It also came with additional matching edge banding but I didn’t need this since my raw edge will be hidden inside the closet.

Then my husband and I carried this into the house and installing the cabinet was so hard. I didn’t want us to damage any of my precious drywall work on the arch. We finally got the correct angle and wiggled it down. I attached the counter to the cabinet base from the inside of the cabinet.

How cool does this look!!!!!
Step 7 – Paint the cabinet doors
Now was the time to make the most difficult decision. What color would I paint the cabinet doors and drawers? I have been itching to use a moody green in my kitchen makeover… when the time comes. I thought this is a great time to sample a few shades.

I painted a shiplap board with Evergreen Fog and Retreat by Sherwin Willimas. I also love a beige kitchen so I tested that too with Accessible Beige. I watched these paint samples in different lighting and landed on Retreat by Sherwin Williams.
I have an in-depth blog post on how to paint IKEA furniture.
To prep the cabinet doors for paint, I sanded using p80 grit sandpaper. I used a mouse sander so I could get into the corners of the shaker details.

After I wiped them clean, I primed them with a Shellac based primer for good adhesion. After letting the primer cure for 24 hours, I loaded up my paint sprayer. I thinned out the paint a bit and gave it 2 coats of paint.

Now typically I would use the Sherwin Williams Urethane Trim enamel paint for cabinets. But I didn’t want to spend $90, so I used the sample paint. The sample paint is regular interior paint which I have used to paint furniture, and it’s held up great with the right prep. The only drawback is that it feels dry vs cabinet paint feels a bit smoother (like laminate).

I installed the cabinet doors and drawers as per the IKEA SEKTION instructions.
Step 8 – Build a floating shelf for a styling moment

I debated how many shelves I should add to this coffee station. But I felt like one shelf would keep the design simple. I built a simple floating shelf to add a place to display my fav decor items like vases, cups and art. I built the floating shelf using pocket holes. I stained it walnut.

For the floating shelf face, I used leftover pole wrap.
Step 9 – Add sparkle with peel and stick tile

While I waited for the paint to dry, I started on my peel and stick tile. I debated using real tile, but I ordered a sample of this zellige look peel and stick tile. Once I opened the package, I knew I wouldn’t be going through the hassle of real tile. The thought of using mortar, grout, and a wet saw seemed so unnecessary once I saw how good the peel and stick zellige tiles.
These are so easy to install. I started by drawing a center line of the wall. Then, just remove the backing. It’s like a giant sticker, and stick it to the wall. To make any cuts, use a utility knife.

To cut the outlet, I took off the plate. I put a dot of washable marker in each corner on the outlet. Then I aligned the tile mat, and pressed the back of the tile into the outlet. I had a dot in each corner. I connected the dots. Then use a utility knife to cut it out.
When I finished the peel and stick tile, I was so happy with the result! It looks glossy and wipes clean easily too!

Step 10 – Finish by installing the hardware

Once I got to these last few steps, I couldn’t wait to see the result! I attached the doors and drawers.
I picked a combination of a substantial gold handle and knob. Mixing hardware gives your kitchen a more high end look. I used a hardware jig to drill the holes. I measured and re-measured several times so I didn’t make any mistakes with the installation.


My Arch Coffee Bar Reveal
I cannot believe that just a few weeks ago this was a regular coat closet with sliding doors.

I have been wanting to add an arch to my home, and this is the perfect spot! It took a lot of patience to get the perfect finish on the arch.

The combination of the green cabinets, black counters and peel and stick tiles brings so much style into this tiny pantry nook. I added some high end looking vases and vintage art to bring this nook together.

I’m using this as a spot to keep my coffee maker, air fryer and blender. It’s close enough to my kitchen that I can access it, but tucked away so I don’t have to see the small appliances all the time. The drawers are perfect storage for bread, coffee pods and protein powder.

If you love this project, pin it!
Leave a Reply