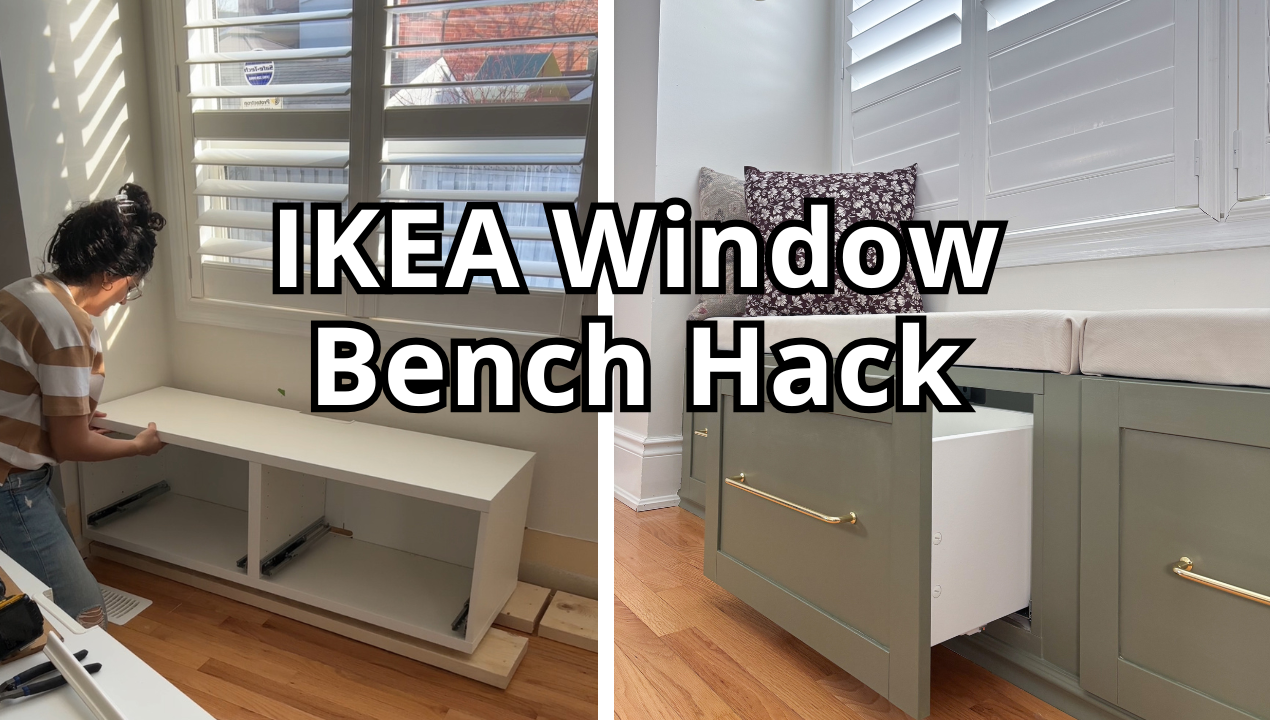
If you’ve ever dreamed of having a cozy built-in window seat but thought it required custom carpentry, let me share how I transformed a recessed nook into a beautiful and functional reading spot—all with a little DIY magic and two IKEA Besta units.

I have a recessed nook in my living room. It has a window on top. It seems like the builder made this space for a window seat. I love filling in random alcove with functional storage like I did for my brother’s living room with IKEA KALLAX.
You can also use this tutorial if you’re looking for a DIY bench seat with storage elsewhere in your home, like in the entryway, a kids room or a kitchen banquette. This would also be really inviting for a bay window!
What I used for my IKEA Window Bench
I’ve gotten a lot of comments and emails to share my exact product list. There are the products I used.
How to measure your space for a built-in window seat

There are a few different IKEA BESTA units you can choose from. Which one you choose will be based off of the length of your window or recessed space. There is a single, 2 and 3 drawer unit. If you have a small smaller space, a 2 or 3 door unit may fit in there. What’s important is that your units fit inside the nook with space leftover.
Don’t worry about the space leftover, it’s easy to fill with a few spacers. Try to have the spaces 3″ on each side of the units. Anything larger will look off.

If you have a large space, you might need to put multiples of the units side-by-side. You can also get the individual drawer units and put spacers in between every drawer unit if you really want a symmetrical look. If in doubt, tape your design with painter’s tape to help get a visual.
Shop my tools
Preparing the Space for a window bench

The first step in this project was preparing the nook where I wanted to install the window seat. Since my space had existing baseboards, I needed to remove them to ensure a flush fit.
First, take your utility knife to break the seal on the caulking between the wall and the baseboard. If you do not break the seal, you are guaranteed to have drywall peeling off when you pull the baseboard off.
Using a pry bar, I carefully detached the baseboards from the wall, making sure not to damage the baseboards since I plan to reuse them later.
This step was crucial in achieving a seamless built-in look, making the final result appear intentional rather than an afterthought.
Building the Base for the Window seat

Once the space was prepped, I turned my attention to constructing a sturdy base for the Besta units. Since standard seating height is typically between 17-19 inches, and the IKEA Besta units on their own were too low, I needed to raise them to a comfortable level.

Initially, I made a mistake thinking that I wanted to attach my full height of baseboard. My baseboards are 8 inches tall, so I made the base 8 inches high. My feet could not even touch the ground!! I disassembled it.
I built a rectangular frame using 2×4 lumber. After measuring and cutting the wood to size, I assembled the frame and ensured it was level before securing it to the wall.
I don’t attach my bases to the floor in case I want to remove the built-ins. Then I would be left with a hole in my floor that would be hard to fill.
This step was essential for stability, providing a strong foundation that would prevent any sagging over time. Plus, you can attach your baseboard to it to make it look a lot more built-in.
Assemble your IKEA BESTA units
I assembled my BESTA units following the instructions. I opted for the drawer unit. Just beware because there are two different types of drawer mechanisms. There is a push to open drawer mechanism and also just a regular pull open mechanism. I accidentally bought the wrong drawer slides the first time.

The only modification I made was leaving off the bottom levellers on the base cabinet.
There are also a ton of different door options for the IKEA BESTA unit. I chose the white cabinet and doors so they are easy to paint.
Attach the BESTA units to the base

I removed the drawers, and placed the BESTA units on top of the base. I checked the spacing between the cabinets and the wall. I made sure the spacing was the same around each unit. Then I use my nail gun to attach the cabinet units to the base. I attached it in the front and the back of the cabinet from the inside.


Filling in the spaces around the IKEA BESTA unit
Chances are that you won’t be able to get the units to be flush with your walls. There is probably an small but unsightly gap. This is really easy to fill. Measure the spaces and cut the a filler piece. I used 5/8″ MDF as I had this scrap in my garage. If you have a space that is a standard size of wood, like 2.5″, then you can use stock pine or trim from the hardware store. Mine was an odd size, so I had to use my tbale saw to rip it down. If you don’t have a table saw, most hardware stores can cut if down for you.
Then I placed the spacer between the cabinets and nailed it in from the sides. I also cut spacers for the top of the units, even though you won’t be able to see it. Now all that is left to do is caulk the seams for a pro finish!

Reattaching the Baseboard for a Built-in Look

To give the window seat a polished, custom look, I repurposed the baseboards that I had removed earlier. Instead of discarding them, I used my table saw to cut them down to fit the front of the 2×4 base. Once cut to size, I attached them securely with my nail gun. I then caulked all the seams to give it a nice finish.

This small detail made a big impact, giving the project a truly built-in appearance rather than looking like an after-market addition.
Painting the Drawers and Base
With the structure in place, it was time to bring in some color. The standard IKEA BESTA units come in a limited range of finishes, so I decided to paint the drawer fronts and the base to match my vision for the space.

To ensure a smooth and durable finish, I followed a careful painting process. First, I lightly sanded the surface to help the paint adhere properly. I use P80 grit sandpaper to scuff up the top of the drawers and the face of the cabinet.
Then, I applied a coat of BIN primer, which is excellent for sealing surfaces and preventing any bleed-through.

To paint the cabinet, I will be using the Rustoleum Home transformation cabinet painting kit. Once the primer was dry, I painted everything in a gorgeous green cabinet paint (Tate Green) that complemented my décor perfectly.
I first use a brush for any of the corners. Then I used a foam roller for the large surfaces.
Finally, to add durability and protect against wear and tear, I sealed the painted surfaces with a protective top coat.
I’ve never used a topcoat before, but I figured I would try it because this will be in a high traffic area and used by my kids often. I initially panicked when I put the top coat on because it went on a milky white. But it dried clear and shiny. I also used a foam roller to apply the topcoat.
Once you do a topcoat, do not try to do any touchups when the paint is wet. If you need to do touchups, let the paint dry fully, and then apply a second coat of the entire topcoat.
The end result was a rich, smooth finish that looked both elegant and professional.

Making the Window Seat Cushions
A window seat isn’t complete without a plush, comfortable cushion, so I decided to make my own rather than purchasing an expensive custom cushion. This is so simple! You do not need any sewing experience to make a window seat cushion or the cover.

To start, I bought a 3″ foam mattress topper and cut it with a bread knife to fit the exact dimensions of the seat. I also shopped around for foam seat cushions, but they were out of my budget.
I also had the hardware store cut a piece of 1/4-inch plywood to match the size of the foam. This plywood base added stability and ensured the cushion maintained its shape over time. Plus, it gives you something to staple the fabric onto.

Next, I chose a thick, high-quality fabric that would hold up well to everyday use. Using an electric stapler, I tightly wrapped the fabric around the foam and plywood, securing it at the back with evenly spaced staples.
The corners are a little tricky to staple, but I folded them over so they wouldn’t be visible from the front of the cushion. See the images below for the steps. The result was a plush, well-structured cushion that fit the window bench seat perfectly and added an extra layer of comfort.


I was asked by my instagram community why I created 2 cushions instead of one long cushion. The answer is simply because it was more cost effective. I cut one twin mattress topper in half so I could use it for both cushions. I couldn’t find an affordable foam that would be 105″.
Adding the Finishing Touches

To complete the look of my window bench, I focused on the small details that would elevate the space even further. I installed beautiful oversized brass handles on the drawers, using a hardware jig to ensure perfect alignment and placement. These handles added a touch of elegance and made it easy to access the storage inside the BESTA units.
For an extra decorative touch, I also installed two stylish sconces on either side of the nook. These sconces do not provide additional lighting since I have potlights in the recessed nook. I cut off hte cord so I could mount them. But in the future I can add a rechargeable light bulb if i want them to give off light. This enhances the cozy ambiance, making the space feel warm and inviting. Now, whether it’s daytime or evening, the nook is always an inviting spot to curl up with a book.
Reveal of my IKEA BESTA Window Seat with Storage


What was once an empty, under-utilized nook has now become one of my favorite spots in the house! The new window bench seat is not only a functional storage solution but also a stylish and comfortable reading nook. The painted drawers, custom cushion, and carefully chosen details make it feel like a high-end built-in, even though it was created with budget-friendly IKEA pieces and a little DIY effort.


This window seat cost approximately $550. The bulk of the cost is the IKEA BESTA units. The 2 window seat cushions came under $100. I think for the cost, this window seat adds so much function in my living room. We can store our throw blankets, board games and books.

This DIY project was both simple and rewarding, proving that with the right approach, anyone can transform a small space into something beautiful and practical. If you’ve been thinking about adding a window seat to your home, I highly recommend taking on the challenge. It’s a DIY project that delivers big results with a personal touch. Would you give this a try? Let me know in the comments!
Leave a Reply