A walk-in closet should be both functional and beautiful, and I recently took on the challenge of upgrading mine. Custom closets can range from $10-20k, but I knew I could get the same look on a tiny IKEA budget.
At 5×7 feet with 8-foot ceilings, I knew I needed to maximize every inch of closet space. Using the IKEA PAX planner as a foundation, I combined PAX units with custom-built wardrobes to create a seamless, high-end look. Here’s a detailed step-by-step guide of this IKEA hack so you can do the same!
Why I needed a custom closet

A custom closet is not something everyone needs. But, it’s been on my wishlist for years! I had a freestanding IKEA PAX wardrobe in my old home when we turned our walk-in closet into a nursery. I absolutely loved it. It had so much customizable storage for jewelry, pants, and tons of drawers! When we moved, I disassembled it and brought it to our new home.
My current closet is a standard builder closet. It has hanging rods that are too low, with zero drawers. It’s not optimized. Plus, there is a door that opens inwards into the closet, blocking access to the clothes behind it.

I knew I could re-design my closet with IKEA PAX closet system. There are so many different customizable organizers for jewelry, pants, shoes and clothes. I am SO excited to build the closet of my dreams! If you’re looking for closet inspiration, check out this post of closet design trends.
Step 1: Planning the Closet Space
Before purchasing anything, I used the IKEA PAX planner to design my closet layout. The planner is a great tool to visualize the closet space, but I realized that to truly optimize my storage, I needed custom-built wardrobes alongside the PAX units.
Measure Your Space
Start by measuring your closet’s width, depth, and height. Note any vents, outlets, or obstructions that may affect installation. I had a heating vent on the floor so I made sure I could have access to this (more on this later!)
Design the Layout

Use the IKEA PAX planner to arrange the wardrobes. Consider different configurations for hanging space, shelves, and drawers. It’s really fun to play around with the different depths and width of the wardrobes. You can also save your design, and have it emailed to you so you can come back to it later.
I always tape the floor and wall with my design to get a better idea of the space. It helps a lot to get a feel for the space!

Identify Custom Elements
If the PAX system alone doesn’t meet your needs, plan for custom-built sections. For me, that meant constructing additional wardrobe units to maximize storage. I’ve never done this, but after building my first one, I realized how easy it was!
Order Materials

Purchase IKEA PAX units. The IKEA PAX planner gives you a print out of everything that you need to purchase. It also has the in-store location, or with a single click you can add it all to your cart for delivery or pickup. I’d suggest getting it delivered because the height of the wardrobes is close to 8ft.
Step 2: Prepping the Closet
Start with a blank slate closet
Before installing the wardrobes, I needed to prepare the space. After I emptied my closet, I got to work! I wanted to start with a blank slate, so I removed all the shelves, rods and brackets that were in the closet.

This was easy to remove, but left behind a lot of holes. Plus, where I removed anchors were LARGE holes. On the walls I was installing IKEA PAX closet system, I didn’t bother to patch the walls. The walls would be covered by the backing of the wardrobes. But on the walls that I planned to make custom wardrobes, I spent some time patching, sanding and priming the walls.

Remove Baseboards
Since we want the wardrobes to fit flush against the wall, we need to remove the baseboards. Using a utility knife, cut the caulking at the top of the baseboards (where it meets the wall). Failure to do this will almost guarantee that you’ll pull off a layer of the drywall.
Then wedge a prybar between the trim and wall. Start tapping the prybar lightly to pusht he prybar behind the baseboard. Once it’s far enough down, you can angle the prybar and wedge the baseboard away from the wall. Be careful as you will have several nails sticking out.
You might reuse these boards later, so try not to damage them too much!
Remove Popcorn Ceiling
I should have removed the popcorn ceiling at the start of the project. It would have been less messy. But I didn’t consider a smooth ceiling until I decided to color drench the entire closet. I have an in-depth post on removing popcorn ceilings. It’s not a job I love, but I love the result!
If you do this, be sure to wear a mask and goggles, as it can get messy. I sprayed the ceiling with warm water. Then I let it sit for 5-10 minutes. With a 12” flat knife, I scraped off the popcorn into a small tray.
Step 3: Assemble the Wardrobes

Once the prep work was done, it was time to build the wardrobe units.
Follow the IKEA instructions carefully to put together the PAX wardrobes. The new IKEA PAX wardrobes are so easy to build. They open up like an accordion with the sides and back already attached. This makes it so much faster than the older model.
Secure Wardrobes Together. First, using clamps, position the wardrobes side by side. Then, screw them together with long wood screws. This prevents shifting over time. IKEA provides these screws with the wardrobes.
Attach the wardrobes to the wall for safety. Locate wall studs using a stud finder and use the bracket that comes with the system to secure the wardrobes to the wall. This step is crucial for safety, especially if you plan to store heavy items. Ensure the bracket is secured into the stud of your wall. If not, use a heavy duty anchor.
Then I built all the drawers to complete my closet. It was really coming along!!

Step 4: Cut a Hole for the Vent

You can skip this step if you don’t have a vent in your closet. I have an air vent on the floor in my closet. Since I live in Canada, I definitely want access to the heat! When I planned my wardrobe, I made sure to have a hanging pant organizer to allow the heat to escape. Drawers would not allow for the flow of the air.

I measured and traced the outline of the vent on the bottom of the organizer. I used a drill to make holes in each corner big enough for the jigsaw to fit. Then I simply cut the vent out.

I secured the base to the IKEA PAX wardrobe, and popped in the vent cover. Now I have access to the vent!
If you build a base, you can alternatively add a vent in the toe kick. This will allow the air to flow outwards.
Step 5: Build Custom Closets

It’s very hard to perfectly optimize the IKEA PAX wardrobes to fit your closest, especially if you have a small closet like mine. I build 2 custom wardrobes to maximize the closest space. This allowed me to have perfectly fitted IKEA PAX built-in closet.

I used an old dresser my mom was donating as the base of the one of the dressers. The top of the dresser had a lip, so I used my circular saw to cut off the lip. This gives is a more modular look that resembles the IKEA PAX wardrobes. I don’t want it to look out of place!
Next I built 2 wardrobes, one smaller wardrobe was going to be placed on top of the dresser, and a full sized wardrobe that would fit in the corner of the closet. I’ll be honest, I got a lot of comments about the usefulness of the corner closet because it is so tight. But, I will be using it to store my infrequently used South Asian clothing. This still allows them to be accessible.
I used 3//4” plywood that I had cut at the hardware store. I drilled 3 pocket holes into the long vertical boards. I used corner clamps to set up my wardrobes. Be sure that the pocket holes will not be visible, so they should be facing outwards. I secured it with Kreg Screws.


For the tall wardrobe, I built a base out of 2×4 lumber so it would be the same height as the IKEA PAX wardrobes.

It took me a long time to build my first wardrobe. I used a square in every corner to make sure the box would be level and square. The second one went much faster. I am so happy with the result! Even though I have done a TON of DIY, this was my first time making wardrobe boxes.

I didn’t add a backing to these to save money. I secured them to the wall using small brackets.
Now all the wardrobe boxes are done! I am so excited to trim this out and make it look custom!!!
Step 6: Trim out the IKEA PAX Closet Edges

I wanted to cover all the edges facing outwards with trim to make it look more substantial. I cut ⅝” MDF strips to 1.5” wide using a table saw. These strips will act as the face frame, covering the seams between PAX units and providing a more polished, high-end appearance. Before attaching the trim, sand the edges lightly to remove rough spots and ensure a seamless fit. It’s important to measure each section carefully, especially around the top and sides, to maintain uniformity and create a cohesive design.

Once your MDF strips are cut and prepped, begin securing them to the PAX wardrobe frames using brad nails. Start with the vertical pieces along the sides, ensuring they are flush with the front edge of the wardrobe for a seamless integration. Then, add the horizontal strips along the top and any additional pieces needed for a more built-in effect. Using a level throughout the process is crucial to keep the trim aligned. I also added a baseboard with the MDF.
If you find there are spots where your trim isn’t perfectly flush with the piece beside it, place some cards behind to bump out the trim until they are flush. Then nail them in place. Just be sure to cut or fold them so they are not visible.
Step 7: Create Custom Drawer Fronts


Adding custom drawer fronts to an IKEA PAX closet is a great way to achieve a high-end, built-in look while maintaining affordability. I used the same ⅝” MDF that I used to trim out the wardrobe. I carefully measured the dimensions of each drawer, ensuring to subtract ¼ inch from the height and width to allow for an even reveal around all sides.
Once measured, I cut the MDF to size using a saw. All my drawers were 7 ¼” tall. So, I got the hardware store to cut 7 ¼” long strips, then I could easily cut them to the width of each drawer front. Sand the edges lightly to remove any roughness.

Next, decided on my design elements—one option is to use half-round dowels to create a decorative trim pattern. I cut each trim piece at a precise 45-degree miter angle for a seamless corner fit. I arranged the trim on the drawer fronts and attached it using wood glue and pin nails, making sure to press firmly to prevent gaps.

For installation, I stacked the drawers inside the PAX unit with ¼-inch spacers placed around them to maintain even gaps (starting at the bottom is easier). This ensures that each front is perfectly aligned before securing. With the drawer fronts positioned, I used a nail gun to tack them lightly in place.

After all the fronts are attached, reinforce their hold by clamping each front securely to the corresponding drawer box. From inside the drawer, drive screws through the existing holes in the IKEA drawer hardware and into the MDF front, ensuring a sturdy connection. Once secured, remove the clamps and check for alignment.

Step 9: Add Molding to the top of the wardrobes

Adding molding to the top of an IKEA PAX wardrobe is a great way to close the gap between the unit and the ceiling, giving it a built-in, custom look. To begin, I measured the distance between the top of the PAX and the ceiling.
At the hardware store, I had to choose a molding profile that complements the design and the width. Crown Molding would have been too big for me (and a headache to cut!). I ended up using a simple baseboard that was only $6. I cut the molding, making precise 45-degree miter cuts at the corners for a seamless fit.
Once your molding is cut and prepped, secure it to the front of the wardrobe using brad nails. For added strength, apply a bead of wood glue along the back of the molding where it meets the PAX frame. Using a level, ensure the molding is straight before nailing it in place, working from one end to the other.
Step 8: Don’t skip the finishing work if you want a professional finish

Phewf, I’m done all the hardwork of customizing the IKEA PAX wardrobes. But I need to make it look flawless before I paint.
If needed, use caulk to fill any small gaps where the molding meets the ceiling or side walls for a professional, built-in appearance.
Finish by filling nail holes with wood filler, sanding smooth. Also, caulk any visible seams for a flawless finish. If you’re wondering when to use wood filled vs when to use caulking – here’s a good rule of thumb. Wood filler goes on any seam where 2 boards meet. Caulk goes where the board meets the wall.
I also chose to fill all the shelf/drawer holes for the IKEA PAX wardrobe with wood filler. Then I sanded it. This small detail makes it so no one knows it was once IKEA!

Using a hardware jig, make the holes for your knobs and pulls. You can do this after you paint, but I find that you might scratch your freshly painted drawer fronts, so it’s safer to do this before painting.
Step 9: Prepare you closet for paint

I gave my entire closet a quick sand with p80 grit. This was hard at some spots like in the back of the wardrobes. I used my mouse sander for most of it.
I vacuumed really well and wiped every corner with my tack cloth. You want to ensure there is no dust left behind as it will form clumps when you paint.
I always prime my IKEA furniture with a foam roller. Shellac based BIN is my favourite Primer. It needs 24 hours to cue. For high traffic areas, I like to give it an extra coat of primer.
I have an in-depth guide to painting IKEA furniture for more details.
Step 10: Paint your IKEA PAX Closet your Dream color!
I debated a lot what colour I should paint this closet. I ended up choosing a moody mossy green. I feel like this will look really good in this closet and I got brass hardware to complement it.
Make sure to tape off the doorway of your closet, so the paint does not overspray into your bedroom. I also taped down a protective film on the floor, so the paint would not adhere to the floor.

I used Sherwin-Williams urethane trim, enamel paint. This is my favourite paint for painting cabinets. I had it color matched to Wethersfield Moss by Benjamin Moore.
I used my paint sprayer to help get into all the awkward nooks and crevices and tops to the bottom of the shelves. You could definitely handle this, but using a paint sprayer will be much faster and more thorough.
I thinned the paint just a little bit before I started spraying (like 2 tablespoons of water). If you’ve never used the paint sprayer, make sure you practice on a piece of scrap cardboard. The key to getting a really smooth finish is to move your entire body and not just flick the wrist.
Step 9: Add hardware, lights and rods
To finish off the closet, I used a combination of these brass knobs and handles. I love the polished brass look. It makes the closet look so high end (but spoiler, these were so inexpensive!)

I felt like this closet didn’t enough elements of natural wood. Instead of using the metal white rods from IKEA for hanging clothes, I opted to get 1” dowel and stained it. I used rub n buff on the closet rod brackets to keep the consistency of brass.

I only have one small overhead light in the closet, and no other electrical outlets. I wanted to add mood lighting so I purchased wireless LED chargeable lights. They have a sticky backing on one side and a magnet on the other side. The lights are magnetic so they can easily be removed for charging.
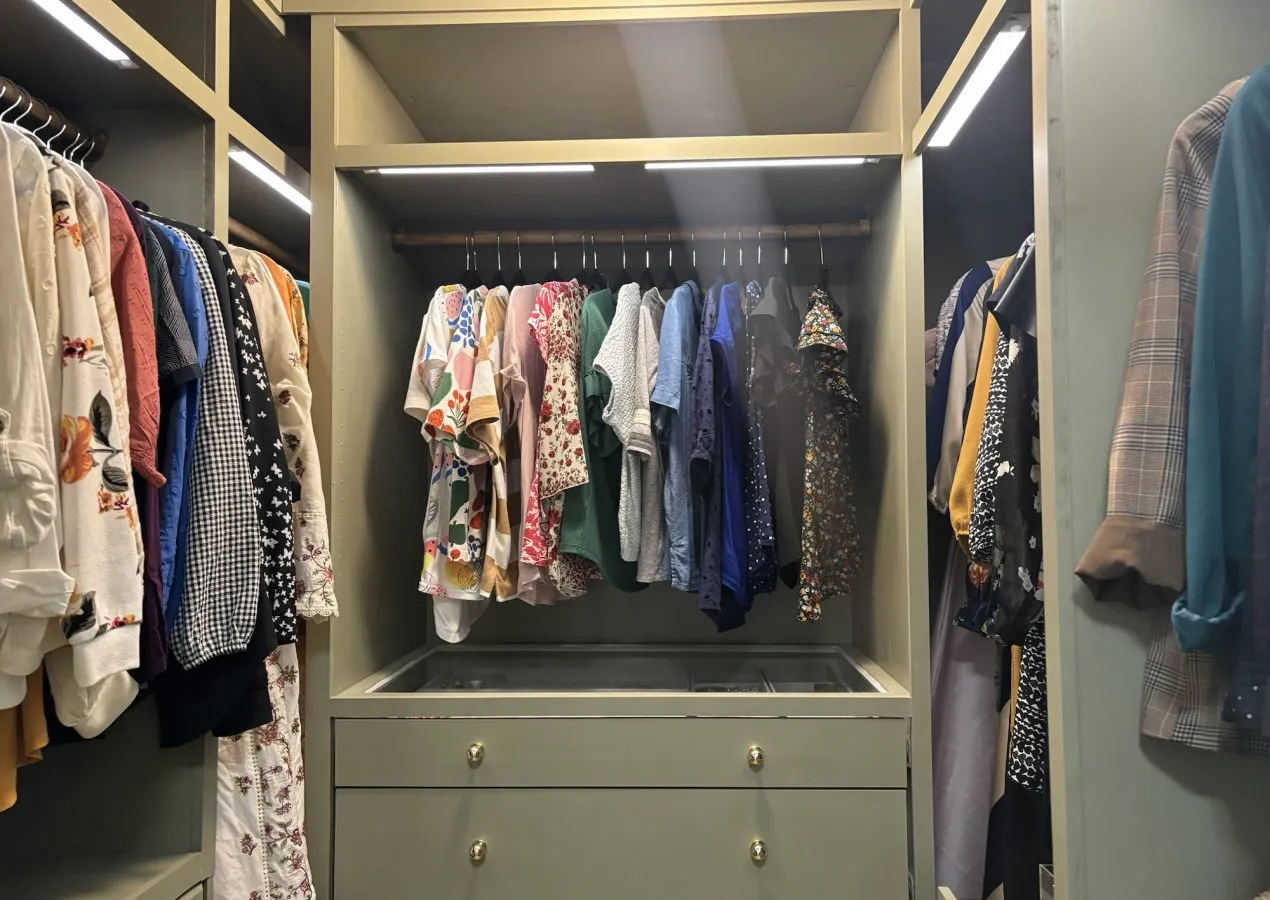
The Reveal of my Dream IKEA PAX Closet Hack!!!!
Before I show you the reveal of the closet, here’s a reminder of my closet when I started this makeover. It was a disorganized mess with no drawers for folded clothes. It’s small closet so I intended to maximize every last inch!

I can’t believe this once used to be a builder grade closet!!! I totally transformed this space with IKEA PAX closets. This IKEA PAX hack I added a ton of storage with many drawers, and overhead space for out of season clothes. There is a spot for everything in this closet.


The green paint color with the mood lighting really sets a dramatic mood for this closet. If you’re looking for more IKEA PAX hacks, I found some beautiful inspiration for you!


If you loved this project, make sure to pin it. You can follow me on Instagram for tons more IKEA hacks!
Leave a Reply