I was really eager to tackle my entryway. An open concept entryway is a tricky space to navigate with a family. With 3 kids and a busy schedule, the entryway is always messy and lacks personality. There were some parts that I adored, like the IKEA shoe organizer and the old school charm of the stained glass. But, because my kids require more storage for their accessories, I decided to scrap everything and start from scratch.

The Vision:

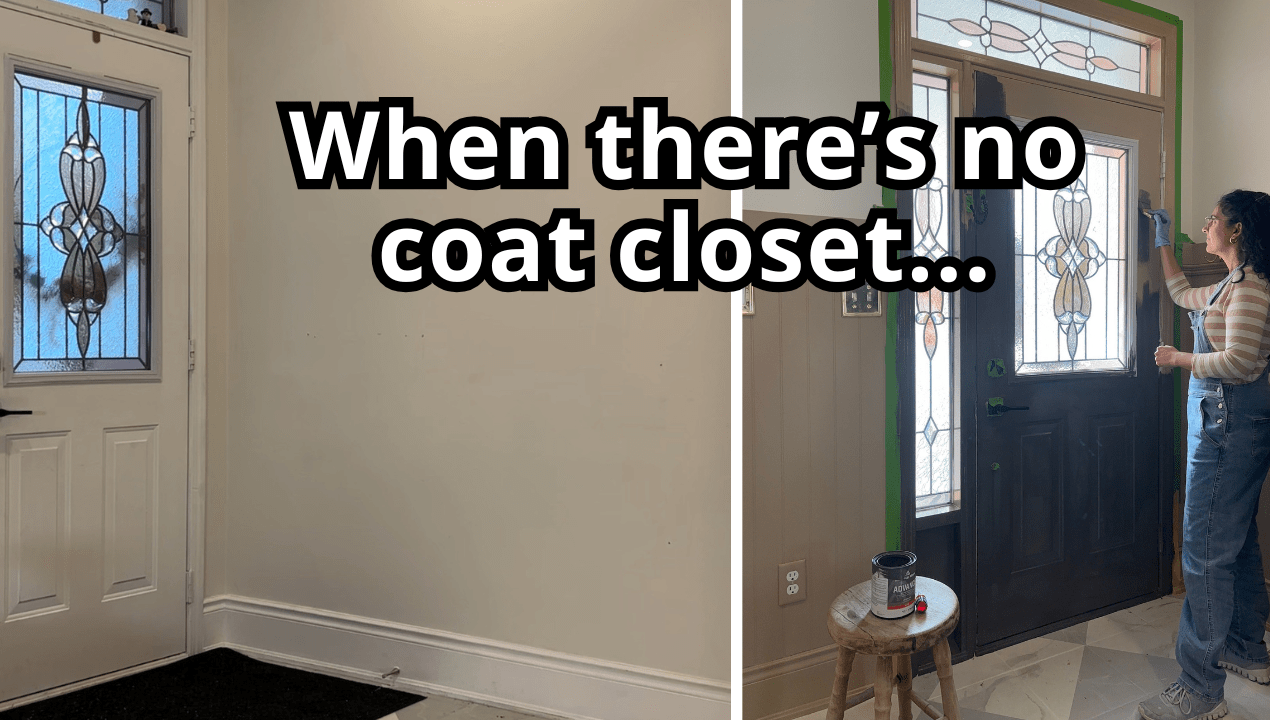
My vision was to design a stylish and functional entryway. With the absence of a coat closet, storage is essential in this space. For that, I decided on a coat rack for coats and backpacks. I also wanted to find a dresser that I could makeover and use as a shoe cabinet.
I wanted to curate modern classical vibe, and I decided the quickest transformation would come from installing a beadboard wall. I wanted to paint the door and emphasize color coordination throughout the space, ensuring cohesiveness.
Here’s everything I used for this space
Installing BeadBoards

After clearing out the entryway, I started on the beadboard installation. I have installed beadboards before in my daughter’s room; they are one of my favorite walls detailing to change up a room.
I had some left over beadboards from my daughter’s room makeover that I used for this entryway makeover. One thing about me I will never let DIY items go to waste.
I used 1 inch nails to install the beadboard into place as opposed to glue. In case I ever want to change it up, nails are much easier to remove.

There was a spot to the left of the door that I was going to leave blank, but it looked very awkward, and for continuity purposes, I went the extra mile to get it matched and put it up. I used the paint hack to align the outlets with the beadboard to cut it properly.

After installing the beadboard on both sides, I added trim to the top of the beadboard for added detailing. I used a level that turns green when your board is straight to ensure uniformity throughout the beadboards.
Painting the entryway

The color palette for the entryway is a bit more mature and traditional from my usual style. I wanted a more mature and understated color scheme. I used the Wooster Brush to paint the beadboard. I used the Benjamin Moore Advance in Sherwood Tan 1054 for the beadboard.

Coordinating colors is very essential in a project with such moody colors. To make all the paints stand out more, I painted the walls in White Dove OC-17 by Benjamin Moore.
Painting the door

I put a lot of thought into what color the door should be. My door has a beautiful stained glass that I wanted the paint to contrast well with.

I originally painted the door the same color as the beadboards, but it was not meshing well at all. I landed on Silhouette by Benjamin Moore, the same color I used for the dresser makeover. This is the Benjamin Moore Color of the Year and it is to rich and dreamy!

The rich espresso hues with subtle notes of charcoal made the stained glass window pop.
IKEA Dresser Makeover
I found a lovely IKEA dresser from Facebook Marketplace and knew it would be the perfect addition to my entryway. It’s very spacious and can store shoes, hats, and all winter accessories for my kids easily. Because I am going for a vintage vibe, I wanted to make the dresser look vintage. I started with sanding the dresser with my P60 grit, so that the surface isn’t shiny.

I then painted the dresser with a high-adhesion primer. This step is essential to ensure your furniture paint doesn’t chip.

I used an old wood attachment as a stencil to create an attachment at the bottom of the dresser. It has an ornate curve to it that fits perfectly with the vintage vibe. I used my jigsaw to create the attachment, and with my nail gun, I attached it into place.


I used the Benjamin Moore Advance color of the year 2026 in Silhouette AF-655 to paint the dresser. I did 2-3 light coats, with light strokes and a foam roller

The final touch for this IKEA dresser makeover was changing the handles. With the moody charcoal color, I decided on bronze hardware. The colors coordinate very well.

Here is the final look at the IKEA dresser. It turned out beautifully and is the perfect staple to this vintage entryway makeover.
Detail my Entryway with me

I don’t have a coat closet in my entryway to store jackets and shoes. So, I opted for a gorgeous brown coat rack with 11 hooks for storage. I got these ornate gold double hooks that I installed along the trim of the beadboard for added storage.
Shop all the products here:

Styling the entryway was the final stage of the makeover. On top of the dresser, I placed a curved mirror with a black frame, a small gold and white lamp, a brown basket, and an abstract white vase.

On the side of the door, I placed a brown stool that matched the coat rack and placed a grey vase on top of it. In both the vases, I placed darker stems.


One of my favorite details in this entryway is the gold-plated light switches. And the vintage painting with gold detailing above it.

And finally, to pull the entryway together, I added a floral non-slip rug with darker hues that completed the vintage vibe perfectly.

Final Look
This entryway is a bit different than most of my DIY’s on an aesthetic basis. But the overall look is so classic and vintage that it really brought out the personality in this space.
If you were inspired by this post, make sure to pin it! And keep on DIY-ing!


Leave a Reply