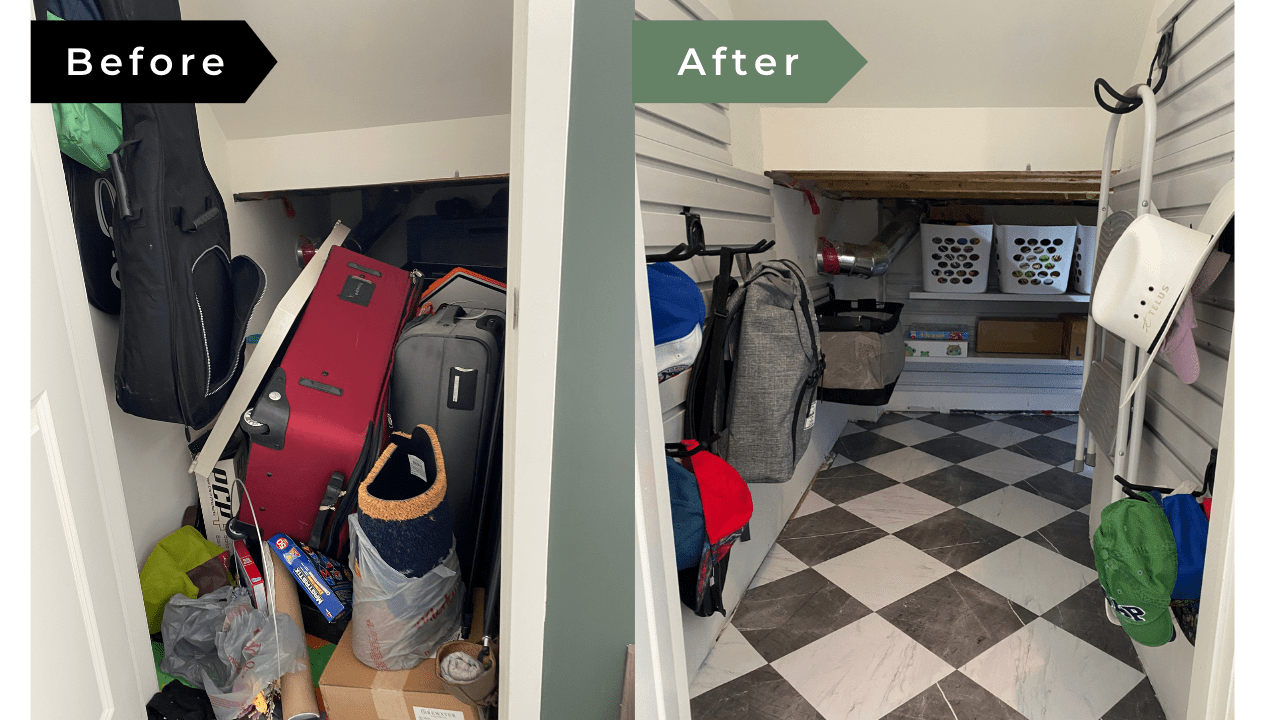
I’ve struggled with how to organize my closet under the stairs. I finally tackled this awkward space and it’s a dream closet! I used the vertical space, hooks and baskets to organize my kids toys, out of season coats, and luggage.
We all have that drop zone space in our house that we don’t even want to think about. You know the one. It’s a convenient place to use as a dumping ground for everything, it makes you sad every time you walk by it on a daily basis, and you really aren’t sure where to start with making it work better for you and your family.

For me, this space was my under the stairs storage closet. It’s a small space and not quite tall enough for a grown person to stand up in, but plenty large enough to stack boxes and everything else that doesn’t have any other place to live. You can imagine how messy it got in there! I finally decided I couldn’t ignore it any longer and it was time to organize this closet under the stairs.


Part 1 – Preparing to Organize the Closet For a Major Overhaul
Step 1 – Sort through the items in the Closet
The first thing I did to organize this closet was take everything out. This way, I could see what I was dealing with and plan the space to my advantage. It was a satisfying job, let me tell you! Under the stairs storage areas are so difficult to use, so I wanted to make sure that my plan maximized this awkward space as much as possible.
Step 2 – Prep my floors for the Peel and Stick Tiles
Then, I removed the interlocking foam mats that I was using as temporary flooring on the otherwise bare concrete floor. I had to prep the floor properly before putting in the new flooring. Because concrete is a porous substance, it can be difficult to cover and I knew that the flooring I chose wouldn’t stick to it very well unless I did an extra step. I put a layer of latex primer on top of it, which is a great way to seal concrete properly. So, I solved that problem and moved on to the next step.

Step 3 – Adding Vinyl Peel & Stick Tile Flooring
Then it was time for the new flooring! I’m so excited about this! I chose peel and stick tiles in a gorgeous black and white checkerboard pattern for this under the stairs storage area. I chose these for a few reasons. First, I wanted something affordable. This is a low traffic area without easy access, so I didn’t want to spend a lot on the flooring given that no one else would really use it much.

I chose a product that was easy to deal with for someone who is not a professional floor installer! This tile cut easily with an Exacto knife, so there were no power tools required and it was easy to go around posts and into corners and small spaces. I also didn’t need grout or any of the tools or skills that go along with that. I just started laying my pattern and cut as I needed to! It was so easy. If you’d like to give it a try, here are step by step instructions!

And lastly, I chose it because it was beautiful! Buying something affordable doesn’t mean it can’t be pretty too. I think the chalky, slightly distressed look of these tiles is just perfect and they make me smile every time I go into this under the stairs closet space. You can see the difference between my temporary flooring and these beautiful tiles right here!
Part 2 – How to Install the Gladiator System
Step 1- Cut the Gear Wall Panels
The panels were easy to cut and customize to this storage space. I used my circular saw to cut the panels to the perfect size, the length of the walls. I chose to cover the entire wall to maximize storage and have flexibility to move my hooks and baskets around.

Step 2 – Install the Gear Wall Panels
- Find your studs with a stud finder. Make sure the studs are not more than 24″ apart. This will ensure the panels don’t fall off when you hang your heavy objects on them and make them ideal for heavy duty storage.
- Mark your stud line vertically
- The panels are installed at the bottom of the wall first, and then upward from there. You can get a buddy to help you, or place an object of the right height on the floor and then place your first panel on top of it. Make sure the first panel is level.
- Drill a pilot hole. Then, use an impact driver to install the panels. Bonus points if you use these screws to install the panels, since they are color matched to them
- Each subsequent panel is installed on top of the last one. The panels click together.


Step 3 – Organizing Your Closet Under the Stairs!
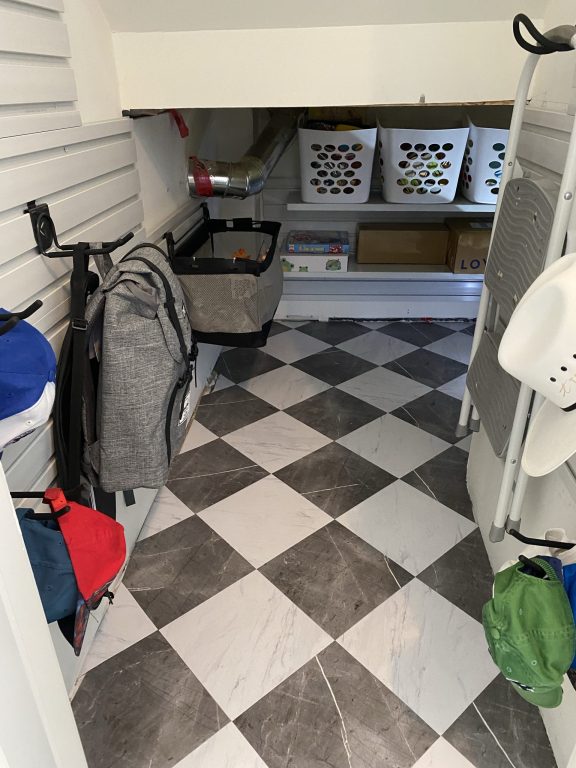
I used shelves, racks, and accessories to ensure every square inch of this space was being used to its full potential. I needed the flexibility to store a wide range of items. The Gladiator System is a great solution because every single hook and shelf can be moved to a new spot. This is great as our kids get older and our closet needs change! I used baskets to store winter things and other random items, the shoe shelf for out of season shoes, and shelves for sports gear and toy and board games rotation.
This system is also a great way to store smaller items that don’t usually have a home. The hooks are a good place for hats, backpacks, or anything that hangs easily! I decided the best things to store here were those items I don’t need to use every day, so it stays tidy because I don’t have to go into it that often. Since the space is not very tall even the top shelf is totally usable space for me, which is so nice. And I love that I no longer have to hang hooks on the back of the door, which always felt messy to me. Check out exactly how it turned out right here!
Using Vertical Storage to Organize This Closet Under the Stairs
I knew that one of the easiest ways to maximize this funny-shaped under the stairs storage area and make enough room for all our stuff was to store things vertically, and I love the Gladiator Premier Series for this purpose. This room was a great place to put up these GearWall panels. I love them because they are compatible with a whole bunch of shelves, hooks, and baskets. Using the vertical wall space gained a tonne of extra storage space, which is exactly what I needed to organize this closet under the stairs. I put them up on the side walls and also the back wall of the closet. These are the products I used:
This system allowed me to get everything up off the floor so I could store more and also access it more easily. It turns out there is actually so much space in here!
Part 3 – Installing a coat rack
With 3 kids, the challenge of storing all their out of season jackets and snowpants is real. Plus, I hand down these items between kids, so we have A LOT of extra winter gear. I turned part of this storage closet into a coat closet with a curtain rod flipped upside down to hang our extra jackets. I simply screwed it into the joists of the stairs. Wasn’t that such a great idea? It might be my favourite of all these ideas to organize the closet under the stairs!

The reveal: the most organized closet under the stairs!
There you go! Now you’ve seen how I turned this under the stairs area, which was basically wasted space, into a smart, organized closet under the stairs. I don’t cringe anymore when I walk past this closet door. And because I increased its capacity to hold things with all the vertical storage, I was actually able to clean out some other areas in my house and store it all in there, even though there isn’t much floor space at all! I love this new space. I’m glad I finally decided to tackle it! This system would also work great in a laundry room or mud room setting, or even at the back of the closet in a front door entryway, at the back door, or in your linen closet. That’s what I love about this system, it is so versatile and functional!


Have you turned an awkward area in your home into functional storage? Tag me @hanashappyhome with your before and after pics! And leave a comment below if you loved this space!
Leave a Reply