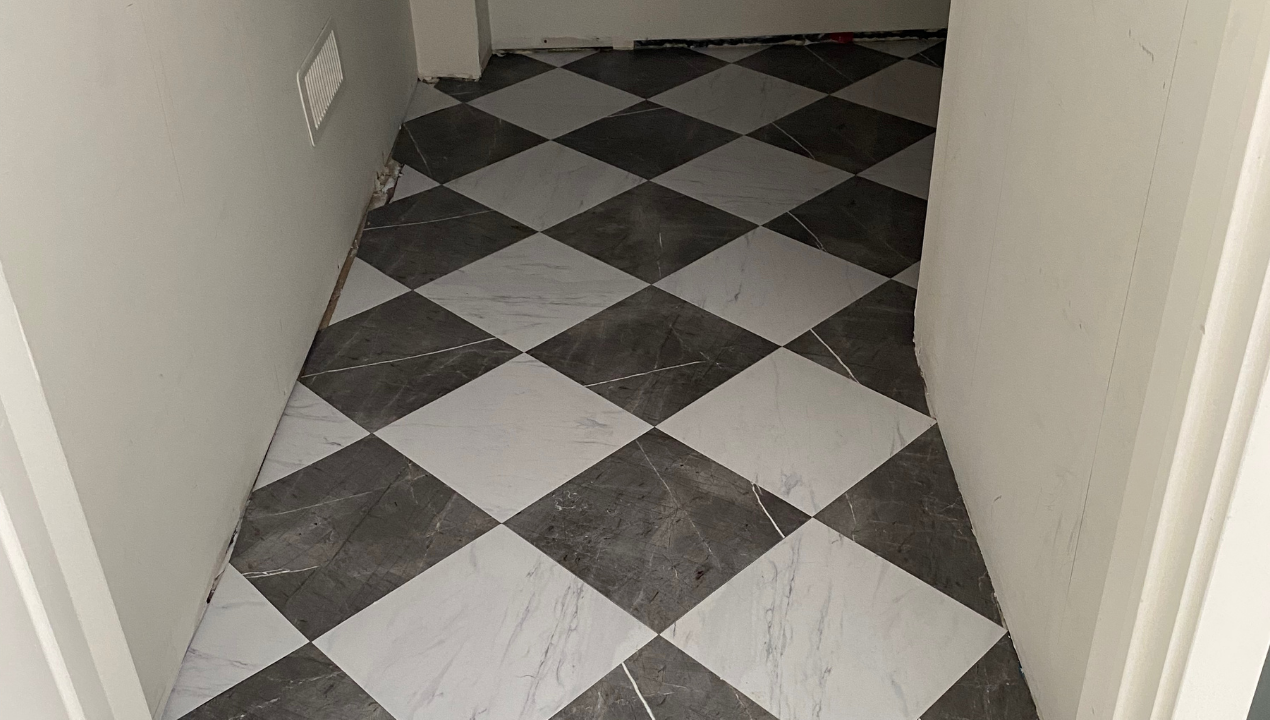
I’m so excited about my new peel and stick tile flooring! I went with a gorgeous black and white checkerboard pattern, using tiles that have a marbled, distressed look. I could not be happier! They are so inexpensive but look so high end (too nice for a closet really!). The process was so easy – no power tools needed! Read on below for my tips and tricks for making sure you get the same high quality result with your vinyl peel and stick flooring project.

Before I started this project, I was covering my bare concrete flooring with these interlocking foam mats, just as something temporary. This floor brought no joy and no motivation to tidy up the space, as evidenced above!
Materials
- Peel and stick tile
- Several sheets of newspaper
- Primer
Tools
- Vacuum cleaner
- Paint roller
- Chalk line
- Level
- Carpenter’s square
- Pencil
- Shears
- Box cutter or Exacto knife
Step 1: Clean your floor
It is very important that the floor you are laying tile on is perfectly clean. Concrete is especially tricky, because it tends to be dusty and dirty. Any dust, dirt, pebbles, etc can be felt and seen through peel and stick tile, so this step is very important. I recommend you give it a good vacuum with a hard-surface attachment rather than just sweeping it.

Step 2: Fix your floor
If you notice any large gaping holes or cracks, these must be patched and repaired before you can continue your flooring project. Just like dirt and debris, holes will be seen and felt if you don’t deal with them now. You should also check your floor in several spots with a level to make sure you don’t have any areas that are significantly higher than the others. Peel and stick tiles need a level surface, and they will not adhere properly to uneven floors.
I had a bit of an issue with the unlevel flooring. It looks like my builder poured 2 separate sections of foundation. One fore the house and then one for the garage, so I had a seam. You can see this on the left side of the closet. I wasn’t about to get an industrial sander so I crossed my fingers and hoped for the best. I won’t be going into depth about how to fix your floor. I will tell you that you can get concrete patching compound and self-leveling compound if you need them. I was fortunate enough that 2 months after this project, my tiles are still stuck and did not peel up.
Trust me, all this prep will be worth it!
Step 3: Prep your floor
Concrete is a very porous substance, and is constantly absorbing moisture. This means that without a barrier between it and your tiles, the peel and stick tile surface will not adhere directly to it very easily, or for very long. I recommend putting two coats of a good latex primer on it first, to seal it and give the tiles something to stick to. This will extend the life of your tiles considerably.

Step 4: Plan your peel and stick tile floor
Once your floor is clean (and patched and/or leveled, if need be) and primed, there is just one more step before you get to peel the backing and start actually laying your tile. You don’t want to start without a plan, because your pattern can start to look crooked very easily. Since the straightness of walls can never be trusted, I recommend finding the centre of your floor and working your way out toward the walls from there.
Measure out the centre point of two sides of the room, and then snap a chalk line straight across the entire space, once from each side. Where the two lines intersect is your centre point for the room, and this is where the first tile should be laid (centred, of course). Lay that first tile and several more around it with the backing still on to see what pattern you like best. I liked a diamond orientation best, but maybe you will like a square pattern better. Best to lay them both out now and see!
There’s one caveat to this! Here’s why laying the pattern first is really important. One both the right and left edges of the floor, the tiles that would be cut were tiny (less than 2″ big). The instructions say that you should avoid very small pieces as they can peel off easily. So I shifted my pattern a few inches to avoid these small pieces. You can’t tell when you’re standing at looking at it.

Step 5: Start your floor
Once you decide what pattern you want, go ahead and peel the backing off your first tile and lay it carefully in the starting point of your floor. I laid mine where the t intersects. Then, make sure you put pressure on every bit of the tile so that the entire thing sticks properly. You can even put some heavy objects onto it for a few minutes just to make sure! I used paint cans or hand weights, whatever was most convenient. Then, work your way in one direction toward a wall, stick the tile down, and move the heavy objects onto them as you go.
Step 6: How to lay peel and stick tile for edges and tricky corners
Once you get close enough to a wall that you need to deal with cutting tiles or going around corners, it’s time to take a break and get ready for the next fun part.
For tiles that simply need to be cut smaller with a straight edge: I measured them and marked the shape with a white pencil crayon.
Later I learned, you could also take the tile you need to cut smaller and line it up flush with the wall, overlapping with the closest tile that is already in place. Line up a third tile over top of that, flush with the end of the same closest tile that is already in place. Take your pencil and draw a straight line, using the edge of the third tile, onto the tile that needs to be cut. Then cut it with your Exacto knife or box cutter. Then make sure you lay the cut side closest to the wall. That’s it! No measuring needed.


For tiles that need to go around corners or into tricky spaces: a template is the best way to go. You can use different materials for this (some people like cardboard), but I really like to use newspaper. It’s very flexible and easy to work with, and it cuts very easily. There’s also always a lot of it around, so if you mess up you can start again without worrying about wasting your template material.
For this template method, take the newspaper and place a tile on top of it. Then trace and cut it out. Now wedge your newspaper tile into that awkward spot and trace it out with. a pencil. The paper will wrinkle but it doesn’t really matter since it’s a template. Use your scissors to cut this shape out, and then test it in place to make sure you did it right. Since you’re using newspaper, you can easily cut a new one if the first one didn’t work out. Once you are sure, use this template to cut your tile, peel the backing, and stick it in place. No measuring this way either!


You’re done!
And that’s it! Isn’t this peel and stick tile floor just so beautiful, and SO much better than the temporary flooring I had in that room before? And the best part about this project is that it is a very easy DIY (no tools!) that would be a perfect first flooring project for anyone.

Have you done a peel and stick tile floor? I would love to see it! Tag me @happyhanashome on Instagram with your before and afters! Now, come see how I incorporated vertical storage solutions in this cramped, under the stairs storage area. It’s an easy, budget friendly project you can do in a weekend!
Leave a Reply