This modern DIY geometric design for an accent wall is such a bold and elevated look for any space. It looks amazing and if you follow the steps below, you’ll see it was pretty easy to accomplish – and all for under $200! Follow these 10 steps below.
If you like accent walls, be sure to also check out how I created my bathroom accent wall or the board and batten accent wall for my hallway.

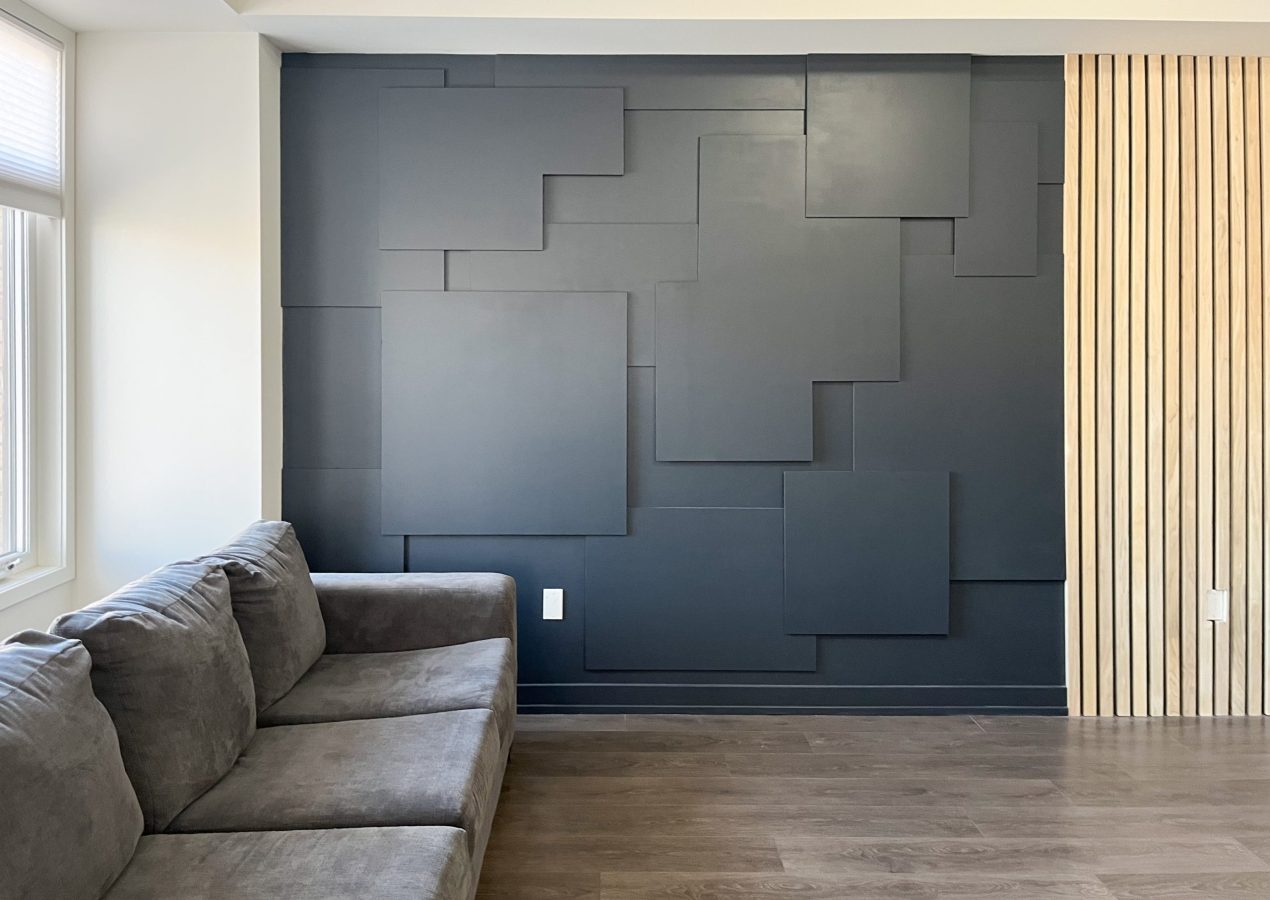
When my friends Leena and Shabir asked me to help them design their living room, I of course said yes! We got together and brainstormed what they wanted the space to look like. Based on the results of our vision board, we went with a dark wall with a combination of 2 accent walls – a gorgeous DIY wood slat wall and this geometric accent wall.
This post is the second part of their living room accent wall.
Part 1: DIY Wood Slat Wall
Part 2: DIY Geometric Accent Wall (covered in this post)
What you’ll need:
Power tools
- Nail gun
- Table saw (or have the store cut the pieces)
- Stud finder
- Circular saw
Materials
- 1 1/2″ brad nails
- Paint brushes. This is my favourite rubber handled brush
- Primer. I used Sherwin-Williams wood and wall primer
- Paint. I used Sherwin-Williams Cyberspace
- Painters tape
- Drop cloth
- Foam rollers
- Two plank of 4×8” plywood, ¼ inch thick
If you love to watch videos instead, check out my YouTube tutorial
Step 1. Design the geometric accent wall
Before painting the wall, we mapped out the geometric design on the wall using painters’ tape. This gave us an idea of the overall look of the design as well as the sizes of the pieces that we would need to make.


Once all the shapes were outlined on the wall, we took a photograph and printed it off on paper. As we measured each piece, we wrote down the measurements on the printed image. We also wanted to use this photo of the wall to reference later when it came to putting the pieces together.
Step 2. Paint the accent wall
After removing the painters’ tape design and the base boards we painted the walls using Cyberspace SW 7076.

We built the slat wall first. Once we finished that, we could start replicating the geometric design we came up with earlier for the other half of the accent wall.
Step 3. Get your wood
With our measurements in hand, we headed to the hardware store where we bought two 4X8 ft pieces of 3/4 inch plywood. They were $72 each. Although we were able to get the hardware store to cut some of the pieces to our specifications, they were not able to do them all, so we cut the rest ourselves back home. We used a combination of circular saw and table saw to do this. If you don’t have a table saw, you can totally use a circular saw to get the job done. The ones that are like a tetis or L shape could not be cut at the hardware store.
Step 4. Prepare your geometric wood pieces
Once all the pieces were cut, we used spackle to cover the open edges of the plywood. This gives them a smoother finish. You can also use edge banding to do this step, but this way tends to be easier and more cost-friendly.

Step 5. Paint the wood pieces
Next, we primed and painted them using the same Cyberspace SW 7076 colour as the wall. We did 2 coats of primer and 3 coats of paint. We didn’t want the wood grain to show through at all.

Step 6. Mark the wall studs
The next step was to mark on the wall where all the studs were so we could plan how we would nail the pieces during assembly.

Step 7. Assemble the geometric pattern
This part was so fun since it really brought the design to life. We took all our pieces and laid them out on the floor in the pattern we came up with. We used the photographs we took earlier of the design as reference.

Our design was made up of several overlapping pieces to create layers, so we moved the pieces around to go over and under other pieces until it looked the way we wanted.
Step 8. Plan the placement of the nails
Once we were satisfied, we noted which pieces would be covered by another piece and where. This step was important when it came to nailing them on the wall since we didn’t want a bunch of visible nails taking attention away from our modern design. The way we planned it, we tried to hide as many nails as possible under overlapping pieces so it would look cleaner.

Step 9. Install the geometric accent wall
Finally, we nailed the wood to the wall. Don’t forget to start with the bottom layer first, the ones that will be underneath other pieces. As you’re nailing the pieces into the wall, keep in mind where you want to place the nails so as to be covered by the top layers. Use a level to make sure the pieces are correctly aligned while you do this, too.


Since we moved our geometric pieces around so much, they needed a little extra TLC before being put up. We spackled a few roughened spots and, once that dried, we applied a final layer of paint to finish up.
Step 10. Admire your geometric accent wall
I really feel like this accent wall is like a piece of art for your home. It’s unique and special, especially when you create it yourself. Doesn’t it look great? I can’t wait for Leena, Shabir, and their family to relax and spend quality time together in their beautiful new living room.


I would love to see you build something like this. If you do, be sure to share it with me. Don’t forget to follow me on instagram for more budget projects!
Leave a Reply