
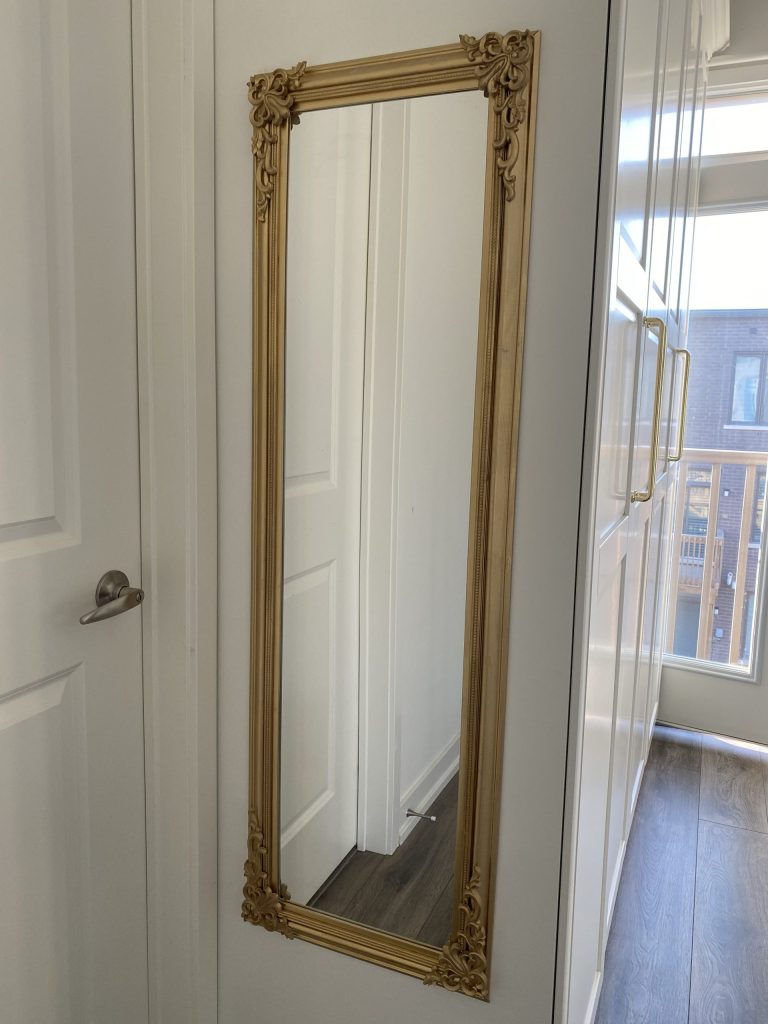
Looking to create a DIY anthropology mirror dupe? Not to brag, but I made this is a beautiful dupe on a budget! It’s no surprise the Anthro mirrors have become so popular. But given that these mirrors can be hundreds or even thousands of dollars, I knew there must be another way. I fell in love with this mirror and knew it could be created easily. If you’re looking for a modern mirror, check out my double framed mirror.

Here is a beautiful dupe with a plain $10 rectangular mirror that you probably already have at home. The best part? You can customize it to any size frame that you might have!

My favourite part is that this is an easy one day project. And look how beautiful it turned out!!

Materials to for a DIY Anthropologie Mirror
- Mitre saw
- Painters tape
- Drop cloth
- Double sided tape
- Spray Paint
- p220 grit sandpaper
- Leftover cardboard/boxes
- E6000
- Something heavy (books, or small cans of paint, wood blocks)
- Trim pieces:
- Wainscotting trim
- Thinner Ornate trim
- Ornate wood corner pieces (I used 2 packs of the corner pieces. Make sure to order 2 right, and 2 left pieces)
Build your custom Anthro Dupe Mirror
- Measure and cut the wainscotting moulding to size, depending on your mirror. This moulding will sit outside the existing mirror. Measure the outside of the frame. Cut the edges on the mitre so the trim lines up perfectly. To do this, set your saw to 45 degrees. Each piece should be a parallelogram. Here’s an example of why the mitre cut is so important.
2. Cut the thinner ornate trim. This trim will sit on top of the existing mirror frame. I didn’t bother with a mitre on these since the ornate corner trim will cover the seam. Double check your set up. If the corner trim won’t cover up the seam, make the mitre cut on the ornate trim.


3. Set up your spray painting station. I recommend boxes that will hold the smaller pieces and a drop cloth for the longer pieces. Spray paint all of your pieces. Give your spray can a good shake and use long, light coats of spray paint. It’s to do two coats versus one heavy coat. With one coat the spray paint can look lumpy.
4. Prepare your mirror for spray painting. Tape off the inside edges. Try to get as close to the frame as you can. Then cover up the middle of the mirror with leftover cardboard or bottom. Lightly sand the frame. My frame was a plastic, so I sanded it with P220 grit sandpaper. Will help the spray paint adhere to the frame.

5. Spray paint your mirror. Use care to spray with light even coats. I waited a couple hours between coats.
6. Peel your tape off the mirror. If there is any spray paint on your mirror, don’t worry. You can use nail polish remover to wipe it off.

Assemble your Anthro mirror dupe
- Use a strong hold glue to glue the thin trim on to the mirror. I used E6000 and then I put some heavy items on top (mirrors) to make sure that the glue would really adhere. You could also use clamps but I didn’t have mine nearby.


2. Once the glue is dry hang the mirror up on the wardrobe or wall. I taped my trim directly onto my PAX wardrobe, but you could alternatively built this on a piece of plywood first and then hang up the entire piece of plywood.
3. I used double sided tape to add the trim to make the mirror frame much more substantial. This double sided tape is VERY sticky. Once you stick it onto your surface it is near impossible to remove. Make sure that your placement is exactly where you want it to go. My corners ended up being a little bit off when I taped it to the wardrobe, but it wasn’t too worried because I knew the ornate corner detailing would cover it up for the most part.

4. Add a square of double-sided tape to the ornate corner detailing. I didn’t use glue because there’s only a very small surface that actually attaches to the mirror.

Once you’re done, take a look at your mirror. That adds a huge impact on a small budget! I think this would also look fantastic on a builder grade bathroom mirror if you don’t want to remove the existing one!
Budget breakdown of my DIY Anthropologie Mirror:
Mirror – $10
Thin trim detailing – $4.48 for 4ft (I used 3x pieces) = $15
Ornate trim detailing – mine was leftover, but would cost ~$20
Corner detailing – I used 2 packages @$11.99 each = $24
Spray paint – $15
Double sided tape – I had leftover, but would cost $6.54
Total cost = $66.54
I think that’s a fantastic deal on an easy little DIY!


Be sure to follow me on Instagram for more budget DIYs!
Leave a Reply