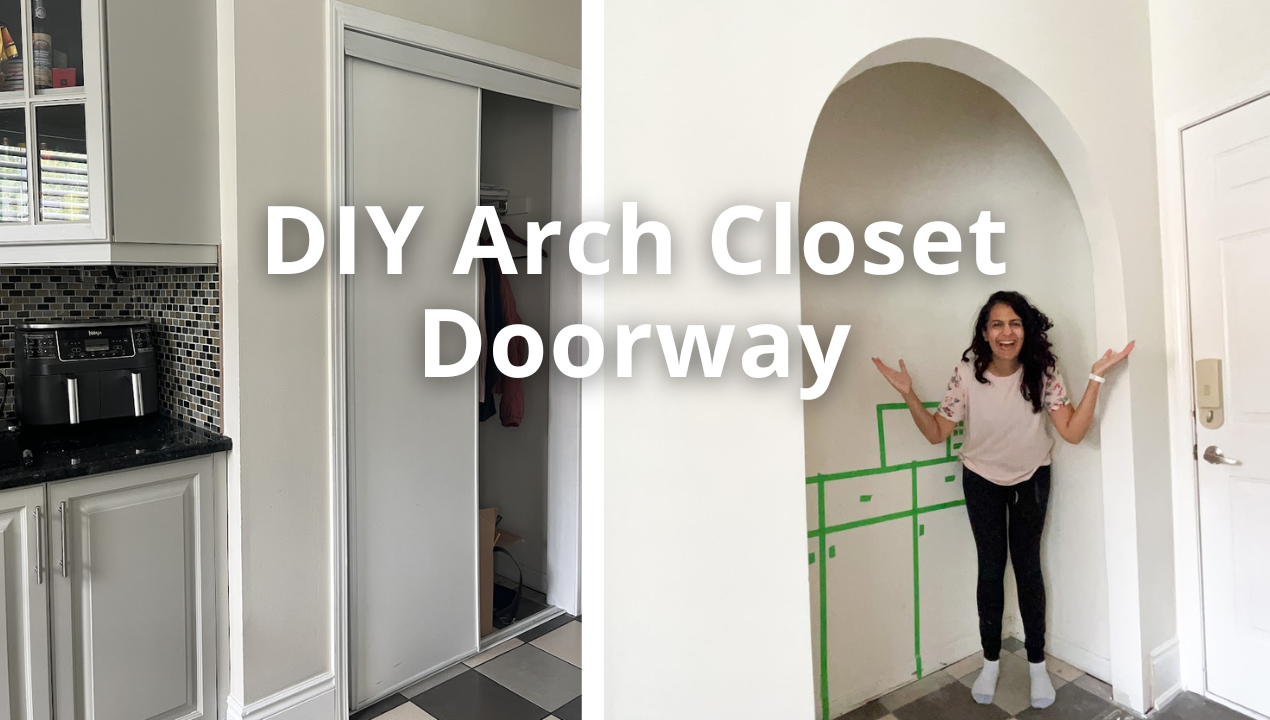
Did you know you can turn any closet into an archway? Arch closets can be a stylish addition to your home for an office nook, coat closet, coffee bar, or a pantry appliance like I’m building!
I’ve been wanting to add an archway to my house. I hate having small appliances out on the counter. But, I have an extra coat closet in my home adjacent to our kitchen. This is the perfect spot to transform into an arch closet to discreetly hide my appliances.
Materials
- Prybar
- ¼” MDF. I used 2 pieces that are 2x4ft (depending on your doorway size)
- Drywall
- 1 ¼” screws
- ⅕” nails
- 2×3 lumber
- 1×2 lumber
- Utility knife
- Drywall knife
- Joint compound (to make my life easier, I used premixed joint compound)
- Arch strips
- Corner bead
- 220 grit sanding block
- Mask + gloves
- Plastic sheets
Tools
- Nail gun
- Impact Driver
- Drill
- Multi-tool or drywall knife
A note about measuring your arch doorway
I stressed way too much about measurements, but it’s actually so easy!
Get a piece of MDF that is the width of your door frame. In my case, the door frame is 48”.
The arch piece you cut out is like a ¼ circle. So the height of that piece needs to be: door frame width divided by 2. Both the MDF and the drywall piece I used is 4×2 feet. I used 2 pieces of MDF and 2 pieces of drywall of 4×2 ft
Step 1- Remove the doors to your closet

We have to start with a blank slate. The first thing we need to do is remove the doors. Mine are sliding doors so I had to remove the doors and the sliding track. It was a little bit tricky fiddling with the clips to remove it, but eventually I removed them. If you have doors on hinges, remove the doors and the hinges as well.
I also added a tarp from this corner in my kitchen because I know that drywall must can travel very far!
Step 2 – Remove the door frame and trim
Next, we have to remove the trim all around the opening of the closet. First, take a utility knife and cut the seal on your caulking.
Then, take a pry bar and wedge it between the trim and the wall. Gently tap the hammer to pry it off along the length of the trim.

Remove the trim from the sides and the top of the doorway. Your 2x4s will be exposed.

Remove the shelf and rod, brackets inside the closet too. Now is a good time to repair the holes with drywall filler.
At this point, you can decide whether you want to expand the size of your closet. I wasn’t sure if any of the framing was structural and so I left it as is.
Step 3 – Add support for your arch
Now you need to start adding support pieces to the door frame so that you can attach your arch frame to them. I used scrap 2x3s and cut them to the width that I needed for the doorway based on the thickness of my MDF and drywall. Now this may vary but I think my door frame is a standard size so I’ll share the math below.
MDF is ¼” thick x 2 pieces (one for the front and one for the back)= ½”
Drywall ½” thick x 2 pieces (one for the front and one for the back)= 1”
Doorway frame is a 2×4. So it’s 3.5” measured – ½” -1” = 2”
All my support pieces need to be cut at 2” wide. You’ll need to cut anywhere between 10 to 15 pieces for Support.
I also cut 8 support pieces that were made out of 1 x 2 trim (also at 2” wide). This is for the top and bottom edges that the arch will attach to because the 2 x 3 will show if you attach them there.

Attach the support to the inner frame of your doorway using screws taking into account where you need to set them based on the MDF and drywall thickness/
Step 4 – Cut out your arch frame out of MDF
Here comes the fun!! Now you start to see the arch come to life. I used MDF to make this as cheap as possible, but you can also use plywood.
My doorway is 48 inches wide. I marked the centerpoint of my 2×4 MDF board. I took a string that was 24 inches long and attached it to a nail on one side and a pencil on the other side.

I attached the nail to the centerpoint of the board at 24 inches and drew a semi-circle. I traced the semi-circle with a sharpie so it’s easier to see when you’re cutting with your jigsaw.
Next, I used my jigsaw with a fine tooth blade to cut out the semi circle. Cut slowly so you can get a nice clean cut. It doesn’t have to be perfect at this point.

I cut two of these out, one for the front of the doorway, and one for the back of the doorway
I also cut these in half so that it was easier to attach but if you have someone helping you, you can use the full piece.
Step 5- Attach the MDF to the doorway

Place your arch inside the doorway and attach it to the supports. I used a few nails and my brad nailer to attach it. Then, I used screws to help get it more secure.

Secure the arches to the front and inside of the doorway.

Step 6 – Attach the drywall to the MDF
This was one of my favourite steps. First, make sure you have a mask, gloves and eye protection. I found the drywall really irritated my skin because of the dryness.

Attach the 2×4’ drywall to the MDF supports, first with nails then screws. To cut the arch shape, you can use a drywall knife. I started with this but it was so tedious. I switched to using my multitool and it was so much easier and faster!
Follow the shape of the MDF arch to cut out your arch on the drywall.

Step 7 – Attach drywall to the arch interior
Your doorway is looking really good! Now we need to close off the gap on the door frame.

First, you need to cut strips of drywall that are 2.5” wide that will fit inside the arch. To cut drywall, score on your line several times (it helps to have a drywall T sqaure). Then bend it on that line. Using your utility knife, cut the excess paper to separate the strips. I cut 4 strips that were 48” long.
I needed to bend 2 strips for the arch. To make the drywall bend, use a utility knife to make slits on the white side of drywall ½” apart. The slits should now go all the way through the drywall, but they do need to be a little deep so the drywall will bend. Put pressure on these strips and they should snap. But keep the drywall paper attached as much as you can.

Then I used my brad nailer to attach them to the arch and doorway. I also found that nailing from the sides was helpful in closing the gaps and making the arch smoother. I accidentally bent the wrong side on the first strip (that’s the one with the brown facing outwards) I don’t think it matters since it will be completely mudded over with joint compound. Mistakes happen!

Step 8 – Add arch corner bead
To make the arch look really seamless, I got arch corner bead. This helps to smooth the structure of the arch. Without it, it would take ages to smooth out all the drywall. Trust me, it’s worth $25.
Measure approximately how long of a piece you need and cut it with wire snippers. It should be as long as the arch plus a few inches to the straight part of the door frame. Then open the arch corner bead by ripping off the tear strips.
Add a generous amount of drywall mud to “glue” the strip on the corner of the arch. You need to add the joint compound to the outside and inside of the frame.

Then press your arch strip into it.

Add another layer of mud on top of the drywall corner bead. Do your best to smooth it out. But you will be doing at least 3 layers of mudding so don’t aim for perfection at this stage.
Step 9 – Add straight corner bead
Cut your straight corner bead to the bottom part of your arch doorway where the frame is straight. Start where the arch corner bead ends. I made the mistake of having a gap between the 2 corner beads and it was so hard to make it look seamless. Learn from my mistake!
Using the same method to apply the corner bead. Add the joint compound to the outside and inside of the frame. Then press your arch strip into it. Add another layer of mud on top of the corner bead and smooth it out.
Step 10 – Tape all drywall seams and add a layer of drywall
I used drywall tape on all the seams where the drywall met. Then I used my pre-mixed drywall mud to smooth this out as best as possible.

I am going to be honest, I watched a lot of youtube videos before I really understood how to do this. My best advice is to layer the joint compound and try to smooth it as you go.

Step 11 – Sand, mud and sand some more!

Here’s where you need a bit of patience. You’ll be sanding your corner arch and mudding a few more times. Be patient and let the mud dry between coats. This will cause a lot of dust. Do not skip on wearing a mask, gloves and eye protection.

Step 12- Prime and Paint your arched doorway

Once your happy with the mudding result, prime your archway and paint it! I needed 1 coat of primer and 2 coats of paint. I used the same paint that I’ll be painting my entire main level which is White Dove by Benjamin Moore.
It’s so amazing to see how you can turn a rectangular door frame into an arched doorway! It’s makes a huge architectural statement in any home! You can turn this into anything you like. I’ll be making this into an arch appliance pantry. This is a DIY project anyone can do. Applying and smoothing the joint compound will test your limits!

If you’d like to see part 2 of this project where I add all the details like cabinets and electrical outlets to make this into a pantry, stay tuned!

If you like this project, make sure to pin this!
Leave a Reply