I’m giving my kitchen a budget makeover. Instead of ripping out all the cabinets and doors which would cost over $20k, I am mindfully swapping out a few pieces.
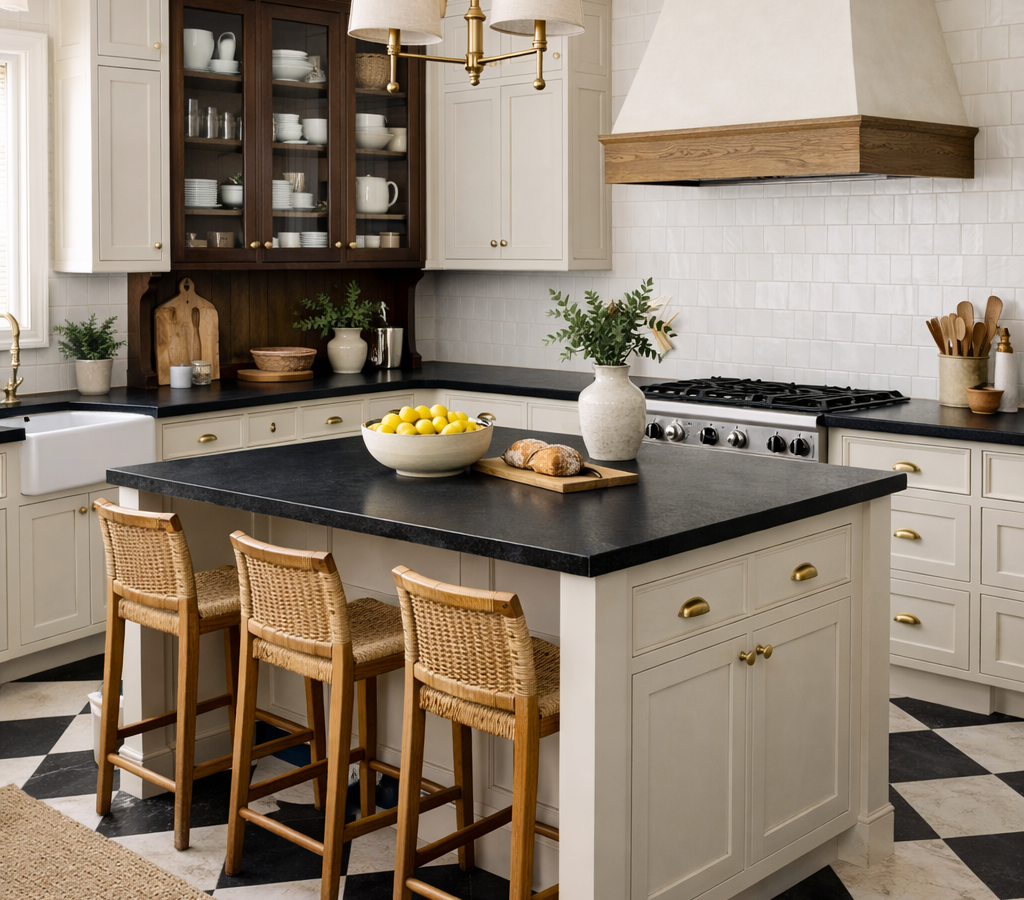
I LOVE the look of a walnut kitchen cabinet hutch with doors. But, if you’ve ever priced out a custom walnut kitchen hutch, you already know that they cost thousands of dollars. That’s NOT in my budget.

So I turned to IKEA. I knew there was a way to use the Walnut IKEA doors. I wanted the warmth of walnut, the look of a built-in, and the practicality of upper storage without sacrificing counter space. So I started with the SEKTION tall pantry cabinet from IKEA and transformed it into a completely custom walnut kitchen counter hutch.
In this tutorial, I’ll walk you through exactly how I modified the depth, shortened the height, applied a walnut finish, installed custom shelves, and finished it with filler pieces and crown molding to achieve a true built-in look.
Here’s everything I used to create this look:
Step 1: How to Cut Down the Depth of an IKEA Pantry Cabinet

One of the biggest limitations when working with IKEA tall cabinets is depth. IKEA does not offer a 14-inch-deep pantry cabinet in 30″ wide size (which is what I needed to fit my space). The standard 24-inch depth would have extended too far over my counter.
To solve this, I customized the cabinet depth myself.
The most important detail in this step is to cut from the back of the cabinet panels, not the front. The front edge is factory-finished, and the hinge system relies on that edge remaining intact. If you cut from the front, the door alignment becomes extremely difficult and can compromise the finished look.
I attached my circular saw to my cutting guide so I could easily cut this down on the floor. I elevated the panel off the floor with a few 2×4’s underneath it. Using the cutting guide ensures that you cut the same amount off each panel, which is really important when you get to cabinet assembly.
You can easily identify the back side by locating the groove designed to hold the MDF backing panel. That groove indicates the back of the cabinet. After carefully measuring and double-checking my cuts, I reduced the depth from 24 inches down to 14 3/4 inches (which is the depth needed to accommodate the drawer).
If you are searching for how to make IKEA cabinets shallower, this is the key step that makes it possible.
Step 2: How to Shorten a tall IKEA Pantry Cabinet
Because I have 9 foot ceilings I had to cut the 80″ tall pantry to fit on top of my counter. In this corner, I used to have a 30″ cabinet that I removed.

I started with the 80-inch tall pantry and cut it down to 71 inches. I figured this size by taking my ceiling height (108″) and subtracting the height from the floor to the top of the counter (36″). I gave myself an extra inch just in case I made any errors since the top would be covered with crown molding.
I made sure to cut only from the top and left the bottom untouched. Preserving the bottom allowed me to keep the factory-drilled holes intact, which simplified the reassembly process significantly.
If you are wondering whether you can cut down IKEA cabinets, the answer is yes, but precision is critical.
Step 3: Applying a Walnut Finish with Contact Paper

To create the walnut cabinet look without replacing all of the components, I wrapped the cabinet insides and back panel in walnut contact paper.
Although you can apply contact paper after assembling the cabinet, I strongly recommend applying it beforehand. Working with flat panels makes it much easier to achieve a smooth finish and avoid bubbles or wrinkles.
For the back panel, I intentionally used a wide roll of contact paper so that it could be covered in one continuous sheet. This creates a seamless appearance and makes the cabinet interior look cohesive and custom rather than pieced together.
I did find that the back panel wrinkled a bit during assembly, but I peeled it off and smoothed it back down. Not a wrinkle in sight!
This is one easy step to make IKEA cabinets look like a true walnut cabinet. If you’re not using the glass doors, you can skip this step as you won’t be able to see the inside.
Step 4: Re-Drilling Holes After Cutting the Cabinet and Assembly

Because I shortened the cabinet from the top, I needed to recreate the assembly holes in that section. These holes are important to assemble the cabinet and the anchoring system
To do this accurately, I used the pieces I had cut off as a template. I aligned them carefully with the modified cabinet panels, marked the hole locations, and drilled new holes only at the top. Since I did not alter the bottom, all of the original factory holes remained intact.
Once the holes were drilled, I assembled the cabinet exactly according to IKEA’s original instructions. This approach preserves the structural integrity of the cabinet while allowing for custom sizing. I used a speed square to ensure it was still square.
Step 5: Installing the Back Panel
After assembling the cabinet frame, I attached the MDF backing panel using the nails provided by IKEA. Usually this is inserted into the grooves, but I had cut the grooves off. Instead, I flipped the cabinet over so the back was exposed and placed the backing on top. Then I hammered nails to secure it to the backing.
When we lifted the cabinet into place later, the contact paper shifted slightly and created minor wrinkles. This can happen during movement.

I simply reached inside, gently pulled the contact paper off, and smoothed it back into place. Once adjusted, the finish looked seamless again.

Step 6: Building Custom Walnut Shelves
Because IKEA does not offer walnut shelves, only white shelves, I created my own using the large panel.
I measured the inside of the cabinet, then I cut an IKEA panel down to the appropriate shelf dimensions (14 1/2x 28 1/2″).
To secure the shelves, placed them on spacers that I cut from scrap wood. Using a level, I drew straight guide lines on the outside of the cabinet to ensure the shelves would sit perfectly even. I nailed from the exterior of the cabinet into the shelf along the guide line.
Then, I reinforced each shelf using small screws that I countersunk for a clean finish. Nailing slowly and following the level line is important to avoid splitting the wood and to maintain straight alignment.


If you are looking for a way to create DIY walnut cabinet shelves, this method keeps the interior consistent with the overall design.
Step 7: Installing Cabinet Doors Over Contact Paper
One advantage of applying contact paper before assembly is that unused pre-drilled holes become visually hidden beneath the finish. All those holes ruin the aesthetic of a custom looking cabinet.

You can still locate them by gently running your fingers along the surface until you feel the slight indentations. Once located, you can install the hinges and attach the doors as usual. Because I preserved the factory-finished front edges during the cutting process, the doors aligned properly without issue.

Step 8: Upgrading with Brass Cabinet Hardware

Hardware plays a major role in elevating the overall design. I chose to use three different styles of brass hardware to add visual interest and dimension. Mixing hardware styles can create a layered, custom look that feels more high-end and thoughtfully designed.
You only get one shot at drilling the holes into door and drawer fronts. I suggest getting a cabinet jig. Take your time to set up your cabinet jig. Place it on your door or drawer and mark the holes. Then, measure and make sure the holes will all align. Then, drill the holes for the cabinet hardware.
For the hardware with a backplate, I added a bit of glue to make sure the backplate wouldn’t shift.
Step 9: Adding a Side Panel to Make the Cabinet Exterior look like Walnut
To achieve a true built-in appearance, I added filler pieces to surround the cabinet. These additions make the cabinet feel integrated into the space rather than simply placed within it.
Although I could have used contact paper on the side, I chose to use the IKEA ENKOPING panel instead. I felt like this would look more high end. I cut the side panel by measuring the side of my cabinet and adding the thickness of the door/drawers. I cut my panel at 15 1/2″ wide x 71″ tall using my rip guide.

Make sure you have one nice factory finished edge that will line up with the front of the cabinet. I cut this using my circular saw and cutting guide.
I nailed this into place using 3 nails along the backside so they wouldn’t be very visible. Then, I clamped the countertop hutch to the my existing cabinet and drilled them together, from the wall cabinet. I didn’t want any exposed screw heads in my IKEA walnut cabinet since it has glass doors.

Step 10: Mounting the Cabinet Securely
Before attaching the doors, I mounted the cabinet securely to the wall. Use the rail system IKEA provides.
This step is essential because tall cabinets become significantly heavier once doors and hardware are installed. Always anchor the cabinet into wall studs to ensure stability and safety.
Step 11: Adding Filler Panels for a Built-In Look
After I installed the cabinet, there was a small gap between the cabinet and the wall. I installed one filler panel along the exposed end of the cabinet to eliminate a small gap.
I measured and cut a thin strip that was the entire height. At this point, I ran out of the nice edges. Since this would be mostly hidden, I used wood edge banding and stained it. One of the shortcomings of using the IKEA system is that they do not have edge banding with the ENKOPING doors.
I took a piece of scrap wood and secured it to the back. I then nailed this in place, from the inside of the cabinet, making sure my filler piece lined up with the front of the door and drawer.
Step 12: Filling the Gap at the Top of the Countertop Cabinet

The filler piece at the top was easier to install. I cut a piece from the large panel, making sure the wood grain would go horizontal. Then I attached it to the top of the cabinet. Just be sure that the exposed edge already has the edge banding (or add one yourself).
Step 13: Installing Crown Molding on IKEA Cabinets
Crown molding is what ultimately transforms this IKEA hack into a built-in feature.
I carefully measured and cut the crown molding pieces, taking my time to ensure clean angles. Cutting crown molding can be hard, so I usually make a template to ensure I don’t end up wasting it (it’s also very expensive!)
I tested 3 different stains and found this walnut stain was the best match, it was almost identical to my relief!

Instead of assembling it overhead, I pre-assembled the molding on the ground using a pin nailer. Pre-assembling allows for more precise angle alignment and makes installation much smoother.

Once assembled, I lifted the crown molding into place and secured it to the top of the cabinet with my nail gun, completing the built-in effect.
Final Reveal: A Custom Walnut Kitchen Hutch for Less

My budget kitchen makeover isn’t done yet, but I am so in love with how this DIY kitchen counter hutch turned out! No one would be able to tell me that’s IKEA!
For this IKEA countertop cabinet hutch hack, I started with the 80-inch tall SEKTION pantry cabinet. The original depth of the cabinet was 24 inches, but I reduced it to 14 inches so I could preserve usable counter space below. I shortened the overall height from 80 inches to 71 inches to better fit my nine-foot ceilings. To achieve the warm walnut finish, I used high-quality contact paper, and I completed the built-in look with filler panels and crown molding.

What started as a standard IKEA tall pantry cabinet is now a custom walnut kitchen counter hutch that preserves functional counter space, fits beautifully with nine-foot ceilings, and looks fully built-in with the addition of filler panels and crown molding.
Here’s everything I used to create this look:
This IKEA pantry hack demonstrates that with careful measuring, precise cutting, and thoughtful finishing, flat-pack cabinetry can be transformed into a high-end focal point for a fraction of the cost of custom work.
If you are planning your own DIY IKEA kitchen cabinet, take your time with measurements and always cut carefully. The precision in those early steps determines how polished the final result will feel. If you love this project, make sure to pin it! I’ll catch you on Instagram for more DIYs
Leave a Reply