I built a custom desk for my friend’s home office. To start things off I hacked an IKEA ALEX drawer unit. I transformed this basic unit into a beautiful and modern piece. In this post, I will share an easy tutorial of how to add trim and a fresh coat of paint to upgrade the IKEA ALEX cabinet.

I have done several desk hacks with the IKEA ALEX drawers unit. It’s a hardworking piece of office furniture with storage space for pens, papers and other office supplies. It’s also the perfect height to be desk legs.


Tools and Materials
Shop them easily here
- Trim 4 x 1/4-inch x 1-inch x 4 Feet Poplar Hardwood Hobby Board
- Gold Knobs
- Wood filler
- Wood Glue
- Pencil
- Measuring tape
- Protective eyewear
- Ear protection
- Mask
- Zinsser BIN primer or Extreme Bond Primer (I have used both and vouch for either of them)
- Paint. I used Pewter Green by Sherwin Williams
What type of trim should I use on the drawer fronts?
I took my ALEX drawer front to the hardware store. The top drawer fronts are really small so I didn’t want the trim to be too wide. I picked a 1/4-inch x 1-inch x 4 Feet Poplar Hardwood Hobby Board. This trim will mimic a shaker style drawer design.
What type of paint should I use on IKEA furniture?
If you follow these steps below of sanding and priming, you can use any interior latex wall paint. I am using leftover wall paint from my hallway board and batten. If you’re concerned about paint chipping, you can use cabinet and trim paint, which is more resistant to scuffs. I’ve used wall paint on many pieces of furniture and never had issues with paint chipping. Do not use chalk paint without the proper preparation.
Step 1: Measuring and Cutting Trim

First up, I measured and cut all my trim pieces. I made my cuts on a miter saw set to a 45° angle. Each piece will be cut like a trapezoid.

A mitre cut gives a more professional finish when putting all the pieces together. You could also do straight cuts if you’re not comfortable with mitre cuts. I simply measured the edges of the drawer fronts and cut the trim to the corresponding size.
Quick tip: to save time, cut one edge of your trim. Then, instead of flipping the saw blade, flip your trim over. Make sure the cut will form a trapezoid. This trick will make cutting all the trim so much faster versus constantly moving the blade back and forth.

Step 2: Prepping Cabinets for Paint
Note: You can leave your pieces unassembled or paint an assembled cabinet. The steps are the same.

To take this IKEA ALEX hack to the next level, I knew I had to paint it. Next, I prepped the cabinets for painting. This includes sanding, priming and then painting. Trust me, don’t try to paint your cabinets without doing the prep work first, you’ll regret it because they will easily scratch.
I started by sanding all the surfaces using a pretty gritty sandpaper (p60-p80) to really scuff them up. You want to get all the shiny gloss off the surface of the cabinet so that the primer and paint will stick well. You don’t need to sand off the entire surface. Run your hand over the surface to make sure it feels rough.

Without sanding, the paint will always chip. Trust me, I have painted tons of IKEA furniture, and none of it has chipped. Make sure you use protective gear for this step, including eye and ear protection but especially a mask, since this will create a lot of dust and debris.
Use a cloth to wipe off any excess saw dust.
Step 3: Adding Trim to Drawer Fronts
Once the drawers are prepped for paint, attach the trim. The trim goes around the edge of the drawer front. Attach the trim first by applying a thin bead of glue. Don’t apply too much glue because you don’t want it to ooze out the sides. Then, use a pin nailer with 3/4″ nails to secure the trim.

I really love my pin nailer. I think it is the greatest tool for when you need a little bit of force and don’t want to use a brad nailer. Also, those nails are so tiny you can even skip the wood filler!
If you don’t have a pin nailer, you can try without it. Add weights on top of your trim to create strong adhesion between the drawer front and trim.

Once the trim was attached to the drawer fronts, I filled any gaps in the corners with wood filler. After it was dry, I sanded the corners smooth with p220 grit sandpaper smooth. Now, the cabinet is ready for priming.
Step 4: Priming the Drawer Unit and Drawer Fronts

A word of advice: never ever paint furniture without priming first. The best primer to use is a shellac-based one, like Zinsser BIN primer. It has never failed me!
Use a foam roller to prime the larger pieces, and a small paint brush for the drawer fronts. Also prime the edges since they will be painted too. Let the primer cure for about 24 hours. Ideally, you would give it a bit longer, but I was so excited to paint!

Step 5: Painting the Alex Drawer Unit

Before starting painting the drawer unit fronts and sides we want to start with a smooth surface. Some bubbles and texture came up after priming and so I sanded them lightly by hand to get rid of them. If I used my sander, it would take too much primer off. This is the best way to get that really smooth finish when painting furniture. I used a P220 grit sandpaper before starting painting but also in between coats.
I applied 3 coats of paint. I used a foam roller on the larger areas, and brush on the small areas. I always talk about the third coat magic, that’s where the real beauty comes through.

A quick tip: If you need to leave your paint roller to use the next day, wrap it up in a plastic bag and put it in the fridge. When you take it out it’s still moist so you can use it for all your coats.
Step 6: Attach the Drawer Hardware

To add the knobs, I found the centre point of the drawer fronts. The easiest way to do this is to lightly draw on an X on the drawer front from corner to corner. The middle of the X is the middle of the drawer.
I drilled a pilot hole. Then I threaded these contemporary brass knobs. It was just that perfect touch of sophistication that this office needed.
Step 7: Assemble Alex Drawer Unit
Now that the cabinet and drawer fronts have been painted, it’s time to assemble the ALEX unit. I was really excited to see this drawer unit come together because my friend really needed some serious organization here.
Step 8: Attach the Desktop

The custom desktop tutorial with built-in nook will be featured on a subsequent blog post. But, if you need a simple desktop, you can pick up a piece of ¾” plywood from the hardware store. Get the hardware store to cut it to your dimensions.
To disguise the plywood edge, add edgebanding. It’s so easy to use. You simply iron on the edge banding. Then sand the entire surface with p220 grit sandpaper. Once it’s clean, stain and seal your desktop!
You can place the desk on top and secure it to the ALEX unit with small L bracket underneath
Admire your IKEA ALEX Drawer Fronts!
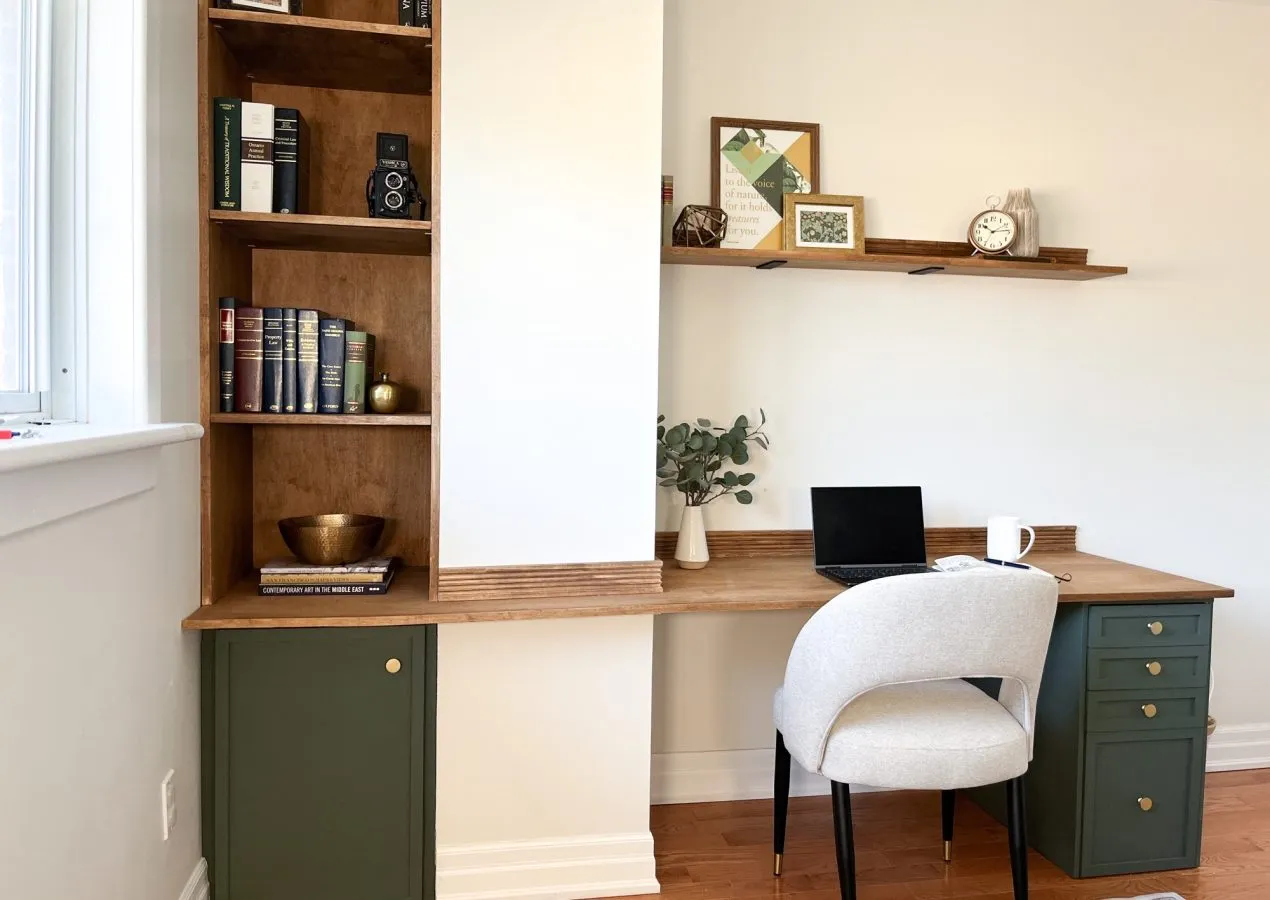
I love hacking IKEA furniture, and this IKEA ALEX Desk unit looks so custom! Adding trim and paint is the easiest way to take basic IKEA furniture into a piece of custom cabinetry. Even if you’ve never tackled any DIY, this is easy enough that anyone can tackle it.


This IKEA ALEX drawer unit is unrecognizable. No one would believe me if I told them I got this from IKEA. The shaker style drawer fronts make it look so expensive. With the touch of the gold knob and deep green paint, this IKEA ALEX drawer adds beauty and function to this custom home office.


If you love this project, be sure to pin it! Feel free to leave a comment below or reach out to me on Instagram.
Leave a Reply