My DIY wall board and batten is a show stopper in my small entryway. It’s the kind of space that my guests walk into, and pause. This style can be replicated in any bedroom, or living room! It’s not your regular board and batten wall- it’s an Elevated DIY Board and Batten Wall with decorative trim.

My entryway did not always start out like that. I live in a split level townhouse. The entryway is actually quite small: it’s a 6 x 6 ft entryway. When you enter, you can either take 8 steps to go upstairs to my main level or 8 steps down to go in to our lounge / flex space. I really wanted my entryway to be something beautiful because we have 25 foot ceilings. There was so much potential. When I started off all I had was a basic shelf with some artwork on it.

I am in love with accent walls. I think they are much more timeless and modern than putting up artwork. So I knew I wanted to do some type of a feature wall to WOW my guests when they enter into my home. This entryway leads into a long hallway in my basement where I did a more traditional style board and batten wall. Check out that post if you’re looking for a more traditional board and batten tutorial.
In the entryway, I decided to make large squares and then add a decorative trim inside of them. This was a really challenging because it’s not just squares or rectangles. Because of the angle of the stairs how to make quite a few triangle boxes and these triangles were really tricky. I’m going to show you how I planned this entire wall, made all the cuts and put all the finishing touches to make it look really professional.
Materials
- Primed MDF boards
- 3.5” flat boards
- Decorative trim
- 1 ½” 18 gauge brad nails
- ¾” 23 gauge pin nails
- Drywall spackle
- P220 grit sandpaper
- Paintable Caulk
- Caulking gun
- Bowl of water
- rag
Power Tools to create a DIY board and batten wall
- Mitre saw. This is a great beginner mitre saw
- More Advanced saw. This is what I use
- 18 gauge Brad nailer. I love this because there is no air compressor required so you can work really fast
- 23 gauge Pin nailer. When using decorative trim, this tool has much thinner nails that prevent the trim from splitting
- Ladder. This is my favourite ladder! SO many safe orientations for the stairs
Step 1 – Plan your entryway DIY board and Batten Wall
When you’re planning an entryway board and batten wall, make sure the design is to scale. I looked at a lot of inspiration pictures to get board and batten wall ideas. I knew I wanted to go with large squares. I didn’t know how big my squares should be though! Here’s how to figure it out

1 – Measure the length of your entryway. In my case, I measured the wall leading upstairs and downstairs. In an ideal world, the squares should be the exact same size. I was prepared that my design might leave the squares on the facing walls slightly different, but to my delight and very good fortune, the walls were the SAME LENGTH!!! This meant that I could do the squares the exact same size, but I needed to figure out how many of each I wanted.
2 – Measure the height of your wall. When I started the project, I wanted my design to go all the way to the ceiling. But, I wasn’t very confident I could climb a 25 ft ladder, so I decided a good place for the vertical pieces to end was in alignment with my railing on the main level. Picking a natural point like this makes the wall seem like it was supposed to end there (and not that I chickened out!).
3 – Measure the width of the MDF boards. My boards were 4″ boards, but measured 3.5″. Most boards are 1/2″ skinnier than the size of the board.
4 – Use this tool to figure out the size of boxes. It doesn’t take into account how many rows of boxes you’ll have, but it gives you a good starting point to the columns of boxes you’ll have.
5 – Use a piece of paper to figure out number of each boxes. I got to work, and drew a few different configurations. There really is no “right” in the spacing, and you can nail rectangles if you like that better!
6- Tape your design to the wall. If you’ve checked out my tutorial for board and batten wall, or geometric accent wall, you’ll know that inexpensive dollar store painter’s tape has a critical role in all my accent walls. I tape my design to the wall. This really helps to visualize the spacing. I used a wall laser level and ended up with a few different options before picking one. For me, I take my time in deciding the pattern because the last thing I want is to spend weeks building a wall that I don’t like the spacing of! I also try to avoid designs where light switches will go through the vertical battens. You have to do fancy cuts, and it ends up being a lot of work.

For reference below are my exact measurements:
- 4″ boards (3.5″ measured)
- Each square is 36″ (measuring the inside of each box)
- There are 3 squares that fill the width of my wall
- 3 squares high (this aligns to my railing height)
Step 2 – Remove Your Existing Baseboard
I hate removing my baseboards, but instead of having a baseboard and then horizontal pieces nailed on top, which would be too thick, I removed my new baseboard.
1- Use a utility knife to cut the caulking. The caulking is like a glue that seals the board to the drywall. If you do not cut off the old caulking, it will rip off the drywall as you pry the board off the wall.
2 – Then use a mallet and prybar to remove the baseboard. Wedge the pry bar in between the baseboard and hit it with the mallet. The board will start to come off the wall
3 – Carefully (and make sure you’re wearing gloves) pull the baseboard off the wall. My builder used SO many nails so it’s really hard to get the boards off the wall. Once it’s off, a good idea is to hammer the nails down flat so they do not injure anyone when you discard of it.


Step 3- Cut the Boards on the wall with the most Squares (Pick the Easiest Wall to Start With)
Some of your walls will have the awkward triangle shapes. Do not start there. Of course, I started tackling the hardest wall first. I do not recommend it because it does not give you confidence and excitement to build you wall. Since you’re picking the wall with the squares to build first, let’s cut all the vertical boards first.
1 – Any time you are making cuts in which you’ll have the same measurement cut several times, use a stop block. It is so fast to cut all your boards with a stop block. A stop block is an object that is clamped to your workbench. Then, without moving the saw or the stop block, you cut every piece of wood to the same measurement. GENIUS isn’t it? You only set up the same once, and then you don’t have to measure every single board (that would take so much time!). Measuring each board leads to mistakes (even a 1/2″ or less can make the wall look sloppy!)
How to set up a stop block:
- Clamp an object to the end of your workbench (like wood or in my case, a case of sparkling water)
- Place your mitre saw on the table and lock the blade down (ensure it’s not powered on)
- Adjust the position of the saw so the distance from the saw blade to the stop block is what you’re looking to cut.
- Make the first cut, measure to ensure it’s accurate. Then cut all the rest of your wood in a flash!
2 – Now that you have several vertical boards, use a laser measurer to get the dimensions of the horizontal boards. This laser measurer also has a built in level, so you know the measurement is going to be accurate.
3 – Cut a few horizontal boards. I like to cut a bunch of boards, attach them to the wall and then cut more. Just in case I made errors in measurements, this doesn’t mean that all my boards will be the wrong size!
Step 4 – Watch the Board and Batten Accent Wall Come to Life!
1 – Start in the corner and check if the wall is level. If it isn’t don’t sweat it. Use a level to make sure it’s straight.
2 – Load up your brad nailer with 1 3/4″ nails. Applying pressure, nail the first board into the wall.
3 – Attach the top horizontal board with you nail gun. Start to build your design with your vertical batten pieces, and horizontal pieces.

My top tips for your entryway board and batten wall DIY:
- To make sure you get even batten spacing, use a spacer that is cut to the distance between the boards. This ensures that your boards are level and takes less time.
- I don’t use liquid nails because I don’t want to rip up my drywall in case I don’t like this design and want to change it in the future.
- I do not stress about getting the boards in studs. Heck, I didn’t even use a stud finder for this project. Shoot your nails in at angle so the criss cross (make an X) and the caulking will help to secure them to the wall.

Step 5 – Time to tackle the Triangles
Get as far as you can with the straight boards. You will reach the point where you need to tackle the triangles. To be honest, I struggled with this section. A mitre saw only measures to 45 degrees. I used a triangle calculator and found out some of my angles were greater than 45 degrees. I used templates, I marked my boards and cut with a circular saw, and this worked for my flat boards. Remember, small gaps can be concealed with wood filler! This video was really helpful for the angles larger than 45 degrees

Step 6 – Add the Detailed Trim Work
You can leave this as is. It’s a great DIY project: a modern board and batten. However, I wanted to tie in the decorative molding I used on the hallway board and batten. This simple wall wasn’t giving me the WOW Factor I was chasing. The next step was to add the decorative molding.

1 – Unlike the flat boards, the decorative trim all needs to be cut on a 45 degree mitre cut to form the squares. There’t no way a 90 degree cut can make the curves of the decorative trim line up. To make the perfect square, each board should be a trapezoid so all the edges line up.
2 – I used a stop block again to make all my cuts for the decorative trim. There were some nuances in the length of the boxes, so some of the trim had to be re-cut, but I was pretty happy at how fast this project was coming along.
3 – I always use a pin nailer when I am doing any type of decorative trim work like I did in my living room wainscoting or master bedroom accent wall. A pin nailer is a great tool. It’s similar to a brad nailer but the nails are headless, and much smaller. The biggest benefit is that it doesn’t split the wood of thinner decorative trim.

4 – If you thought that cutting the flat boards for the triangles was hard, cutting the decorative trim was EVEN HARDER. My only consolation was that there was only a few cuts but they made my brain hurt. In retrospect, I should have used an extra piece of trim to make a guide so I could easily tell which way my mitre saw should be angles for those cuts. I used the method in this tutorial, which helped me a LOT! It takes some time to wrap your head around the cuts and how to set up the saw. It helped me the most. I did my best to follow the guide and have the smallest gaps between the boards. Small gaps can be concealed with wood filler, but large ones cannot.


Step 7 – Tackling High Ceilings
Completing the design that was closest to the floor was the easiest place to start. That way, I didn’t have to get on to a ladder. When tackling that high ceiling, I used 2 different types of ladders: a regular 9ft metal ladder, and a Little Giant Ladder that folds for the stairs, but also extends up to xx feet to reach the ceiling (just in case I was going to be ambitious enough to tackle that!)


I really loved the folding ladder. I felt completely safe on it. If you’re going to tackle a design like this on your stairs, please don’t make a jig. Be safe and use the right ladder. I am not scared of heights, but I still found it intimidating working on the stairs. The end result of the DIY board and batten on the tall wall is STUNNING!
Step 8 – All the Finishing work
Would you believe that all the trim work took WEEKS? And, I wasn’t even done yet! I still needed to do all the finish work on my DIY Board and Batten Wall.
- Wood Filler will go on any spot where 2 flat boards meet each other (ie a vertical or horizontal space)
- Wood filler will also be filled into the holes of the brad nails.
- Luckily the pin nailer hardly leaves a hole behind that is filled when you paint!
- Caulk will run along the edges where wood and wall meet
1 – When you fill nail holes, use the least amount of wood filler possible. You want enough that it forms a little bump, but too much filler means that you will be sanding the boards FOREVER to get a smooth finish
2 – Filling the gaps between the 2 straight boards, use a putty knife. Again, just use the least amound of wood filler needed

3 – Once the wood filler is dry, sand with p220 sandpaper until all the boards are smooth. Even a slight imperfection of bumpiness will show through when you paint the boards.
4 – Where the boards meet the wall, caulk the edges. This is a lot of caulking work. Cut the smallest hole possible in your caulk. Load it into your caulking gun. Squeeze a bead of caulk. Wipe off any extra with a wet finger or a baby wipe. I always say you don’t want this to look like a DIY board and batten wall. You want it to look professional, so these time consuming steps


Step 9 – Paint your walls
There was a lot of walls to paint and I thought it would be a lot faster to paint with a paint sprayer. Painting all the decorative trim with a brush, rolling the flat boards and then also rolling the walls inside the squares seemed like it would take forever.

The difficult part about using a paint sprayer is that you have to tape every single nook and cranny. Especially in an open space entryway, there can be a lot of overspray. I thought I did a good job of taping, but as soon as I started painting, my husband signalled to me that there were gaps and the paint was landing on our hardwood floors. In my panic, I ripped off the tape + plastic to try to clean it. TBH, to this day a bit is still left over.

I switched to using a brush and roller. While this took time, I feel a lot more in control of a brush and roller than I do with a paint sprayer.
The Reveal of my Entryway DIY Board and Batten!!
I couldn’t believe I made it to this point. This was a daunting project. But the impact was unreal. The first time I cleaned up my entryway and walked inside, I was SPEECHLESS. I could not believe that I did this myself – all those weird angles, getting on to a ladder, and making what seemed like 4892 cuts! If you do this project, you will not regret it. If you try this project, I would love to see it. Send me a note on Instagram.


The Before and After: Board and Batten Entryway
There is nothing as satisfying as looking at before and after pictures of a space! Take a look at how must character and opulence this board and batten entryway adds!

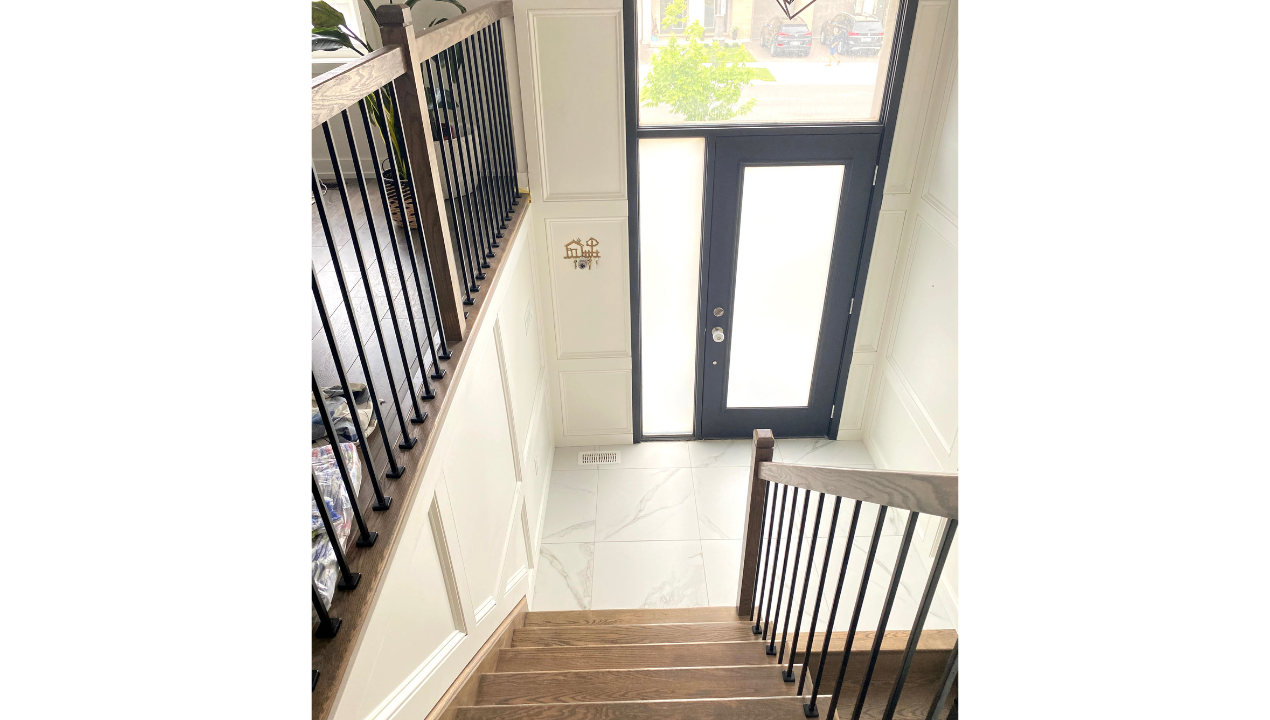
This is one of my favourite views because it shows the transition of the entryway to the downstairs hallway board and batten. I continued the same thickness and width of the flat boards, and the decorative trim.


This wall was so sad with a shelf and sign. I love the wall so much more with the DIY board and batten. All the angled cuts really came together in the end. I still need to add a few hooks here, but I already love it!

The transition down the stairs is seamless and looks perfect. All the time it took to conquer the angles was well worth it!


Leave a Reply