Every Living room needs a focal point. Our living room has a very long wall and I’ve been uncertain of what to do with it until I finally decided it was time to DIY a living room accent wall! I love a good accent wall. It adds a great focal point to the room. I really think feature walls are better than adding any wall art because they’re timeless and more minimal.

This accent wall will mimic the traditional accent wall in my bedroom except I’ll be adding a rectangular box around it. If you’re looking for more accent wall ideas, I also did a very cool box accent wall in my powder room, but that’s more modern and I am going for a more traditional vibe in my living space. I divided this project up into two phases –
Phase 1: the rectangle trim molding box (covered in this post)
Phase 2: the picture frame trim molding box (next phase)
What you need to build your living room accent wall
Power Tools
- Mitre saw
- pin nailer
- Pin nails – I used 1” 3/8
- Laser measurer
Materials
- Trim molding (I used 10 pieces for this wall)
- A spacer
- Level
- Ladder
- Paint supplies (paint, brushes, roller)
- Wall sparkle
- Putty knife
- P220 sandpaper
- Caulk
- Water in a bowl
- Old rags/ baby wipes
- Clamp
- Scrap wood
Step 1: plan your project
1. Measure the height and the width of your wall. I use the laser measure because I find it to be so much more accurate and easier to use
2. Use a piece of paper to draw out your boxes. I didn’t account for the placement of my outlets and struggled to figure out a solution after I made all my cuts. Be sure to measure these and see if they will interfere with your boxes! I typically plan a few different designs and then pick the one that I think will look best. Here’s the math:
(I’ve included my measurements to help see how to calculate it
What you need to know:
1. Height of the walls – 93″
2. Width of the wall – 204″
3. How many boxes you want- 4
4. Gap between boxes- 5.5″
5. Gap between ceiling & boxes- 6″
6. Gap between floor & boxes- 6″
How to calculate the height of the boxes
Height of the wall – Gap between ceiling & boxes – Gap between floor & boxes = height of boxes
93 -6-6 =81″
How to calculate the width of the boxes
Width of the wall – (number of boxes +1 x gap between boxes)/ number of boxes
204- (5 x 5.5) /4 = 44.1″ (I rounded to 44″)
Here’s a mock up of my design:
(interior boxes will be covered in a phase 2 post)

Step 2: Prepare your walls
I Started off by painting my wall. There are so many different accent wall colors to choose from – deep greens, blacks, greige, etc. However, since this is an open space, I choose to continue painting my walls a shade of white.
- Remove any furniture that’s in front of your accent wall
- Always wipe down your baseboards before you paint.
- Next, I took down the guitars that were on the wall and patch the holes. I used dap drywall filler and a putty knife. I did two coats and sanded them in between with P220 grit sandpaper.
- Last was 2 quick coats of paint. I use my favourite brush for cutting in. It had a rubber handle and I never need to tape.


Prepare to make your cuts for your living room accent wall
Before we get to our cuts, a few things to note:

- I will use the term mitre cut throughout this post. This refers to a 45° cut.
- Having a dual angle saw make this project extremely fast. However you can do without it but you will need to flip your trim upside down to get the opposite 45° mitred angle. You can also complete this project with a box mitre or mitre snippers if you don’t want to invest in a saw (it will take more time)
Step 3 – Start chopping your decorative molding
Cut list (this was for my wall but will give you an idea):
– 44″ long trapezoid x 8 pieces (horizontal pieces)
– 81″ long trapezoid x 8 pieces (vertical pieces)
1. Set your saw to 45° and chop down one side of each piece of trim. This will make it a lot faster when cutting each down to size. You don’t have to constantly change the angle in your saw.
See image of what the cuts look like. If you’re using a trim that is thicker on one side and thinner on the other, you need to make sure that all your trims are cut the same way


2. Now set up your stop block. Stop block is simply a point that every single piece of wood will butt up against so that you can make your cuts quickly without having to measure each piece. I measure one piece of trim to 44” (I started with a horizontal cuts). Mark it and put it on your saw exactly where are you would make the cut. But do not make the cut

3. Use the clamp that comes with a saw to clamp down a piece of wood where your trim would end. Make sure the clamp is really tight so that when you butt the trim up against it, the wood does not move. This is your stop block.
4. Start making your cuts. Take care not to let your saw move as you handle it
5. Once you are done all the horizontal trim then adjust your stop block for the vertical trim
6. For longer pieces that extend beyond your saw (like the 81” cut), clamp the stop block to the workbench. Take a few pieces of scrap wood and stack them. Clamp them to the end of where your piece of wood ends. Now every piece of wood that you will cut will butt up against your stop block. I added some extra weight of a full can of paint to ensure that the wood does not budge.
7. Make a few spacers as well if you don’t have a piece of wood that is the same size as the gap between boxes, from your bottom baseboards to trim and ceiling to trim. I used a piece of one by six so I didn’t have to make any spacers. This was leftover scrap from a previous project.
Step 4 – Start building your living room accent wall
Here’s where the project starts to get exciting, and your vision comes to life
Note: I used spacers because I know my walls are level. If your walls are not level use a spacer and double check each piece of trim is straight with the level

- Start in one of the corners of the room. Place your spacers into the bottom most corner. Then placed your trim on top to make an L shape
- Nail only one nail on each vertical and the horizontal piece
- Slide your horizontal spacer along the baseboard and nail in in a few more spots
- Now slide along the wall and the horizontal spacer and add a few more nails but don’t go past half way up on the trim
- Attach the other vertical piece, this time using the level. Also only place nails on the bottom half piece of the trim
- Now get on your ladder and place the top horizontal pizza and see how the box lines up. The reason we didn’t nail the top of the vertical pieces that this gives you pack flexibility to squeeze the box in to make it perfect. You should still use a level and make sure that the box is a straight as can be.
- If all your cuts were perfectly the same size in the box should be fun should have a beautiful picture frame molding box

Step 5 – Create the remaining boxes
I typically will make the two outer boxes first and then work my way inside. This ensures that if any of your spacing or the measurements are off then the gap in the middle of your wall is a little bit bigger. Not at the end where it will be more noticeable. 

Build the second and third middle boxes similar the way you build the outer boxes Use the spacers to ensure that the gaps between the boards are the same and use a level to make sure that all the pieces are straight.

Now you could stop here and just create a simple box moulding design. If you do you can caulk, fill any mitre seams and paint the trim to your wall colour now. These steps are previously covered in my board and batten accent wall.


Although this is the perfect simple accent wall for this living space, I will be taking a step forward to add detailed inner trim in phase 2! This will be where I add my personal interior design style.

FAQ
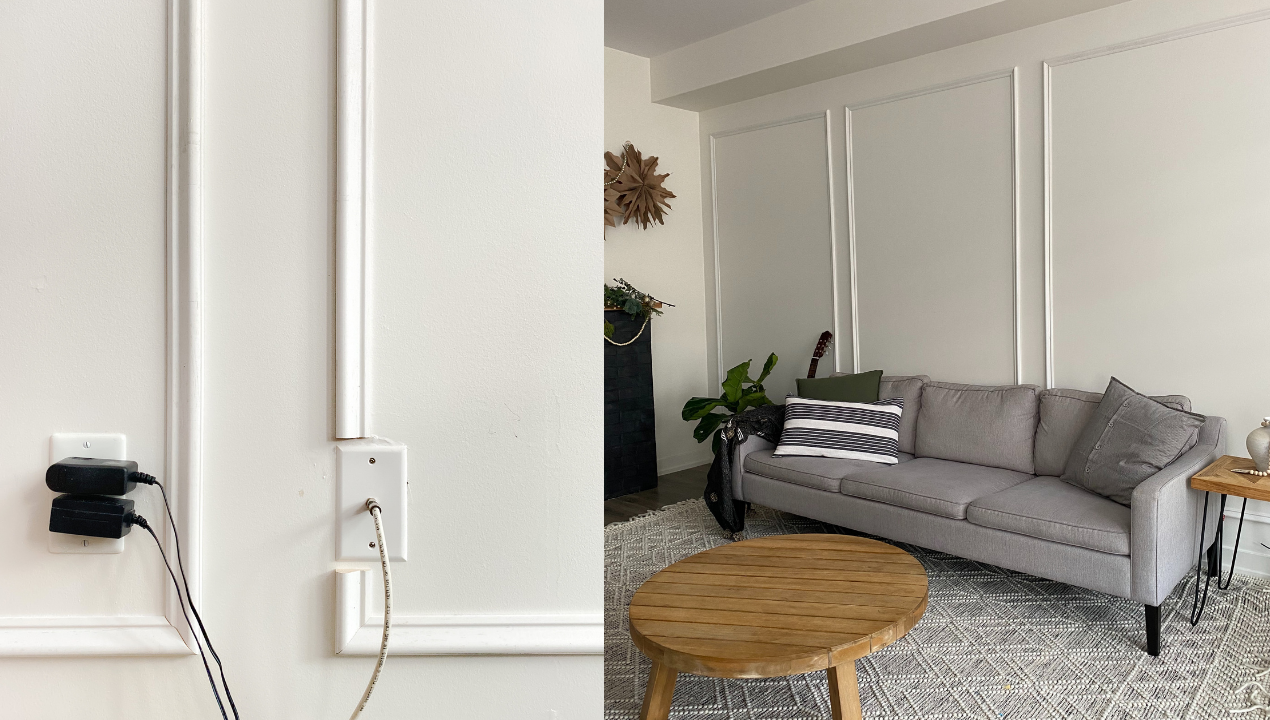
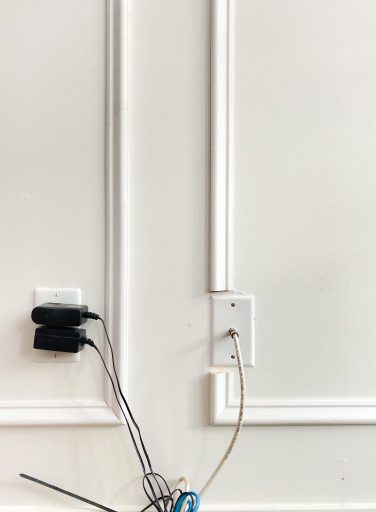
What are my options for working around outlets?
I had 2 outlets I had to work around (see below). One was a telephone line and the other was our internet line. Since we don’t use the telephone line, I capped the wires and patched it up. Now it’s seemless!

I used the my favourite patch. No sanding, no drywall filler. Perfect for any beginner
The second is outlet is an internet connection. It will mostly be covered by a bookshelf, so I didn’t over think it. I cut the trim so there is a 1/2″ gap between the trim and the outlet. I think this looks better than butting the trim up against the outlet, but this is personal preference.
What types of trim can I use?
This primed trim is by Metrie, found at Lowe’s or Rona. Any picture frame molding will work.
What’s the difference between a brad nailer and a pin nailer?
There are so many types of accent walls. Use the right nailer for the type of trim. I used a pin nailer for this project because the trim is a lot thinner than a flat trim. The nailers are smaller and an added bonus is that you don’t need to fill the holes. When I created an accent wall in my bedroom with a similar trim, I used a brad nailer and the trim split in a few places. A brad nailer is better for a thicker flat trim like my bathroom accent wall or a traditional board and batten.
Why didn’t you use glue to stick the trim to the wall
If I get tired of this design and want to take it down, it’s a lot easier to pull the trim off the wall. If I use glue, the drywall will peel off and I will need to fix up the drywall.

Where is your rug from?
I always get asked about this rug! It’s beautiful and soft and does not shed!
What kind of level is that?
The iPhone comes with a built in level. Search for it, it’s under the measure app. Android users can download a free level app from the Google Play store.
What is your accent wall color?
I thought about the color scheme and home decor style for this space. Although I would have loved a black accent wall to add drama, I painted it the same color as the builder. I tried to have the exact colour matched at Sherwin Williams. It is not a perfect match, but it is close enough. I use the Emerald line in a satin finish.


If you decide to build this accent wall in your living room, bedroom or hallway, let me know! I’d love to see it! Follow along on instagram for more budget makeovers.
DIY picture frame wainscoting accent wall - Hana's Happy Home
[…] started off by making the exterior boxes in phase 1 – living room accent wall tutorial. This picture frame wainscoting DIY project can be done in a weekend. This wall would look […]
DIY fireplace for beginners - Hana's Happy Home
[…] This blog post will tell you everything you need to know to build a fireplace. I also have a 2 part tutorial if you’re looking for how to build the beautiful accent wall. […]
Long living room ideas for a town house - Hana's Happy Home
[…] for this space:– DIY Fireplace tutorial– Accent wall: Phase 1 – Box Trim molding– Accent wall: Phase 2 – Picture frame […]
Uche
Lovely transformation. Can you tell me where you got your carpet from? Please and thanks
Hana’s Happy Home
Hi Uche. Here it is: https://rstyle.me/cz-n/hfzv3scy4ux
Entryway DIY Board and Batten Wall - Hana's Happy Home
[…] – I always use a pin nailer when I am doing any type of decorative trim work like I did in my living room wainscoting or master bedroom accent wall. A pin nailer is a great tool. It’s similar to a brad nailer […]