This IKEA Hack learning tower with a chalkboard is a must have for every parent! It’s so much more versatile than a regular wooden learning tower. It’s an easy build too! I used an IKEA BEKVAM stool as the base. Everyone loves IKEA hacks for kids, right? It’s easy to build and inexpensive. I made some mistakes along the way that I’ll share that you can avoid them! If you’re looking for more IKEA kids hacks, check out my MYDAL Bunk Bed Hack and my HEMNES watermelon dresser.
In our household, we are big believers of promoting independence and learning. None of our kids had any screen time before they were 2 years old. Hard, yes. Impossible, no. I wish I had made a learning tower for my boys, but with my 3rd child Sabrina, I knew I needed one. She is only 14 months old but already has a keep interest in being in the kitchen, and being around me. Instead of your toddler hugging your leg while you’re trying to chop veggies, or handle hot food, set them up in a learning tower. When they get tired, move them to the chalkboard. Always stay beside your child in a learning tower. Do not leave them unattended
Contents
- Materials
- Power tools
- Cut list
- What are the benefits of a learning tower stool?
- What age is appropriate for a learning tower?
- Why is a learning tower with chalkboard so much better than a regular learning tower?
- Why did you choose to use chalkboard paper vs chalkboard paint?
- Step 1 – Add chalkboard paper to your boards
- Step 2 – Add a frame to the chalkboard
- Step 3 – Finish the MDF edges with edge banding
- Step 4 – Assemble the DIY learning tower
- Step 5 – Paint and assemble the IKEA hack learning tower stool
- The Reveal of the IKEA Hack Chalkboard Learning Tower!
- How much did this IKEA hack learning tower cost?
Materials
- 2x Cricut chalkboard vinyl
- IKEA BEKVAM Stool
- 1 1/2″ wood screws
- MDF board
- Dowel
- Edge banding
- Wood Trim of choice
- extra long clamps
- Wood stain (I used dark walnut)
- foam brush for stain
- p220 grit sandpaper
- Primer
- Paint (I used Tricorn Black SW 6258)
Power tools
- Mitre saw
- Drill
- Impact driver
- drill bits
- Pin nailer
- Brad nailer
Cut list
This learning tower is for my counter height. You can adjust this to fit to your home needs.
- 2 sides: I cut mine to 16″ x 9.25″. In the end, I wish I had cut them a bit taller to 18″ x 9.25″.
- 1 front brace: I used the scrap that was leftover. It worked out to be the perfect size: 10 1/2″ x 14 3/4″
- 1 dowel: 13 1/4″ long
If you prefer to watch videos, I have a video tutorial on YouTube!
What are the benefits of a learning tower stool?
- Promotes independence in children
- Participation in cooking and cleaning builds healthy attitude towards household tasks
- Enables parents to work alongside toddler
- Safer than a step stool without side reinforcement
After building this IKEA learning tower, I was kicking myself for not having this with my first 2 kids.
What age is appropriate for a learning tower?
My daughter is 14 months old. She cannot walk. She can climb stairs. She needs assistance getting in and out of the stool, but happily played for 20-30 mins. My middle son is 4 years old and too big for this. I suspect the best age for a learning tower is 14 months to 3 years old.
Why is a learning tower with chalkboard so much better than a regular learning tower?

A chalkboard makes a toddler learning tower so much more useful
Toddlers have a limited attention span. After some time of helping parents with cooking, they will either get tired or bored. When I am cooking, I want my toddler to stay close to me. If she’s out of sight, I have no idea what she’s up to. Is she safe? Is she making a mess? A chalkboard is a way to keep your toddler busy, but still keep an eye on them.
It’s also space saving and multi-functional
We live in a small townhouse and I want my kids to have lots of different experiences with play. However, I cannot accumulate too many toys because I don’t have the space. Having the chalkboard as part of the learning tower saves space. Now I don’t need to go buy a standing chalkboard!
Practicing writing/ coloring upright builds different fine motor skills
Most of the time my kids are writing with a paper on a table. My oldest son has struggled with his writing. He didn’t have a lot of fine motor skill and strength. Our speech language pathologist told us that we should also have him draw and write standing upright, like on an easel.
Why did you choose to use chalkboard paper vs chalkboard paint?
I chose to use chalkboard paper because it’s easier to apply, less messy and less expensive than chalkboard paper. I have used chalkboard paint in our first apartment. It was great and really durable. However, I didn’t need a can of paint for such a small project. So I opted for the chalkboard paper. Plus, I have never painted chalkboard paint on furniture. I was nervous that it would chip or have a bad finish on the laminate shelf.
Step 1 – Add chalkboard paper to your boards
I had some scrap boards in my garage, but you can get a couple of inexpensive boards from the hardware store and even get them to cut them down to size. I would not recommend using plywood for this, I would go with laminate shelving with a smooth surface.

I rounded all the edges using p220 grit sandpaper. If you don’t have a power sander, you can do this by hand using sandpaper. It won’t take you long. I am always so paranoid when designing kids furniture that I wanted to make sure all the edges are rounded. Kids are always tripping, falling and getting hurt, right?

I picked up 2 rolls of inexpensive Cricut chalkboard paper. I thought this would be easy enough to apply. It was but here’s a few pointers:
- Initially I was going to add cane the sides of learning tower instead of the chalkboard paper. So I had sanded, primed and painted the laminate boards. This resulted in a textured paper. The Cricut paper needs a VERY smooth surface to avoid air bubbles. I got a few that I could not get out.
- If I were to do this again, I would have left the laminate wood exactly as is, (no sanding, priming or painting). Just clean it well. Make sure there is no dust on the surface. Then peel and stick the chalkboard paper
- Do not leave too much excess. This is where I went wrong. Try to cut the Cricut paper with only a bit of excess. You can definitely cover all 3 boards if you are conservative with your wrapping (unlike me!)
- Wrap it like a present, but I had a very hard time getting the edges that I folded over to stick down. In the following steps, I cut off the paper ont he edge and apply wood edge banding

Step 2 – Add a frame to the chalkboard
Even if I had not cut my chalkboard paper too short, I would have added a frame. Adding a frame gives this chalkboard a much more finished look. It reminds me of the chalkboards that we had in school while we were growing up. I bought trim from the hardware store. I measured the length of each edge of my board and cut a mitre cut of 45 degrees. This gives it a really polished finished look. Just remember to measure to the outside edge of your wood when cutting on a 45 degree mitre. I hand sanded the edges if there was any roughness with p220 grit sandpaper.


I used Dark Walnut to stain the trim with a foam brush. After the trim was dry, I used my pin nailer to attach it to my boards. I used 3/4″ nails so they didn’t go through my boards. I prefer a pin nailer for smaller trim as you don’t have to add wood filler to the nail holes. The nail holes are almost invisible. You can also use a brad nailer or leave off the trim if you don’t have these tools.

Doesn’t that look so cute!? It reminds me of a school class chalkboard. But it’s going on our DIY learning tower!!

Step 3 – Finish the MDF edges with edge banding
Did you know you can easily cover ugly edges on plywood and MDF? You need veneer edge banding. It’s so easy to use. It has a glue backing that is activated by heat. You simply cut it to the length of the edge, and glue it down. Be sure it’s in the exact correct spot because it does not come off once the glue has cooled!
Make sure to cut off the chalkboard paper if it’s over the edges. The iron will melt the chalkboard paper. Iron from one corner to the other edge. Don’t start in the middle.


If your edge banding is thicker than the wood, you can trim it. It’s really easy to trim with a fresh blade on a utility knife. Put your knife on an angle to get the smoothest cut.

Step 4 – Assemble the DIY learning tower
Drill 3 pilot holes on the short edge of the top of the stool. I marked a line to make sure I knew where my board would be on top. If you mark the holes incorrectly, you risk the wood screw coming through the chalkboard. Be careful and take your time.

I also partially drilled in the wood screws. Don’t let them come through the wood. I find this makes assembling boards together easily.

I used 2 long clamps to hold my chalkboard to the stool top. You can also get someone to help you hold the boards, but it’s really hard to screw this together without the extra hand or clamp. Use your impact driver to slowly drive the screws in. If you go too fast, you risk splitting the wood. Do not overtighten the screws. I tried to tighten mine, and a little bit split.


Attach the front chalkboard. To make sure it’s level, stack a few objects. You can also use a level to double check it’s straight. Hold it in place with the clamps.

I used my brad nail gun and 1 1/4″ nails to secure the front chalkboard to the learning tower. You can also use regular screws if you don’t have a brad nailer.

I attached a dowel on the back so Sabrina won’t fall off the back. I didn’t use a piece of lumber, even though I have tons of scraps! I used a rounded dowel because kids will the climbing up and down off this side and I don’t want a sharp edge to hurt them if they bump their head into it. the dowel doesn’t have any edges that could hurt kids.
Don’t use a nail gun to insert the dowel. I tried 2x and both times it wouldn’t go through. In the end, I used a screw. I drilled the pilot hole first. It was SO much eaiser.

Drill a pilot hole into

Step 5 – Paint and assemble the IKEA hack learning tower stool
I sanding with p220 grit, primed and painted the stool Tricorn Black SW 6258. This is the color I painted the door in my entryway. I chose this color because the chalkboard is really dark and I want there to be a beautiful wood and black contrast.

I assembled the IKEA stool as per the instructions. It’s so simple and just took a few minutes.

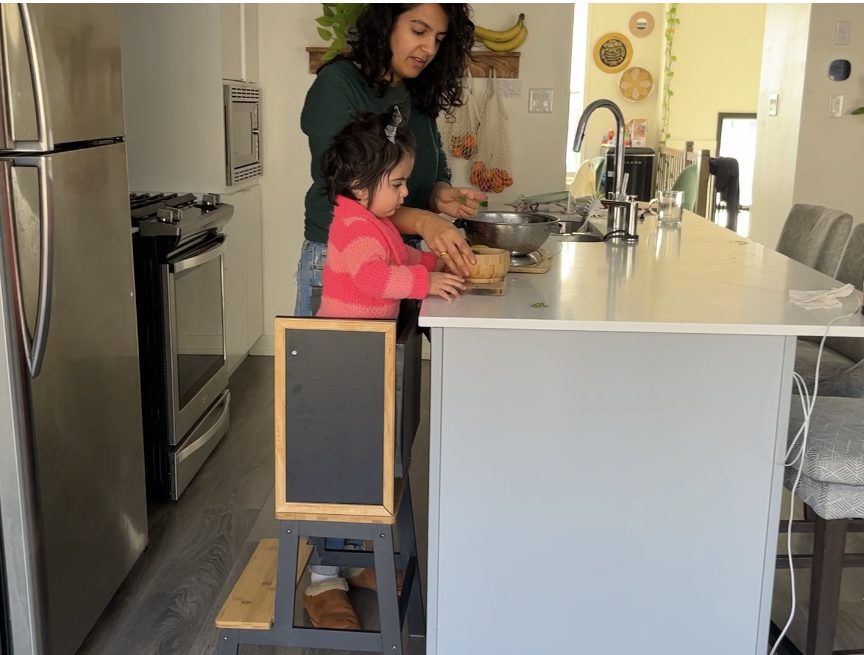
The Reveal of the IKEA Hack Chalkboard Learning Tower!
I’m so thrilled with how this chalkboard turned out!! It’s the perfect aesthetic for a modern kitchen. I believe kids furniture can match your kitchen style too! I got into the kitchen with Sabrina right away and we started cooking. Surprisingly she had so much fun and it was A LOT easier to cook. After a while she got tired of standing so I moved her down to the chalkboard.


How much did this IKEA hack learning tower cost?
This DIY IKEA Hack learning tower with chalkboard costs $108. I have seen learning towers on etsy and wayfair that range in the hundreds. If that’s not in your budget, and you want to DIY this, it’s very inexpensive. Cost breakdown below:
- Cricut paper: $22
- IKEA stool (BEKVAM Stool): $43
- MDF for sides: $15 (I had scrap)
- Edge banding: $6
- Dowel: $8
- Stain: $11 (I had leftover)
- Screws: $3
- Total: $108

IKEA Learning Tower Hacks -
[…] This is another variation on a learning tower. This one has a chalkboard look to it. You can see it fully here with instructions for making this. […]