When I stumbled upon a discarded wood coffee table by the side of the road, I quickly grabbed it so I could give it new life. Instead of just giving it a paint job, I envisioned a stunning transformation using penny tiles!
Penny tiles are really popular for bathroom floor design right now, so I was really excited to try it. I can’t get over how nice it looks! Check out my DIY tile coffee table design, using penny tiles to create a unique and eye-catching centrepiece.

Materials
- Penny tiles (2 sheets black, 9 sheets white):
- Affordable beginner saw
- Cordless nail gun
- Tile snippers
- Musclebound tile adhesive mat
- Pre-mixed grout
What tile to choose
For my design, I used these black and white penny tiles, of the exact same size and shape, in a matte finish. I love that they’re small, which opens up a wider range of possible designs.
When choosing penny tiles, use the same brand. The tiles have to be the same size so that you can make a cohesive design. If you use diff brands of tiles for black and white tiles, then you risk the tiles not fitting together.
Step 1: Prepare the table
Before the tile magic begins, ensure the table’s top is flush for the tile installation. Since my table had a glass top in its previous life, I needed to add some wood to complete the top and give the tiles something to stick to.

I just used leftover scrap pieces of shiplap from a previous project for this. After cutting them down to fit, they covered the entire surface perfectly. You could also add a piece of plywood.

I accidentally broke one of the supporting pieces of the tabletop (oops), so I also had to create more support underneath the shiplap to provide the necessary stability. If you also need to do this step, simple secure everything with a nail gun for a firm hold.
Step 2: Design the pattern for your DIY tile coffee table
The fun thing about penny tiles is that they’re so small, you can arrange them in any number of designs to create a stunning mosaic.

To get the design down first, I laid the white tiles to cover the whole tabletop and simply placed the black tiles on top of the white tiles to see how it would look.

I cut out some strips and small groups of black tiles to make it easier to try out different designs.

I knew I wanted some kind of border, so that was easy. And for the middle, I settled on diamond shapes.

Once I was happy with my design, I made sure to mark the white tiles with a marker or painter’s tape. This was to ensure that I knew where to place the black ones once I was ready to stick the tiles on.


Step 3: Stain the table
To refresh the table, I opted for a gel stain, slightly darker than the original shade. After a quick scuff with p220 grit sandpaper, I applied two coats of stain, ensuring a smooth application.
I went with full coverage. Initially I wanted the wood grain to show through, but MDF is hard to re-stain and keep the wood look.

I had never used gel stain before, but it worked quite well.

I did think I could get away with just one coat, but it looked pretty streaky, so I’m glad I added the second.
Step 4: Cut the penny tiles
Next, I had to cut the penny tile mats to the appropriate size for my table. I added painter’s tape to mark where to cut the tiles. This also served as a way to keep the tiles from flying around once they were cut.

I won’t say that this process was easy. Despite using the tile saw properly and taping down the tiles, I still found the pieces kept lifting which made it harder to cut.
The worst part was the look of the tiles once they were cut. The table saw did not yield clean results. They looked really gnarly. Next, I attempted with an angle grinder but that did not work, either.

Finally, I tried tile nippers, and they worked perfectly! They provided cleaner cuts, which is essential for precise placement, especially along the edges and corners. I was very pleased with this simple solution.

Step 5: Prepare the pattern for the DIY tile coffee table
To make space for the black tiles, I removed the designated white tiles from the mat. I simply had to peel them off. While this wasn’t difficult to do, it did take some time. Some were stubborn and I have to use a flat head screw driver to get them loose from the tile mat.

Step 6: Apply Tile Adhesive
To attach the tiles to the table, I applied tile adhesive. I used Musslebound instead of mortar. Mortar is messy and dries fast.
MuscleBound is an adhesive mat made especially for tiling. It’s like a double sided sticker. One side sticks to the wall, (or in the case, table), and the other is the surface for sticking the tiles. Using it for this project was such a good idea. If you’re wondering whether MuscleBound really works as a long-lasting solution to tile installation, I’m here to tell you it does. We actually used it in our kitchen for the tiled backsplash five or six years ago and those tiles have not moved since!

I removed the adhesive back to the MuscleBound and stuck it on the table. It was now time to put tile to table.
Step 7: Apply the tiles to the table!
When working with MuscleBound, you really want to triple check that your tiles are exactly where you wanted them. While you can place, remove, and replace your tiles mats with MuscleBound, don’t push down until you’re ready. Once you press down, that’s where they stay. It’s a permanent bond.

I made sure my tile sheets were just as I wanted them, and pressed down firmly.
Maintaining the tile mesh for white tiles was essential to retain their shape and spacing. This meant that though the adhesive mat worked for white tiles, I couldn’t then stick the black ones.

Not a big deal. I just used construction glue to stick the black tiles in place and it worked fine.

The use of MuscleBound adhesive mat made the process so much smoother. I was so happy that I didn’t have to use mortar to get them to stick.

Step 8: Grout the tile table top
Once all the tiles were stuck down, it was time to grout to bind the whole look together. I used premixed grout in white. You also need a bucket of clean water and a large grouting sponge.
Scoop the grout on to the table and push it into the crack of the tiles at a 45 degree angle. Because these tiles are so small, you will need a lot of grout! I ended up needing 2 small containers, to my surprise!

Using your float, really push the grout into the cracks between the tiles. Then, scrape it across to cover the area.

Next, remove the excess grout from the tile table top. For this step, make sure you have a clean bucket of water. Wring out the dirty sponge frequently to wipe the tiles clean after you apply the grout.

You don’t want to leave the grout on the tiles. It will harden and becomes impossible to remove. For this reason, I suggest working in small sections and wiping as you go.

As a last step, take a microfibre cloth or paper towel and wipe all the haze off. Polish the tiles until they shine!
Step 9: Finishing touches on the DIY tile coffee table
Since the tiles on the edges of the table ended abruptly and not very cleanly, I wanted to add a trim to give it a nice finish.

I just got some simple trim. I cut it at a 45 degree bevel. I stained it with the same gel stain. Then, I nailed it to the sides of the table.

To fill the edges, I caulked the gaps. Very simple, but so nice!
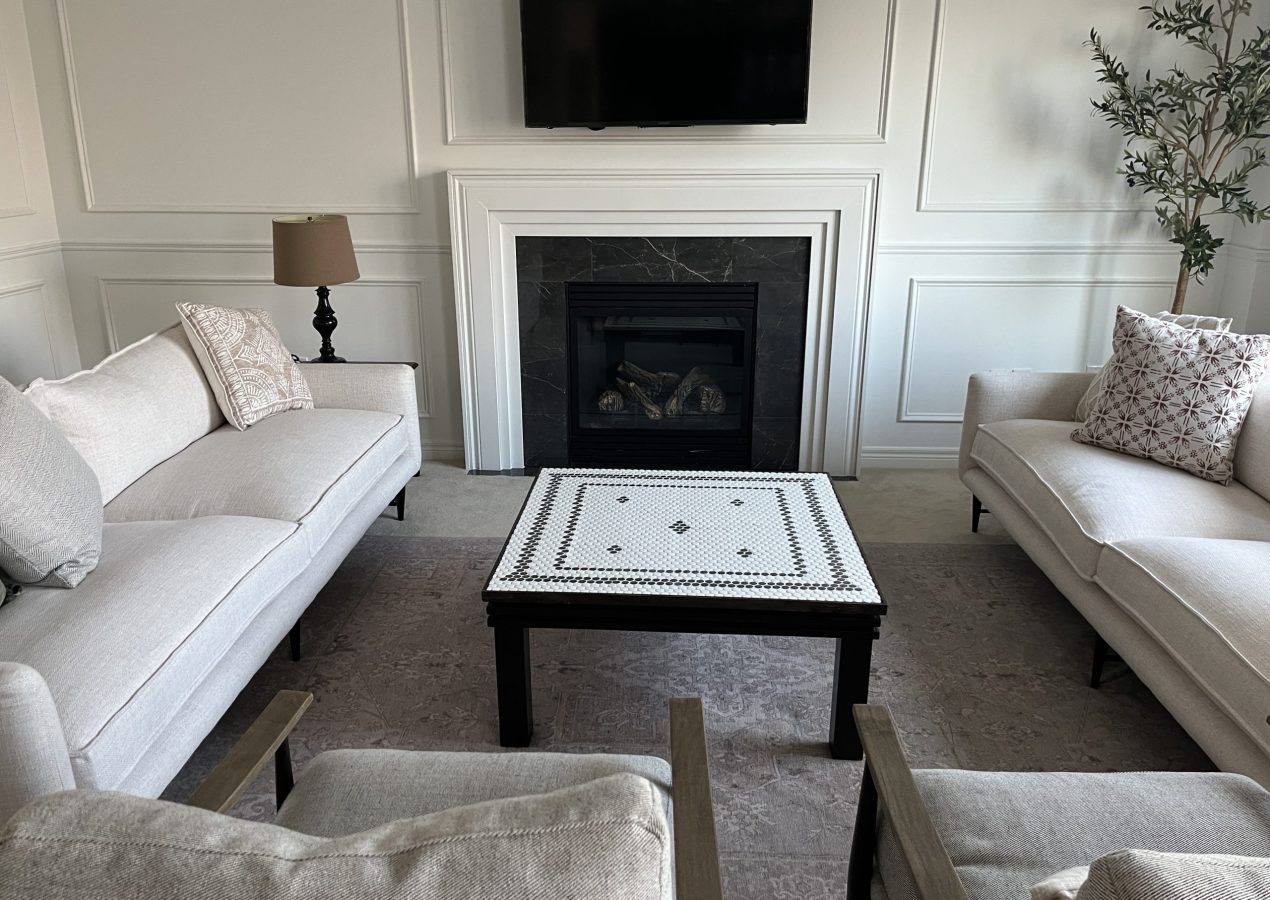
The reveal: A unique DIY penny tile coffee table

And that’s it! The DIY tile table is done and ready for it’s new life. I actually made this coffee table for my mom’s living room. And she really liked it! When she saw it, she said “Oh, it’s so pretty!” And you know that’s high praise from her, so I was thrilled.

I love that with these tiny tiles, I was able to revive a discarded table by giving it its own unique facelift. This mosaic style coffee table will add charm and personality to any space. This DIY project not only breathed new life into an old coffee table but also reminded me that you can create a big impact with the littlest pieces.
Cost of my Penny Tile Table
This table turned out costing more than I anticipated. BUT, it’s such a unique and stunning piece. Because I had to buy 2 boxes of tiles (I couldn’t find single sheets of black tiles), that increased my cost significantly. It ended up costing around $200. If you can find the matching penny tiles in single sheets, you can get the cost around $125.

If you love this project, pin it!
Leave a Reply