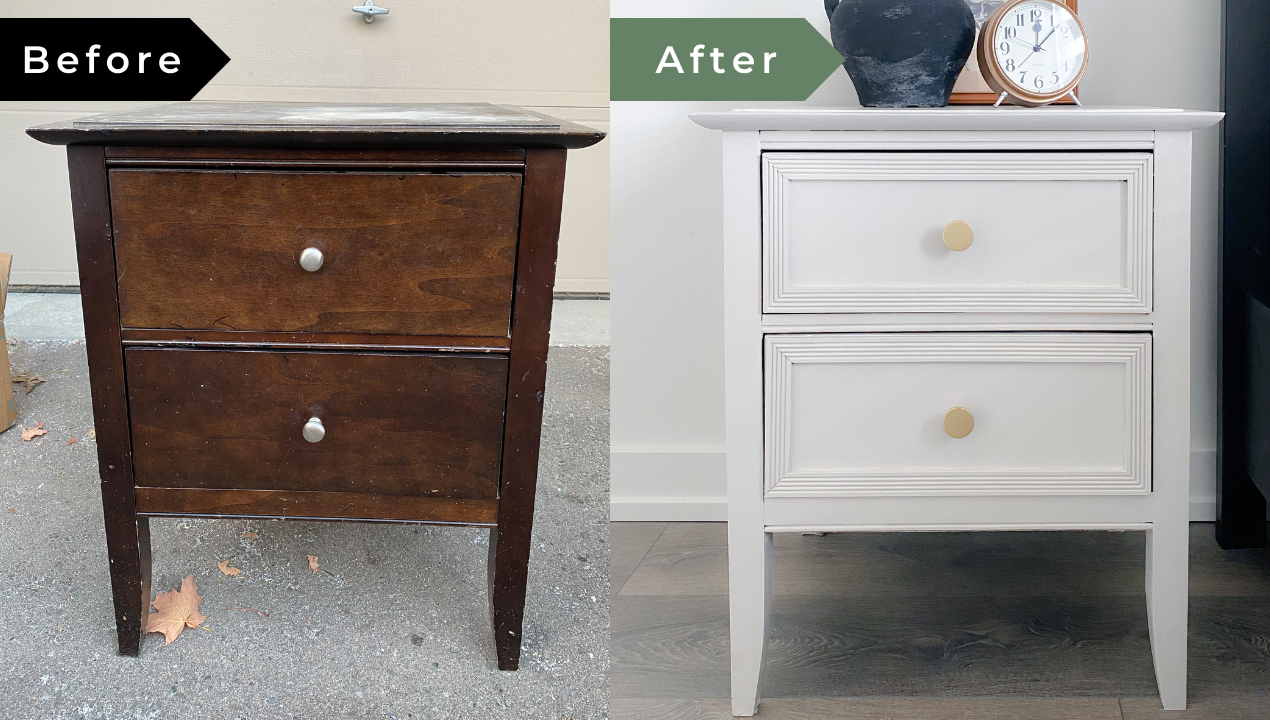
This blog post will take you through this unbelievable DIY paint nightstand.My Mom and dad had this old nightstand in their home. My mom was ready to throw it in the trash. I immediately knew that I could rescue it. I could make it look really high end without spending more than $75. I love repainting old furniture. I’ve painted an old IKEA Hemnes dresser, and added resin flowers for a nursery dresser. I’ll show you how to paint an old nightstand to make it look expensive. The best part – it looks expensive, but isn’t!
What to look for when picking an old piece of furniture to paint
I knew this nightstand has a lot of potential because of the key factor: The shape. It is a modern shape. The legs are angled. The piece itself is in good shape with minimal dents and, no holes. It has some watermarks and chipped stain, but that’s something that can be easily re-painted. A DIY nightstand with paint is a fun 1 day DIY project!

Materials to build
Power tools
- Mitre saw
- Sander with the 60 grit sandpaper
Materials
- Rustoleum UMA extreme bond primer
- Cool dowel trim. I got 8ft of this one
- Paint brushes.
- This is my favourite rubber handled brush
- I also had a cheap brush from the dollar store because the primer is very hard to wash off
- Paint. I used Sherwin-Williams in Accessible Beige SW 7036 in the Urethane Emerald Trim line in a satin finish
- Painters tape
- Drop cloth
- Wood Glue
- Safety goggles
- Mask
- Ear Protection
Step 1- Prepare the Nightstand to Paint
Remove any hardware like knobs from the drawers. Keep them in a safe space if you will be resuing the. Fill any dents or scratches with wood filler and sand them smooth with p220 grit sand paper.
The very first step before you can paint your DIY nightstand is to the sand the nightstand. This can be done by hand, but I used a sander. Make sure to put on your safety gear (goggles, ear protection and a mask) I couldn’t find my mouse sander, so I had to use both and orbital sander for the large surfaces and a multi-tool attachment to get into the corners and nooks. Trust me if you’re investing in a sander, this mouse sander is inexpensive and perfect for small projects. Use p60 girt sand paper.
You’re done sanding when the entire surface of the nightstand is roughed up. You don’t need to take off all the stain or paint finishing. It needs to be roughed up so the primer can adhere to the dresser. Primer cannot adhere to the dresser with the glossy paint or veneer finish. After sanding the entire surface, use a tack cloth or paper towel to wipe away all the leftover sawdust. This is important. If you skip wiping away the sawdust, you’ll get clumps of sawdust on your surface as you being the prime the nightstand.

Step 2 – Make the nightstand look expensive: Add the trim
You can easily transform any old piece of furniture with paint. Adding the trim detailing takes it the next level. I debated between a picture frame molding vs dowel, but I like the dowel more!

I measured the outside edges of my drawer fronts. Each piece is cut as a parallelogram. It has a 45* angle on both ends. I set my saw to 45*. I measured on the long edge of the trim and then made my cuts. It takes a bit of practice to ensure you’re cutting a parallelogram and not a rhombus or trapezoid (there’s some elementary school math coming in handy!).

This image below explains why we even need to do a mitre/45* cut. This is the only way the cuts will line up so the dowel pattern matches. With a blunt 90* cut, there is no way for the dowel to continuously wrap around the the drawer front.

Once I had all my pieces cut, I dry fit them on the drawer fronts to ensure all the pieces lined up. Then I used wood glue to secure them to my drawer front. Be careful that none of the glue oozes out the sides. If it does, quickly wipe it off with a baby wipe. To prevent that, I smooth out the glue before sticking it to the drawer front with my finger. You can also use a small brush if you’re more sophisticated.


Place heavy objects like wood or bricks on top to make sure all the pieces really get good adhesion to the drawer front.
Step 3 – Prime the Nightstand
Use a cheap dollar store paint brush to prime all the edges and nooks. Primer is very hard to wash off and I usually end up throwing the brush away. Then, use a foam roller and prime all the flat surfaces like the tops, sides and drawer fronts. I apply 2 coats and wait 24 hours before moving forward.

Step 4 – How to Pick a Paint for your Bedside Tables
The paint color you choose can make your furniture look more expensive. Bold colors do not a timeless look, and therefore, scream “cheap”. To make it look expensive, pick a neutral like black, grey, beige. or greige. I used Accessible Beige SW 7036. I had a quart leftover from my mom’s entryway makeover. I used it to paint a door, and it worked out perfectly for me because it is from the Urethane Trim Enamel line which is meant for painting doors, cabinets and furniture. It’s more durable than regular wall paint and doesn’t chip is prepped properly.
Step 5 – How to Paint an Old Nightstand
Make sure you’re working in a well-ventilated area. To get the best results, you need a foam roller and a good quality brush. I used a brush for the corners and edges of the drawers and then a foam roller for the flat surfaces. The key to getting a flawless paint job? I always give my paint projects 3 light coats. I think it gives it that extra evenness and polished look. Between coats, take a look to see if you may need to sand and bubbles or debris that landed on the nightstand. Minimize brush strokes by immediately rolling over those areas with your roller
I’m often asked why I don’t use spray paint or a paint sprayer. I have a paint sprayer but find it has 2 issues:
1- It takes a long time to set up. You have to thin the paint, make sure it sprays correctly, etc. It always takes me so long to set this up!
2- You have to wash the paint sprayer tips between coats. If you let any paint dry on, it sprays unevenly
3 – The clean up. It takes a minimum of 30 minutes to clean the paint sprayer. Getting every nook clean is essential to the life of the sprayer. Any build up will prevent you from being able to use it again.
I don’t like spray paint because I don’t think it looks like a real professional paint finish. It ends up looking cheap, which I don’t want for my furniture. I have painted many pieces of furniture and this is the best paint method to DIY a nightstand
Lastly, I added new hardware, they are also leftover from this bathroom renovation project.

Reveal: Doesn’t this DIY Nightstand look expensive with paint?
Funny enough, when my mom saw the nightstand, she was shocked. It looked nothing like the previous nightstand. She couldn’t believe this was the same piece she was going to put on the curb on garbage day. Just goes to show you, that you can breath new life into old furniture with some imagination and new paint!


Next time you’re at the thrift store and spot a piece of beat up furniture, remember – you can give it a new look. Just DIY your nightstand with paint! Furniture makeovers are a lot of fun and a great way to start your DIY journey. If you try this project, be sure to share with me. Follow me on instagram for more budget projects.
Leave a Reply