If you are looking for a fun and easy DIY, look no further than a peel and stick tile fireplace makeover.
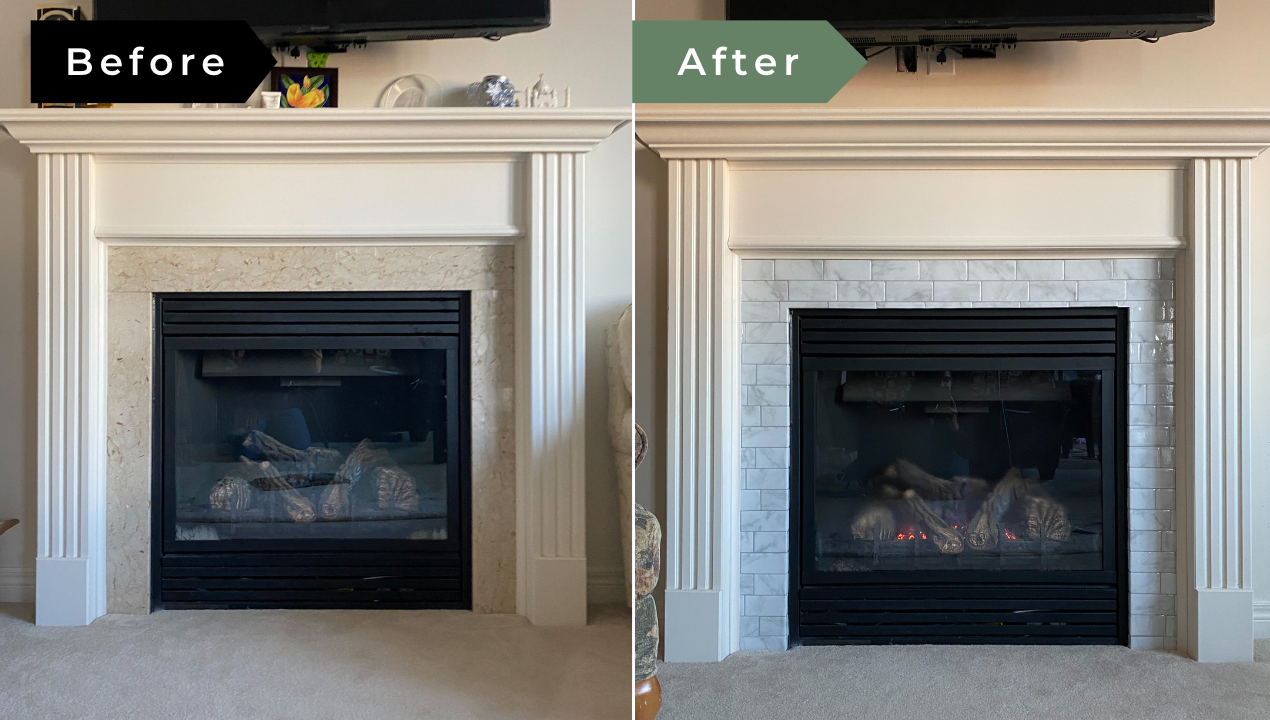
Sometimes all it takes is one small upgrade to improve an entire space. My Mom’s outdated marble tile fireplace deserved a fresh makeover. What better time to change up your décor and try something? This is such an easy and cost effective project. I love an easy, home improvement project. Using these peel and stick tiles from Smart Tiles was fun, easy and a super simple way to upgrade a space. There is no removal and these tiles are basically a thick sticker that looks exactly like a tile, with imitation grout lines. It can create an amazing new feature piece for your home and with the money you saved you can splurge on a bigger renovation.
If you don’t have a fireplace and are looking to create one on a blank wall, check out my DIY electric fireplace tutorial.
Why I love Peel and Stick Tiles
Using peel and stick tile is a great beginner project if you’re looking for a quick and inexpensive way to give your space a makeover. It’s renter friendly and perfect if you change your mind about how you want your space to look. This tile fireplace makeover DIY can be intimidating but these tiles are easy to use, easy to apply and can be used in so many different home décor scenarios. I am imagining future design projects in different rooms like your kitchen or bathroom, and in this case a living room. There’s a ton of different colors and styles of tile to suit your tastes and needs. There’s no power tools required, all you need is a good utility knife! This is a fun and easy beginner DIY to get your feet wet and give your outdated marble tile fireplace a total facelift.
This was my Mom’s fireplace before I added the tiles, it was dated and the beige marble didn’t really go with the rest of her décor, so it needed a makeover.

Materials for your Peel and Stick Tile Fireplace Makeover:
- Peel and stick tiles
- Utility knife
- Cleaning solution
- Paper towel
- Ruler
- Level
Step 1: Prep your fireplace
Clean the surface where you want to apply your tiles really well in order for the adhesive of the tile to really stick. I used a basic all purpose cleaner and paper towel. Do make sure your surface is dry before you apply the tile.

Step 2: Placing your tile
Start by applying tiles on the top horizontal tiles of the fireplace. The first step of my tile fireplace makeover project was to cut a piece of tile that fit between the mantel and the metal fireplace and use it as my guide to fit the rest of the pieces. Don’t cut on the tile for these cuts but between the tile pieces where there are “grout lines”.

The best way to do this is to take the tile and turn it upside down on top of the existing fireplace tile. The tile surface is a bit sticky which helps you take your measurements. Really take your time to line it up right. The top of the tile should sit flush to the mantel, that will be where the tile begins from the top.
Now take your ruler level and keep it flush to the actual fireplace (in my case the black metal). You can use a pencil or a highlighter to line it across so you get a straight line. Try to be as precise as possible, take your time!
Step 3: Cut your Peel and Stick Tiles
After you mark the tile it’s time to score! Make sure you start with a fresh blade on your utility knife. I used a cardboard box underneath my tiles to protect my flooring, you can also get a mat from any art store that is specifically made to score on. Hold your level to the line and use one hand to hold it down so it stays in place. Using the other hand, apply heavy even pressure with the utility knife across the line.

When you use a utility knife, you must press hard, to make sure you score and cut correctly. Try to cut in 1 smooth line. If you have to score several times, the cut ends up being jagged.
Now peel off your sticker backing off the tile and stick it down.
Start with one piece and follow the steps until it’s cut, measured and applied before beginning another. This way you can make sure each piece is precise for your tile makeover.

Step 4: Adding tiles to the vertical sides of the fireplace
Now start on the vertical sides of the fireplace. Use the same method of marking, cutting and sticking. Start at the top of the fireplace (under the first row you just completed) and work your way to the ground.

I made sure to fold the tile over the vertical edge of the old marble tile to give the tile dimension and make it look even more realistic. But I cut the top row. Instead of cutting the top row of the tile, however, I would wrap under the tile on the top row, to create evenness and add to the realistic look. This really gives your tile fireplace makeover the extra touch.
As you apply each tile piece grab a cloth and be sure to press down the tiles to make sure it sticks as well as possible. I was a bit nervous about how much I handled each tile so pressing it in can ensure maximum adhesion.
I would make sure to score the edges of the tiles that were folded over so they stick better. A few of mine started to pull up. As an extra measure, I would have used construction adhesive on those folded pieces to ensure they don’t pull up.
Step 5: Filling Gaps for the Tile Fireplace Makeover
Once I was done applying all the full tiles, I needed to fill in the gaps along the edges. Here I cut the scrap tile to fit each space and leftover gap. Take your time and be as precise as possible to fit each small tile piece in the space. I found that cutting one tile out at a time was the best way to do it and made sure it looked as even and realistic as possible.

Take your scrap tile and turn it upside down again, and fit it in the small gap. The tile line should line up with a line of “grout” from another tile either above or below and you can use that as a guideline. Use your level to make a straight line and cut. Remember to always place your pieces without removing the backing first, so you can make any adjustments.

The fireplace with the tiles freshly applied

Step back and check out your work!
This tile fireplace makeover project is so great for any DIY level and it was under $100 for a complete transformation. Now this fireplace is a feature. Small no-power tool projects like these are fun, easy to try out and have the potential to transform an entire space with minimal effort. It was so easy to do and you can’t tell it’s not real tile even from up close! It looked so beautiful when I decorated it for the holidays (see below).

Tips:
- When you use a utility knife, you must press hard, to make sure you score and cut correctly.
- For edges, cut out individual tiles and paste them down. Don’t be afraid to use your knife to peel it off and try again if you make a mistake.
- I wrapped extra tile along the vertical row to make it look more like actual tile, as these tiles look very real when they are all on together and truly makes this tile fireplace makeover.
- Make sure you press very hard, I would use a cloth to help rub the adhesive in so your hands don’t stick to the tile. I made a mistake on one of the tiles that went too far, and it was easy to cut it out right on the marble and reapply.
Things I would do differently:
After every DIY we come out the other side having learned a lot, at least I know I am!
There’s always a list of things I would do differently with everything I’ve learned for this tile fireplace makeover:
- I made sure to wrap the vertical rows to make the tile look more real. But I cut the top row. Instead of cutting the top row of the tile, however, I would wrap under the tile on the top row, to create evenness and add to the realistic look.
- I would make sure to score the edges of the tiles that were folded over so they stick better. A few of mine started to pull up.
- As an extra measure, I would have used construction adhesive to ensure they don’t pull up.
Safety note from Smart Tiles:
Please be sure to read the safety notes from the Smart Tiles website on where you can install, tips on placement and temperature (like placing near an oven or heater). According to their website, Smart Tiles can be installed on any surface where the temperature doesn’t exceed 49 °C (120 °F). Be sure to avoid any direct contact or exposure with any heat source or an open flame.
Check out the full video here:
Leave a Reply