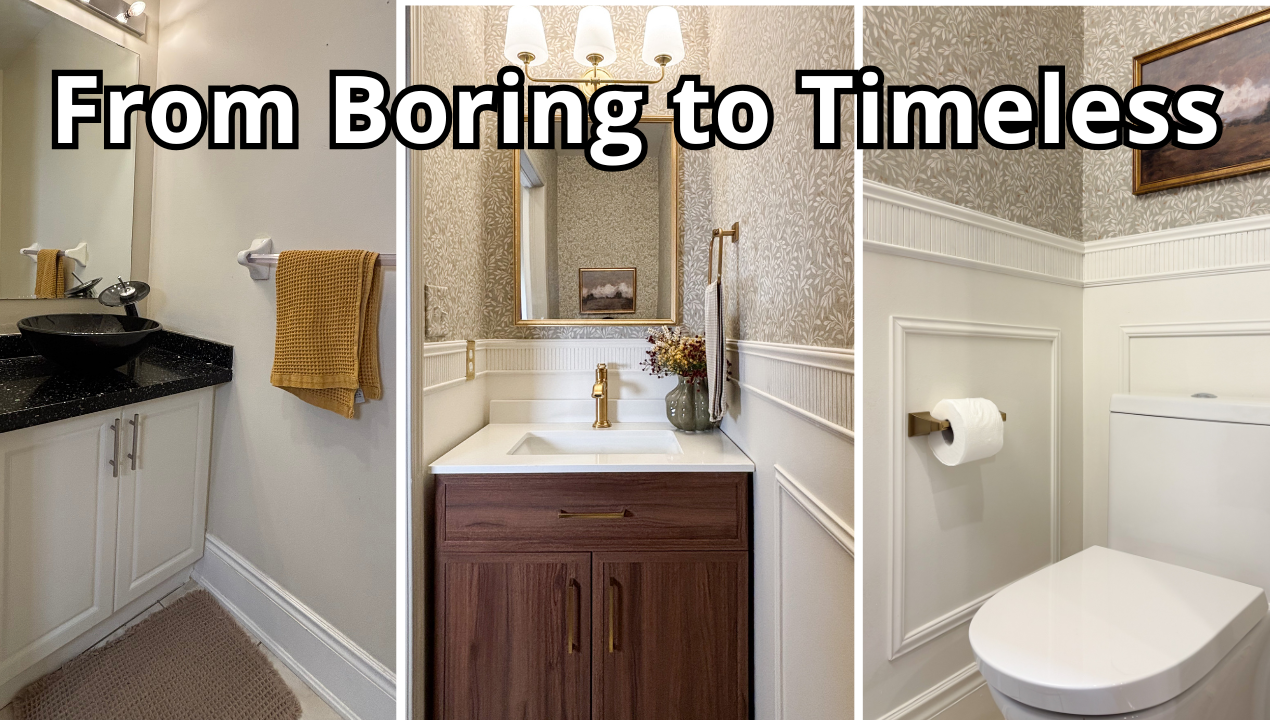
The powder room is quite possibly the most dated space in my house. It’s builder basic and looks like no one has every given any thought to the design.
The sink is such a topic of conversation whenever someone new comes into our home. It’s design-y and cool, but does not fit the aesthetic of my house. Plus with 3 young kids, it’s an impractical fit.


This powder room is located on the main level of my home and is the one guests use the most. It’s a small space that needs a lot of help. With the holidays right around the corner I wanted this to be a quick project I could wrap up in a week. Plus, I didn’t want to remove the tiles, so I wanted to keep it affordable.
The Vision:
I wanted this bathroom to be a classic and timeless space. My vision for this powder room included installing a new vanity, adding trim, new fixtures and wallpaper. I also wanted to change the lighting to give the room a soft glow. This is a small powder room, so I didn’t want to overwhelm it by packing in too much. Here’s everything I planned to use for the bathroom!
Demolition and Removal:
Everything has to go! I started by removing the vanity, mirror, towel, and toilet paper holders.

Normally, I would have already bought a new vanity before starting, but I did not want a repeat of the vanity debacle I had last time with my boys’ bathroom. In case you missed it, there were no tiles under the vanity, and I had already purchased a very heavy (and expensive) floating vanity. This meant that I had to lay down new tiles, which was not in the plan then, and not in the plan now! Just in case I needed to tile again, I held off on buying a vanity until the old one was removed.
The vanity removal was a bit of a process, but I was determined to do it myself. I started off by turning off the water valve and removing the p-traps. I then removed the UFO looking sink. And then slowly took apart the vanity piece by piece. After I removed the counter top, the only thing left to do was wiggle out the cabinets. And much to my happiness there was tiles under the vanity!!!


Removing the mirror I had to be more careful. I taped the wall off, just in case it shattered.

The mirror had these clips that attached it to the wall. I needed to wedge off the clips in order to remove the mirror from the wall. I used a small prybar and gently tapped them outwards with a hammer. With the removals done I now had a blank slate and could being the renovation.

These are all my favorite DIY tools
Wallpaper Transformation:
I had a few wallpaper options that I wanted to choose from. I decided on a neutral leaf pattern wallpaper. I cut all my wallpaper panels to length on the floor. Trust me, it’s much easier to pre-cut your wallpaper panels before you attach it to the wall! I started by cutting the first one, and then rolled the second one next to it to match the pattern. Working with smaller panels is much easier and allows for easier pattern matching too.

To put up the wallpaper I used a laser level. I set up my laser level perfectly with a scrap piece of wallpaper I taped to the wall.

This is paste the wall type of wallpaper. It is SO easy to install. I applied a heavy amount of paste using a brush. Then, I lined it up to the level line. Make sure you practice patience during wallpapering; otherwise you will end up with crooked panels. And there is no shame in having to peel the wallpaper off to stick it back on again. Just apply more paste each time. Smooth out any air bubbles and cut off the excess of the wallpaper on the sides. It took me about 20 minutes to get one panel on the wall perfectly.

I even made sure to wallpaper the light plate of the light switch. These small details pull everything together so well.
Time to Put up the Trim:
If you follow my work then you know I’m a huge fan of trim work. It instantly gives any room a high-end feel. And I knew I wanted trim to be a focal point for this powder room upgrade.
I made all my cuts for the trim. I made sure to pre-paint the trim so paint doesn’t get on the wallpaper. And got my nail gun ready to nail the trim in place. I used the pin nailer as it is ideal to use for smaller trim and doesn’t split the wood.


I decided to make a ‘trim stack’ and trim boxes. Other than the trim cuts I made, I also used leftover pole wrap from the kitchen island renovation I did, for the trim stack. It was easy to use and any cuts that were required I used a blade.
For the stack I started off with a smaller trim at the bottom, then a layer of the pole wrap and finished it off with a thicker trim on top. For any gaps in-between the trim I used a caulking gun. Just apply the caulk where you see gaps and then use a rag to wipe off the excess.
Painting the pole wrap was an absolute pain. I had to use a brush and get into every tiny groove. The result was worth it though! I used White Dove by Benjamin Moore for the powder room.
Upcycling a plain old Mirror:
I used my love for trim in many ways in this powder room. I had an old mirror that was the perfect size for the powder room, but it was a framed black mirror. I decided to spruce it up. I cut trim on a mitre, and then glued it to the mirror.

I wanted it all to match so I covered the mirror with newspaper and then spray painted the new frame. It looks gorgeous and expensive!


Installing my new wood vanity
This was the last thing I did for the powder room makeover. This also happened to be the hardest part of the project. I had my fingers crossed all day that everything from plumbing to installation would align and this would be a smooth process.
I picked a gorgeous wood veneer vanity from Home Depot. The style is perfect for a modern or classic style home. The chocolate brown color contrasts well with the ornate gold detailing and white walls. And a classic stone finished counter top really pulled the powder room together.
I hit a small road bump when it looked like the tight fit of the powder room with the molding wouldn’t allow the vanity to fit into place. But determination is everything; I lifted the vanity and wiggled it into place.
Next time, I would install the vanity first, then attach the molding to the wall!
The Final Reveal:
This small bathroom ended up packing so much character. I styled the powder room with a few classic pieces.

The fine details of a renovation are really the things that pull the room together.

The faucet, towel ring, and toilet paper holder I upgraded to are a beautiful rustic gold color. The earthy tones of the bathroom contrast really beautifully with the gold.


I also wallpapered the light switch. It’s a small detail. but makes a huge impact!

The last step was to replace the old four bulb builder grade light fixture. I swapped it out for a new elegant light fixture. The coverings on it are an opaque white color, making it look like it has a fabric covering.
I added a landscape painting with a gold frame above the toilet. I placed a small lovely vase adorned with red and yellow flowers on the vanity counter. These minimal décor pieces kept in tune with the classic vibe I wanted to show in this bathroom.
The powder room makeover took me a week to do. And was probably one of my least troublesome projects. The overall look came together exactly as I imagined it.

The power room came together beautifully and fits into the overall aesthetic of my home perfectly. My main goal was to make this a timeless room and remove all its dated aspects. I think I achieved what I set out to do.

If you want to start on a project that won’t hurt your budget and will be quick, this is the perfect starter bathroom remodel.
If you like this powder room renovation, follow me on Instagram to continue on my home renovation journey.


Leave a Reply