I added IKEA KALLAX fireplace built-ins to this long living room, and it transformed this space! This tutorial will show you the easiest way to add built-ins to your home. This project is perfect for a beginner!
The best part of this makeover is the fluted door fronts on the IKEA KALLAX units. It’s SO easy to DIY IKEA KALLAX doors! I’ll show you how.
Living Room Before

My sister-in-law, Asma asked me to help her make over her living room dining room. This is a really long, narrow room. One part of the room has a dining room, and the other end has a seating area.
But, it’s not cohesive. There is no design element pulling the whole space together. To make it more awkward, there is a fireplace in the middle of the room but it’s not the focal point.
The Plan: Add Fireplace Built-ins to transform this Living Room

I’m going to be turning this space into a cozy living room. The focal point of the room is the fireplace. The builder has already designed the room with nooks that are meant to have built-ins. I’m going to do an amazing IKEA KALLAX built-in hack!
IKEA KALLAX has a ton of different options for doors, drawers and inserts. You can customize this to make a function for your family. Plus, with this IKEA KALLAX door DIY, it will look really high-end. No one will believe that this was once IKEA.
And this blog post I will cover the IKEA KALLAX door DIY, and in the next blog post, I will share how I created the floating shelves
Materials
- IKEA Kallax units
- Kallax doors and drawers
- 2×3 lumber
- 2×4 lumber
- 2.5” screws
- Drill and impact driver
- Mitre saw
- Baseboards
- Prybar
- Utility knife
- Hammer
- ½” pine plywood (we opted to not stain for a coastal look)
- 1×3 pine (2 pieces)
Step 1- Build all your IKEA KALLAX units

I started off by building all IKEA KALLAX units. Then I built all the doors and drawers and attached them to the cabinet frame. This is easy, but time consuming.
When adjusting the doors, I set the doors back ½” from the edge. This will ensure the doors are flush with the unit after I add the fluting to the door fronts.
I was so relieved that I didn’t have to make any doors, deal with hinge placement etc. The IKEA KALLAX doors are perfect!
Step 2- Build a base to elevate your cabinet

You need to build a base for the cabinets to sit on top. This allows for the baseboard to sit across the front of the cabinets.
Use 2×4 lumber to build the frame. When building the frame, make sure that it is not deeper than the actual cabinet depth, otherwise your baseboard won’t sit flush across the front of the cabinets.
I built this on top of the IKEA KALLAX units, so I knew exactly where the middle supports would go for each cabinet.
I drilled pilot holes for my screws. Then, I use 2.5” screws to assemble the frame
Step 3 – Remove your baseboards
For a truly built-in look, remove the existing baseboards. Use a utility knife to cut the caulking across the top of the baseboards. Wedge your pry bar between the wall and trim. Use a hammer to wedge the trim off the wall.
If you have to cut the trim in the middle of a long wall, use a multi-tool.
Step 4 – Secure base to the wall

Using 2.5” screws, secure the base frame to the wall into studs.
Step 5 – Allow for electrical access

There are several outlets on this wall. My electrician wanted to close up the outlets to be up to code. But, he still advised us to have access to these outlets, even though he had installed new outlets about the built-in.
I removed the electrical plate. Then, I put toothpaste on the corner of the outlet and pressed the cabinet back up into it. This made an imprint of the outlet.
To cut the access hole, use a large drill bit to make a hole for your jigsaw blade. Then, use your jigsaw to cut the hole for the outlet. The back of the clocks unit is a very thin MDF so it’s really easy to cut
Step 6- Secure the IKEA KALLAX units
I always secure all my furniture. You never want to have an accidents. I Secured the IKEA KALLAX units to the wooden base. Make sure you’re happy with the spacing of the cabinets.If you have extra gaps, you may choose to add spacers between the units.
Using 2.5” inch screws, I screwed the cabinets towards the back of the cabinet into the base.
I also screwed them downwards into the base at the front of the cabinet. When you’re screwing it in the front, make sure the screw sits further back than the door so it doesn’t interfere with the door function and you can’t see it from the outside.
Now you can nail your baseboards to the front of the base.
Step 7- Build a faux countertop

Countertops are really expensive so I wanted to have the look of a countertop on a budget. I used ½” plywood as a countertop. I had these cut at the home hardware store.
I built a base using 2x3s. First I cut these to the length of the units (91.5”). I secured the 2x3s to the front side and back of the top of the IKEA KALLAX cabinets. I used 2.5” inch screws to drive them into the frame of the Ikea units.
Then I put my piece of plywood on top and nailed it into the frame with a brad nailer.

Step 8 – Beautify the edge of the countertop

I had an ugly edge where the 2×3 met the plywood. At first, I tried to use edge banding. I ordered a really thick edge banding, but it started to bubble up as I was ironing it.
So I covered it using a piece of 1×3 pine. This gave a really beautiful crispy edge.

Step 9 – Cut fluting for the DIY IKEA KALLAX door fronts

This is where this stops looking like IKEA and starts to look like a custom built-in!
I got a sheet of 4×8 foot pole wrap. This was enough for the 6 KALLAX units. It is a little bit expensive but I think it’s a great way to make IKEA look a lot more interesting.
If you’ve never worked with pole wrap, it’s really easy to cut. To cut the length, simply roll it up. I add painters tape to where the saw will make a cut to prevent too much wood splintering.
To cut the width, use a utility knife to cut off the slats. They are attached by a paper backing.
I measured the doors and drawer front for the KALLAX shelving unit and cut them to size.

Step 10 – Paint the pole wrap
Sand any edge where there might be a little bit of splintering using p220 grit sandpaper
I painted the pole wrap the same color as the walls in the room. I wanted them to be a different shade of white than the cabinet frame so they would pop and have a little bit dimension. I used one coat of primer and two coats of paint.
In the past, I’ve also stained pole wrap when I did my IKEA Hemnes Shoe Cabinet Hack. This gives it a beautiful wood look.
Step 11 – Attach the decorative panels to the KALLAX door fronts

I removed all the knobs and used painters tape as a little handle on the edge of each door.
Add a generous amount of wood glue to the back of the pole wrap. Press them into the door. For extra security, I nailed them into the door fronts. I used a pin nailer with ¾” nails for additional security.
I love my pin nailer because the nail heads are so small that you don’t need to use spackle to fill them up. You can simply paint them and the tiny holes disappear.
Step 12 – Attach your hardware

I swapped out the basic IKEA knobs for a beautiful brass knob instead. These are so affordable, but they really make the unit look a lot more high-end.
I drilled a hole from the back of each door or drawer through the pole wrap. Then simply thread the screw through and screw the knob on.
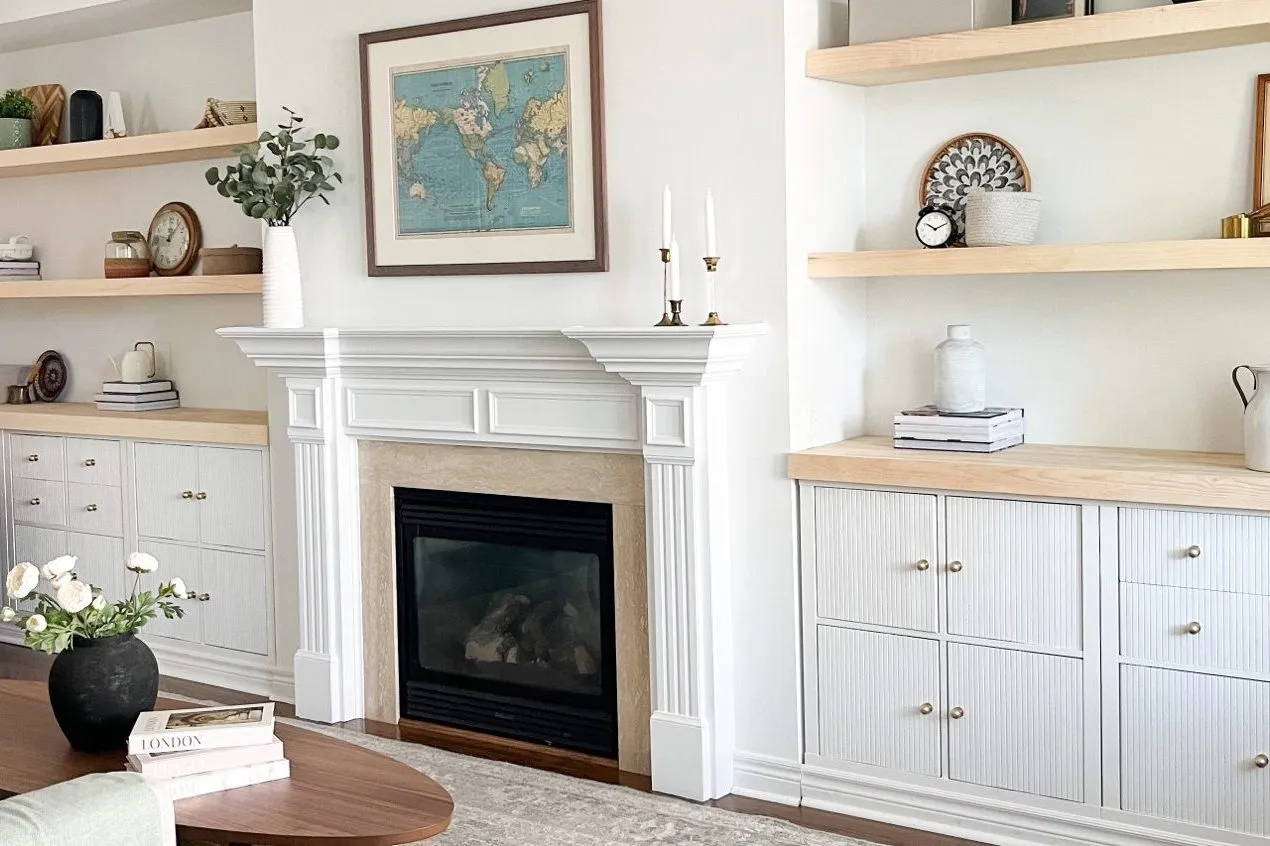
IKEA KALLAX built-in transformation


I love this IKEA KALLAX fireplace transformation so much! It looks like a custom built-in, but I only used IKEA cabinets. This is an easy home improvement project that you can tackle!
This is going to add a ton of storage for my sister-in-law because she has 3 daughters and they have a ton of craft supplies board games, toys.

The open shelving above the built ins is a great way to store decor pieces. It completes the look! Leaving them a natural wood makes the interior design style more coastal modern.

If you’re looking to also build the floating shelves, check out this detailed blog post here. I made a few mistakes along the way that you’ll definitely want to avoid.
I’ve also made a really cool IKEA built-in desk using just IKEA ALEX drawers and IKEA KALLAX units.
How much did this IKEA fireplace built-in cost?

One of the most frequently asked questions is the total cost of these built-ins. These IKEA KALLAX unit make this family room looks so much more cohesive and high-end. I really love how this turned out and it’s so easy to do.
It costs approximately $1350 for the lower units. To save a bit of money on the project, you can leave the door fronts plain and use the knobs that came with the IKEA cabinets.
I hope you love this project as much as I do! If you do, make sure to pin it. Let me know if you have any questions in the comments below!
For more DIY projects, follow me on instagram.


Leave a Reply