When I started my 9 year old son’s room makeover, I knew I wanted to have a functional bed, but also have a place that was really cozy for him. A big bonus would be to add a space where we could house guests since we don’t have any extra bedrooms, but we have a lot of out of town family.

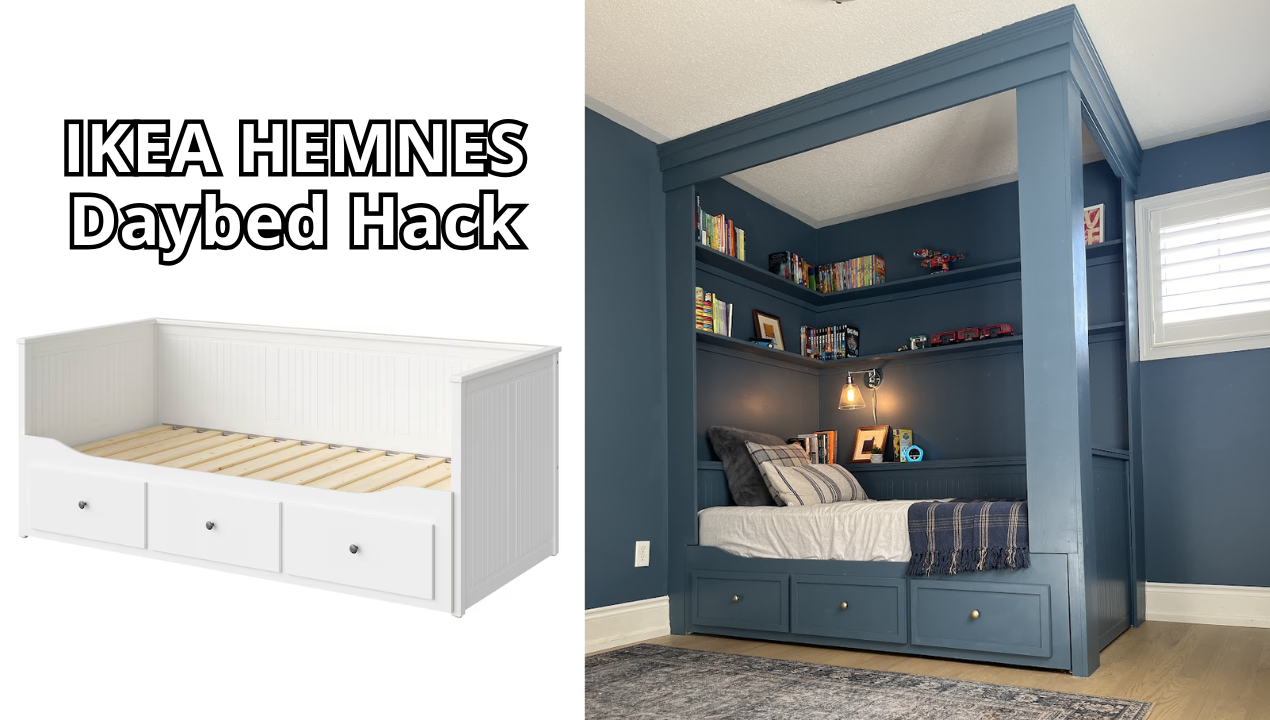
When researching for beds, the IKEA’s HEMNES daybed really stuck out to me. I love the simple design and the fact that not only could you pull it out to be a full size bed, but it also had three extra drawers for storage space. I love how functional this bed is.
My son absolutely loves to read! When I was his age, I did too. I would’ve loved a built-in bed, that was a book lovers Haven. My goal was to create a space that would work for him as he transitioned into a teen.
I had a rough idea what I was gonna do to this IKEA HEMNES Bed, but it turned out beyond my expectation!!! This tutorial will help anyone who wants to replicate this IKEA bed hack.
Tips to assemble the IKEA HEMNES Daybed

I assembled the daybed as per the instructions. The IKEA bed is actually really hard to assemble by yourself and you need a lot of space. I say this as an expert IKEA hacker 😉
After trying by myself for two hours, I finally recruited my husband. In my opinion the only modification that IKEA should make is actually, having you build the top side of the bed first and then the pull out side. Doing it the way the instruction recommends meant that we had to lift the top OVER the pull out drawers. It was not light.

Step 1 – Paint the Bed
I opted to paint my bed before I made it into a built-in. I think that’s actually makes it a little bit easier to paint (unless you use a paint sprayer) because there’s a lot of nooks and crannies that you need to get into.

The first step of painting any IKEA furniture is to sand the bed. Using a P60 grit sandpaper and a power sander, scuff up the surface of the bed. We’re not trying to take off all of the shiny coating on the furniture. I’m simply trying to scuff up the surface, so it’s rough. A rough surface will allow the primer to really adhere to it. Using a mouse sander is your best bet to get into all the nooks and corners of this bed.

After you clean up all the sawdust using a tact cloth, use a shellac based primer to give a base coat of paint. This is my absolute favourite primer. All the furniture I’ve painted has had really durable and long lasting results. Use a foam roller and all the flat surfaces and a paintbrush on any of the corners. Let this cure for at least 24 hours.
Then lightly sand using P220 grit sandpaper (by hand!) if there’s any bumps or paint drips. Give it another coat of primer.
After 24 hours, you’re ready to paint, choose a enamel paint. I like to use Sherwin-Williams urethane trim, enamel paint. But for this project, I used Beauti Tone cabinet paint in Cape Cod Bay.


I used a foam roller for all of the flat surfaces. I always like to paint three light coats, leaving at least eight hours for the paint to adhere to the furniture in between. The longer you let the cure the better and more long lasting the results will be.

Step 2 – Build the Shelves above the Bed
Since my son absolutely loves to read books, I knew I wanted to add a few shelves for him to make a library behind his bed.
I made really simple bookshelves using 1×2 pine as a cleat and then a 1×8 for the shelf
The length of the shelves are a bit tricky because you have to account for the depth of the shelf and also the depth of the pseudo nightstand that you’ll be adding.
After I cut my pieces to length, I gave them a light sanding with P220 grit sandpaper.

I used wood glue on the underside of the 1×8 shelf. Then I clamped together the 1×2 to the 1×8. To make the assembly a little bit easier I drove in a couple of nails that would help secure this.
Then I drilled a pilot hole and drove in 1 ½” wood screws to secure the shelf together together.

I painted the shelves before hanging them to save time. I used a stain blocking primer. Without it, you’ll be able to see that woodgrain and the knots through the wood. I gave it two coats of primer and then I painted it with the same cabinet paint that I used to paint the bed.
Step 3- Hang the Shelves above the IKEA HEMNES bed

To hang the bookshelves, I first found all the studs in the wall and marked them vertically. Sometimes finding studs can be really hard if your stud finder doesn’t work well. I use this magnetic stud finder and it is fool proof.
After marking the studs, I got my husband to help me hold up the shelves. Making sure the shelves are level, drill a pilot hole through the cleat and into the stud. Then I used 3 inch screws to secure them into the studs.
I had a lot of messages from my instagram followers, worried that they would fall down. I have full confidence in the shelves. The most important part to prevent accidents is that the shelves are secured into studs. Drywall anchors would not give me peace of mind.
Step 4 – Adding the Vertical Posts to the HEMNES daybed
To make the bed look like a built-in, I added vertical posts around the bed frame. I didn’t want to secure the posts to the ceiling so I used my multi-tool to notch out a ¾” sliver in my baseboards. You pay prefer to remove the baseboards or scribe around that. But I chose this so the posts would slide into those grooves and give stability to the posts.

I used 1×8 pine for the posts. To ensure the pull out function of the IKEA HEMNES bed would not be affected, I attached the front posts from above the drawers to the ceiling. I screwed the posts into the bed and also the sides of the bookshelves. I countersunk the screws, so it would be easy to fill the holes and give a seamless finish.
I custom cut pieces of pine to fit in the gap beside the drawer fronts and nailed it to the bed. Be sure to give enough spacing so the drawer can still slide out.
On the foot side of the bed, the posts went from the floor to the ceiling, securing into the bed and shelves.
Step 5 – Attach the Floating Nightstand Shelf
I added a 10” shelf around the length of the bed and a 6” shelf at the head of the shelf. The dimensions are based on the space I had. I was constricted by the window at the foot of the bed, otherwise, I would have both of them 10” wide.

Before I secured the shelves, I also got an extension outlet. I cut out the hole for the outlet in the shelf. I traced the shape of the outlet on the shelf and cut it out with my jigsaw. This will give my son a place to put his alarm clock, and have a charging station as he gets older.

I secured 1×2 cleats into the wall. I first found the studs with my favourite stud finder.

Then I placed my shelves on top of the cleats and the bed frame. I nailed the shelves into the cleats and the bedframe.
Step 6 – Add Shaker Detailing to the Drawer Fronts
I could have left the IKEA drawers flat, but I love the look of shaker drawers. I used ¼” thick MDF to cut strip that are 1 ½” wide using my table saw. Then, I cut them to dimensions of the drawer fronts..

I attached them to the drawer fronts using wood glue and a pin nailer. Wood glue is strong, but the pin nails give it some extra security. Just be sure to use ¾” nails so that the nails don’t go through the drawer front.
I also spray painted the knobs gold. I think this is such a simple way to make the drawers more substantial/
Step 7 – Give the bed a Finishing Look with Ceiling Molding

I love using top trim to make built-ins look high end. However, I don’t actually like crown molding. It’s too formal for me. I used stacked baseboards to get this look, but you can use any type of trim.
I used 1×5 MDF and attached it to the posts. Then I used another 1×5 and attached it to the first trim. To give it the finishing look, I opted for chair rail, which is a lot easier to cut and cheaper than crown molding!

Where the 2 trims meet, make sure to cut on a bevel. I measured and cut each individual trim as I attached them. Very time consuming, but it gives that polished detail.

Step 8 – Replicate the Ceiling Trim on the Inside of the Bed

From the doorway, you could see the inside of the unfinished trim. I look at all the details and never want any project to look “DIY”. So I created the same stack of ceiling trim and nailed it to the inside of the posts. I sandwiched a small ¾” piece of MDF between the trim to close the gap.

Step 9 – All the finishing work
Next, I took my time to complete all the finishing work. That meant filling all the nail holes, countersunk screws and caulking all the seams. This is the detailed work that is so tedious but always gives the best result!!
Step 10 – Paint the bed
I painted the bed, the posts, and trim one last coat of paint. I used my cabinet paint so it would be consistent with the sheen of the bed.

I also hung a bedside reading light that plugged into the extension I created. It’s the perfect reading nook!
Reveal of my son’s IKEA HEMNES Daybed Hack!
I can’t believe that this used to be an IKEA HEMNES bed. I am so thrilled at the outcome. It’s probably my best IKEA hack! This DIY daybed doesn’t even resemble IKEA!

What’s even better is that my son absolutely loves it. He loves to read here. And you know, you can find me here too, reading or working during the day!
I can see my son growing up in this room well into his teen years. The shelves are perfect for his books and his lego collection! It’s safe to say, I love this IKEA daybed hack!


Does the IKEA HEMNNS Daybed function still work?
I haven’t bought the IKEA mattresses yet, but my instagram audience was so curious as to whether the pull out function still works. We tested it, and it absolutely does! The IKEA Daybed pulls out to hold 2 twin mattresses side by side. You can use any thickness mattresses, like we did. We have pillow top mattresses. However, you cannot stack them on top of each other for the daybed function.
IKEA recommends their mattresses because they are a lot thinner and can stack easily on top of each other without adding too much height to the daybed.


Leave a comment below if you have questions. I’d love to see you build this! If you’d like to hang out with me, come find me over at Instagram.

If you love this project, be sure to pin it!
Shikha Gill
Absolutely love it. I really wish I can make something like this for my kid! Definitely looks polished and clean.