For my son’s Pokemon-themed birthday party, I wanted to find fun ways of incorporating the Pokemon into the decor and the activities. This party had everything: tons of Pokemon games, a cool balloon arch, Pokeball party favours, and a DIY Pikachu Pinata! Have you every heard of a party punch game? It’s so fun! Using supplies I found at the Dollar Tree, I made this super easy and budget-friendly Pokemon punch game that the kids loved.
Here’s a step-by-step guide to make your own Pokemon punch game, as well as a little guide on how to play at the end!
Materials you’ll need to make your Pokemon punch game
- Red plastic cups
- Treats (Pokemon cards, erasers, chocolates, etc.)
- Tissue paper (black, red, white)
- Elastic bands
- Large piece of cardboard
- Hot glue gun and glue sticks
- Wreath hanger or other hanging mechanism
- Scissors
Step 1. Fill the cups with party treats

Firstly, fill the red plastic cups with treats such as Pokemon cards, erasers, and chocolates. You can choose a variety of small Pokemon-themed items to make it more exciting.
Note: if you’re unsure how many cups you’ll need, start by figuring out your design and layout cups to create a mock up of your Pokemon punch game.
Step 2. Cover the cup mouths with tissue paper
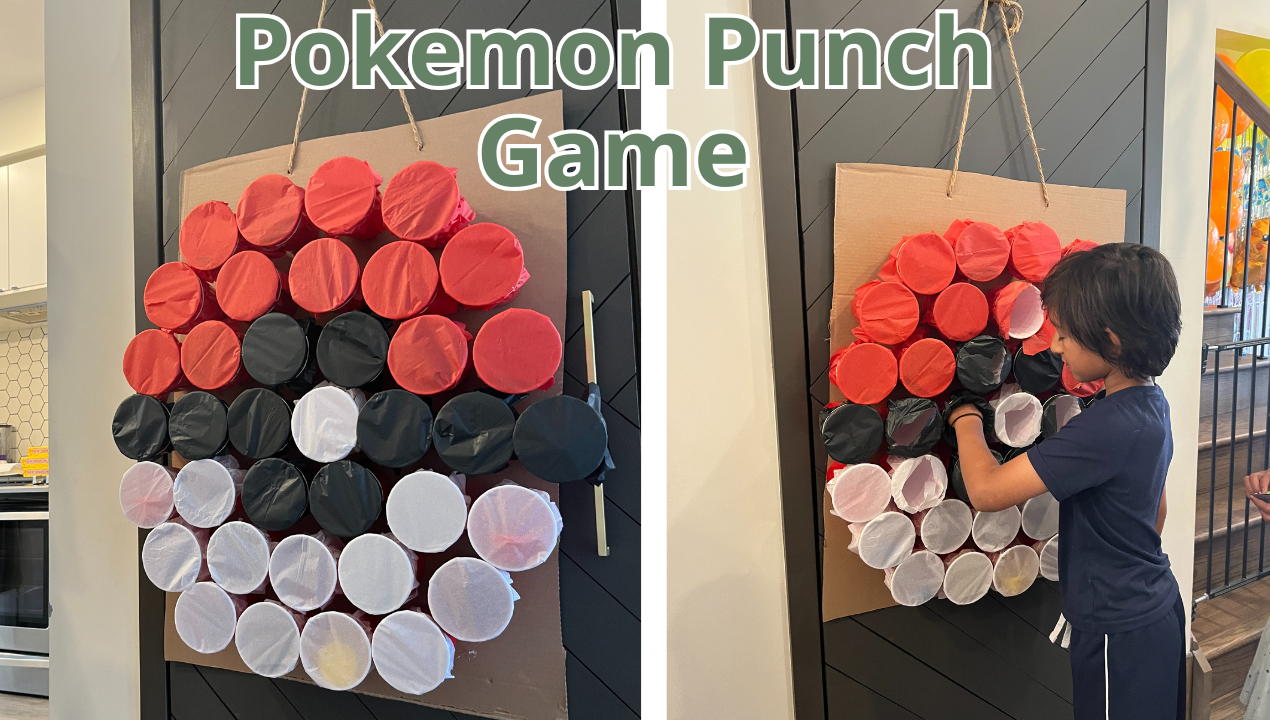
Next, cut squares of black, red, and white tissue paper large enough to cover the mouth of each cup. Here’s how many you need:
- 13 red squares
- 14 white squares
- 10 black squares

Place a square of tissue paper over the opening of each cup to create a Pokeball color pattern.

Secure the tissue paper in place by wrapping an elastic band around the base of each cup. Be gentle when wrapping the cups so the tissue paper doesn’t rip.
Step 3. Arrange the cups on a large cardboard
Lay out the cups on a very large piece of cardboard to create the design of a Pokeball (red on top, a black band in the middle, and white on the bottom). Arrange them in a circle to mimic the shape of a Pokeball.

Make sure that all the cups can fit on your piece of cardboard. Some of mine stuck out at the sides, but there was thankfully still enough room to glue them securely.

Step 4. Secure cups with hot glue
Use a hot glue gun to secure each cup in place on the cardboard. Apply hot glue to the bottom of the cup and press it onto the cardboard. Make sure it’s firmly attached so the Pokemon punch game is sturdy when you hang it up.

Give the hot glue ample time to dry and set, ensuring that the cups are securely fastened to the cardboard.
Step 5. Get ready to play!
Make some holes at the top of the cardboard to insert some string so you can hang it. Use a wreath hanger or another suitable hanging mechanism to hang the game.

Hang the Pokemon punch game on an interior door or any other sturdy support where it can be easily accessed by the players. Now, you’re ready to play!
How to play the Pokemon party punch game
This is a very simple game to play.

Players take turns choosing a cup and punching through the tissue paper to reveal the surprise treats inside.
After punching, they can collect the treats from the cup. Depending on how many kids are at the party, and how many cups are available, they can then go the back of the line and get a second turn!
This Pokemon punch game is not only entertaining but also adds a fun element of surprise to your party. Even the grownups wanted to play!

Check out this Youtube video for great DIY Pokemon birthday party ideas!
That’s it! A DIY Pokemon punch game; so simple to make, so simple to play, and so very, very fun. It’s the best of all worlds!
Enjoy your Pokemon-themed celebration! Pin this for later.

Leave a Reply