I love finding old furniture on marketplace or at thrift stores and using my creativity to make it something completely my own.
There is something so special about taking something forgotten and remaking it your own, to be a part of your home.

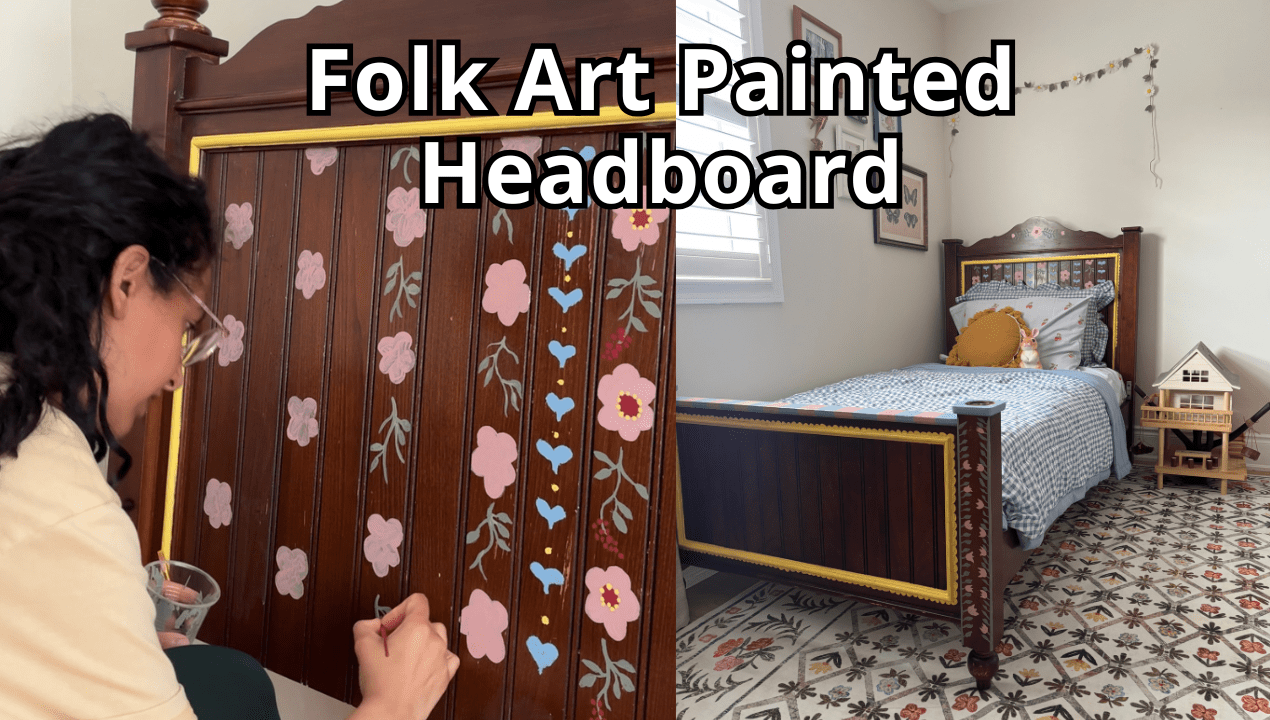
I found this gorgeous vintage dark wood bed on Facebook marketplace for $0. As soon as I saw it I knew I had to have it be a central part of my daughter’s bedroom makeover.
The wood headboard was pretty beat up from years of use and love. It was covered with scratches and scuffs. But like a true DIYer, I saw past the scuffs at the potential of what it could be. Especially the richness of the carved dark wood frame, it was very charming and would look very cohesive with the vintage floral room I was going for.
Quality Over Quantity
Fixing up this headboard was the official starting point for my daughter’s bedroom makeover. I didn’t have a specific vision for it; I just knew I wanted to use it. I saw it as an auspicious feat that this headboard was a $0 market place find and that it was the start of the room makeover. I have always believed kids don’t need the biggest and most expensive thing in order to feel like you care for them. They want something that can be their own. This project is proof of that. With the right attitude, willingness to experiment, even the most beat-up piece can be transformed in a beautiful way.
Let the creativity flow
My first instinct for this headboard was to paint designs on it. I skipped most of the prep work, picked up a few paint samples and a paint brush and let the folk art design guide me.
I didn’t really have a vision in mind for this. I painted straight onto the wood by hand. If I made any mistakes, I wiped them off and continued. It was a very freeing process and gave me the chance to experiment.
Trial Period
This project evolved with every stroke of my paint brush. I picked up a few samples of paint, a pale pink, paisley blue, pale yellow, green and red.
First, I hand painted sweet little pink flowers with green vines over the scratches, following the striped pattern of the headboard. And pastel hearts in between the flowers. And topped it off with a pretty pink flower and vine design, at the top of the headboard. It was very charming and folksy, perfect for my daughter’s vintage bedroom design.

The ball cap of the headboard had a huge rough patch on it; I contemplated what to do with that for a minute. I tried painting it a pretty paisley blue color, didn’t like it much. Then I switched to an open flower design, still didn’t look quite right. I even thought I might spray paint them gold, but it might clash with the rest of the rooms color palette. I considered taking off the ball cap entirely but was worried it would take away from the charm of the bed frame. I turned to my followers on Instagram to help me decide. The votes were in favor for taking the ball cap off completely. And ultimately that was the right decision.

I tried hand painting stripes as well. The stripes were tedious to paint but ultimately fun to experiment with. I even painted the trim red at one point, but decided against it as it didn’t flow. I went with the pale yellow paint trim, pink flowers and blue hearts. The result was a folksy painted headboard.
Hand Painted with Love!
I was pretty happy with the floral folksy headboard and bed frame. As I was working on the rest of the room, I set up a temporary space for my daughter. Both as a living arrangement for her and an experiment in furniture set up for me.


I set up the new white rug with floral patterns, the bed with the hand painted bed frame, a flower vine on top of the bed and her floral sheets.
The bed frame came together very beautifully. It’s always amazing what the power of a good thrift find and lots of creativity will do. Even a $0 bed frame can be a center focus for a cozy bedroom makeover.

Leave a Reply