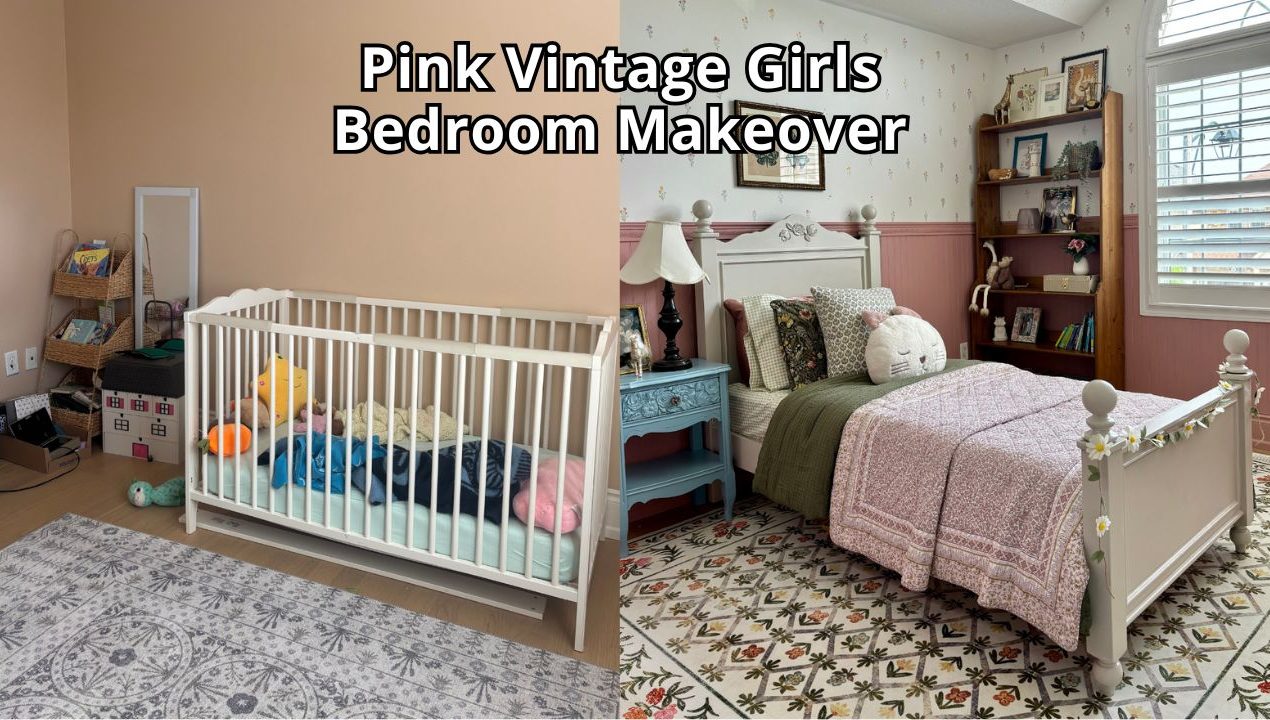
My daughter is growing out of her crib and ready for a big girl room makeover. She’s watched both her older brother’s get gorgeous room makeovers, and now it’s her turn! As you can see, her current space has no character.

This project was about creating something beautiful for someone I deeply loved. Growing up, I always wanted a sister, and sometimes it feels like my daughter is filling the sister-sized hole in my heart. This bedroom felt like writing a love letter to my daughter and I hope when she’s older she can feel the love and heart I poured into this room.

This girl’s room makeover has been a long time coming for my sweet girl. She was a surprise baby brought to us as a miracle of life and a lot of answered prayers. In our old townhouse, she did not have her own room. I had to make her a tiny, cozy closet nursery in our primary bedroom. It was unorthodox, but worked well for our set-up.
So when we finally moved into our forever home, I decided it was time to create a kids bedroom that was as perfect and sweet as my little girl.
Before: A bland bedroom
This kid’s room came with the perfect canvas for my daughter’s floral vintage girl’s bedroom. With high vaulted ceilings, an arched window with sunlight pouring in, and lots of space, I knew I could create a room as special as she is. After sleeping in a makeshift nursery for most of her life, I was excited to give her this space!

She asked for pink paint and lots of flowers!
The goal for this bedroom was to create a vintage, floral, pink bedroom that my daughter would love. I wanted to create a timeless bedroom but also incorporate the rainbows, flowers, unicorns and the color pink my daughter loves.
The vision was clear: floral touches, bead board, soft pastels, creamy whites, and contrasted with vintage furniture.
The next step was to choose the perfect paint color and figure out how we were going to furnish her bedroom.
Picking the Perfect Pink Paint Color
I knew the only color fitting for this room would be pink. She wouldn’t stop asking for a pink bedroom! Now the question was which shade of pink? For this step I asked my daughter for her assistance. We went to the store and she chose a myriad of different shades of pink. I painted the samples onto different sheets of paper and hung them up on her wall. We spent quite a bit of time deciding. She’s only 3 years old, so naturally her reaction to all the sampled paints was “I like them all Mommy.” This, while adorable, was not helpful.

But randomly one night, inspiration struck her; she finally pointed and said “that one, mommy!”
We decided on Amaryllis 1256 by Benjamin Moore in a Regal Select in Eggshell finish. It’s a beautiful, durable and saturated soft pink color. Perfect for that timeless and girly vibe I am going for.

I paired that shade of pink with White Dove by Benjamin Moore, a warm and classic shade of white. This contrasted nicely, a warm feminine and crisp feel to accentuate the timeless theme perfect for a girls bedroom.
Installing Bead board
I had decided early on that I wanted to install a half a wall of bead board in her bedroom. And what I hoped to be a simple DIY to add character to her room, became a project full of trial and error, and lots of patience. With each of my kid’s bedroom I have had to push the limits of my creativity, and it has made me a better DIYer for it.

I made countless mistakes during the installation of this bead board. A few things I wish I knew before I attempted this step:
- Plan around any existing fixtures/light switches: I had decided to do a half wall of bead board, with a layer of trim detailing where the wall and the bead boards meet. And for this, make sure you check the height of your light switch first! It may seem like a minor detail, but it plays a huge role in the polished look of your final look. If you’re planning to add trim, I would recommend, cutting your bead board panels a few inches shorter than the light switch plate.
- Cutting bead board is not an easy task: Bead board by itself is not easy to manage. Although it is not thick and heavy, it is very flimsy and awkward in its make; this makes it very tricky for one person to deal with it safely. I tried to manage full 4 x 8 panels through a table saw myself, which was not the best idea. And while I did manage it, by using a circular saw with a clamped straightedge guide, instead of with the Kreg Jig rip guide I was originally using. It was a time consuming process, but ultimately doable. Get as many of these cut at the hardware store as possible!
- Toothpaste trick for outlets: A big part of doing DIY’s is creative problem solving. This is how I tried this toothpaste trick to cut outlet holes. I dabbed toothpaste onto the front of the outlet cover, and pressed the bead board panel into it, this left a perfect imprint of where to cut. After that, I grabbed my jigsaw saw and cut out the outline easily.
- Scribing is inevitable in old homes: Our house is not new, which means the walls are not plumb. This meant, in order for the bead board to sit flush at the top and bottom, I needed to become familiar with the scribe tool.
- Caulk is your best friend. Close up any seams between the boards or along the baseboard with caulk. Only cut a tiny hole in your caulk to avoid a goopy mess!

Installing bead board is not easy but the payoff is definitely worth it. There is also a paintable bead board wallpaper that I was not aware of before I started this whole process. For future reference I would definitely consider that as an option.
Installing Trim
Once I had the bead board installed, I knew I wanted to top it off with a charming trim. There are so many beautiful trims. I had a really hard time choosing. I chose 3 different types of trim and stacked them for a really vintage feel.
The trim I chose had beautiful floral details on it, which really added to the vintage, floral look I was going for. I made sure to factor in the height of my trim when cutting the bead board, this is important especially around the outlets and switches. You don’t want to get an awkward length because of it.

Painting the Bead Board and the Walls
After my daughter finally chose the shade of pink she wanted, it was time to start painting. I started off by painting the soft coat of Amaryllis first on the bead board. I didn’t realize that painting beadboard is not like painting the walls. All the grooves in the beadboard need to be painted by hand. Next time, I would paint the grooves first, then use a roller for the flat surface.

Then I painted the top half of the walls with the classic White Dove. Together these colors made the room feel airy and inviting.

I painted the trim the same shade of pink as the bead boards, but I used Benjamin Moore Advance in Pearl finish. This is a fantastic trim paint. It’s really durable, especially in kids room! The room was really starting to come together and I couldn’t contain my excitement!
Fixing up the Night Stand
Sticking true to the vintage vibe of this bedroom, I thrifted and upcycled a beautiful wood nightstand. With a beautiful vintage shape and elegant curves, I knew it would look beautiful in the room. I painted the night stand Colonial Blue 1677 by Benjamin Moore Advance. This is an enamel based paints for trim, doors and furniture, which prevents the paint from chipping.

For the perfect finishing touch, I added gorgeous resin flowers to her night stand. I mixed the crafting resin, poured it into the flower mold, let it harden, and took it out, resulting in beautiful resin flowers. I added them to the front drawer of the nightstand and painted over them with the blue color.
Painting the Bed Frame
When I first started this project, I had visited different thrift stores and spent a good amount of time on Facebook marketplace to gather inspiration for this bedroom. I happened upon this great $0 marketplace find; I couldn’t believe I got this beautiful bed frame for free! A dark, moody, vintage bed, covered with scratches and scuffs from years of use. But I saw beyond the scuffs and at how it could be a central piece in my daughter’s bedroom makeover.

I tried different approaches to make this bed frame coincide with my vision for the room. I love the folk art trend. At one point the room really did feel like an English garden come to life. The original flowers I had painted on the head board, with the pink walls, the floral rug and the floral wall decals started to feel like too much. The patterns were clashing and I decided I needed to tone it down.

In the end, I decided to paint the bed a soft, neutral cream color that paired beautifully with the walls and other furnishings. I also added a few resin flowers to the top of the bed frame, to show cohesion throughout the room and the nightstand. You would think the bed frame and the night stand came together as a part of a bedroom set!

The Perfect Vintage IKEA Bookshelf
Since I didn’t have the wood bed anymore, I wanted add warmth into this bedroom. So, I thrifted the perfect vintage IKEA real-wood bookshelf, truly such a lucky find. It added the vintage warmth I wanted and brought the room together perfectly.

Painting the Door Blue
The plain white door felt a little boring amongst the cottage-core feel of the rest of the bedroom. So I decided to paint it. I settled on Colonial Blue 1677 by Benjamin Moore, this is the same color I used on the vintage nightstand I transformed.

The blue contrasted so well with the pink, creams and earthy tones of the rest of the bedroom. It didn’t feel overwhelming or out of place. And using the blue in different places in the room made it feel very cohesive.

Adding Floral Decals To Bring the Room Together!
I love all the colors in here, but it was still missing the little girl room charm.

My daughter loves flowers. After the request for pink, incorporating floral’s in her bedroom was her main request. And I wanted to give her just that, and keep it cohesive to the vintage vibe of the bedroom.

I added floral wall decals to her wall by using a laser level for precision. The decals were a perfect decorating idea, full of such charm. The color and personality they brought to the room would be loved by my daughter!
The Floral Rug My daughter dreamed of!
I wanted to find an inexpensive floral rug that would tie the room together. I saw tons of wool rugs I loved, but I knew they would not be a good choice for a kids room. I stumbled upon this floral rug at a very reasonable price and snagged it. It’s actually the first thing I bought for the room!
It’s also washable which is a huge bonus for a kids room!
Mixing Vintage Patterns
One of the most fun parts of a kids room is adding color, pattern and texture. When I found this gorgeous vintage looking quilt, I grabbed it immediately. I layered it with gingham sheets and block print throw pillow. When mixing patterns, make sure to only have on dominant pattern. In my daughter’s room, it’s the rug. All the other patterns are small scale.

Reveal
This bedroom came together better than I could have ever hoped for! The transformation feels magical and is the perfect place for my daughter to play and grow.
I hope she can see the love and thought her mother put into this bedroom as she gets older. This room is my love letter to my girl, and what I hope to be a sanctuary for her throughout the years.


Kids don’t always need perfect or brand new. They want something they can call their own. And I hope my daughter feels that in her bedroom.
If you enjoyed this transformation, follow along on my Instagram and blog as I continue creating the home of my dreams, one magical room at a time.Vintage Floral Girls Bedroom


Leave a Reply