
My elevated DIY board and batten accent wall makeover looks SO professional. It is a show stopper in my home. Even if you’ve never done a DIY project, this is a perfect beginner project. I’ve done a geometric accent wall and traditional molding in my home. This board and batten is my new fav accent wall! Read below for 10 steps on how to create this look for around $150-$200.
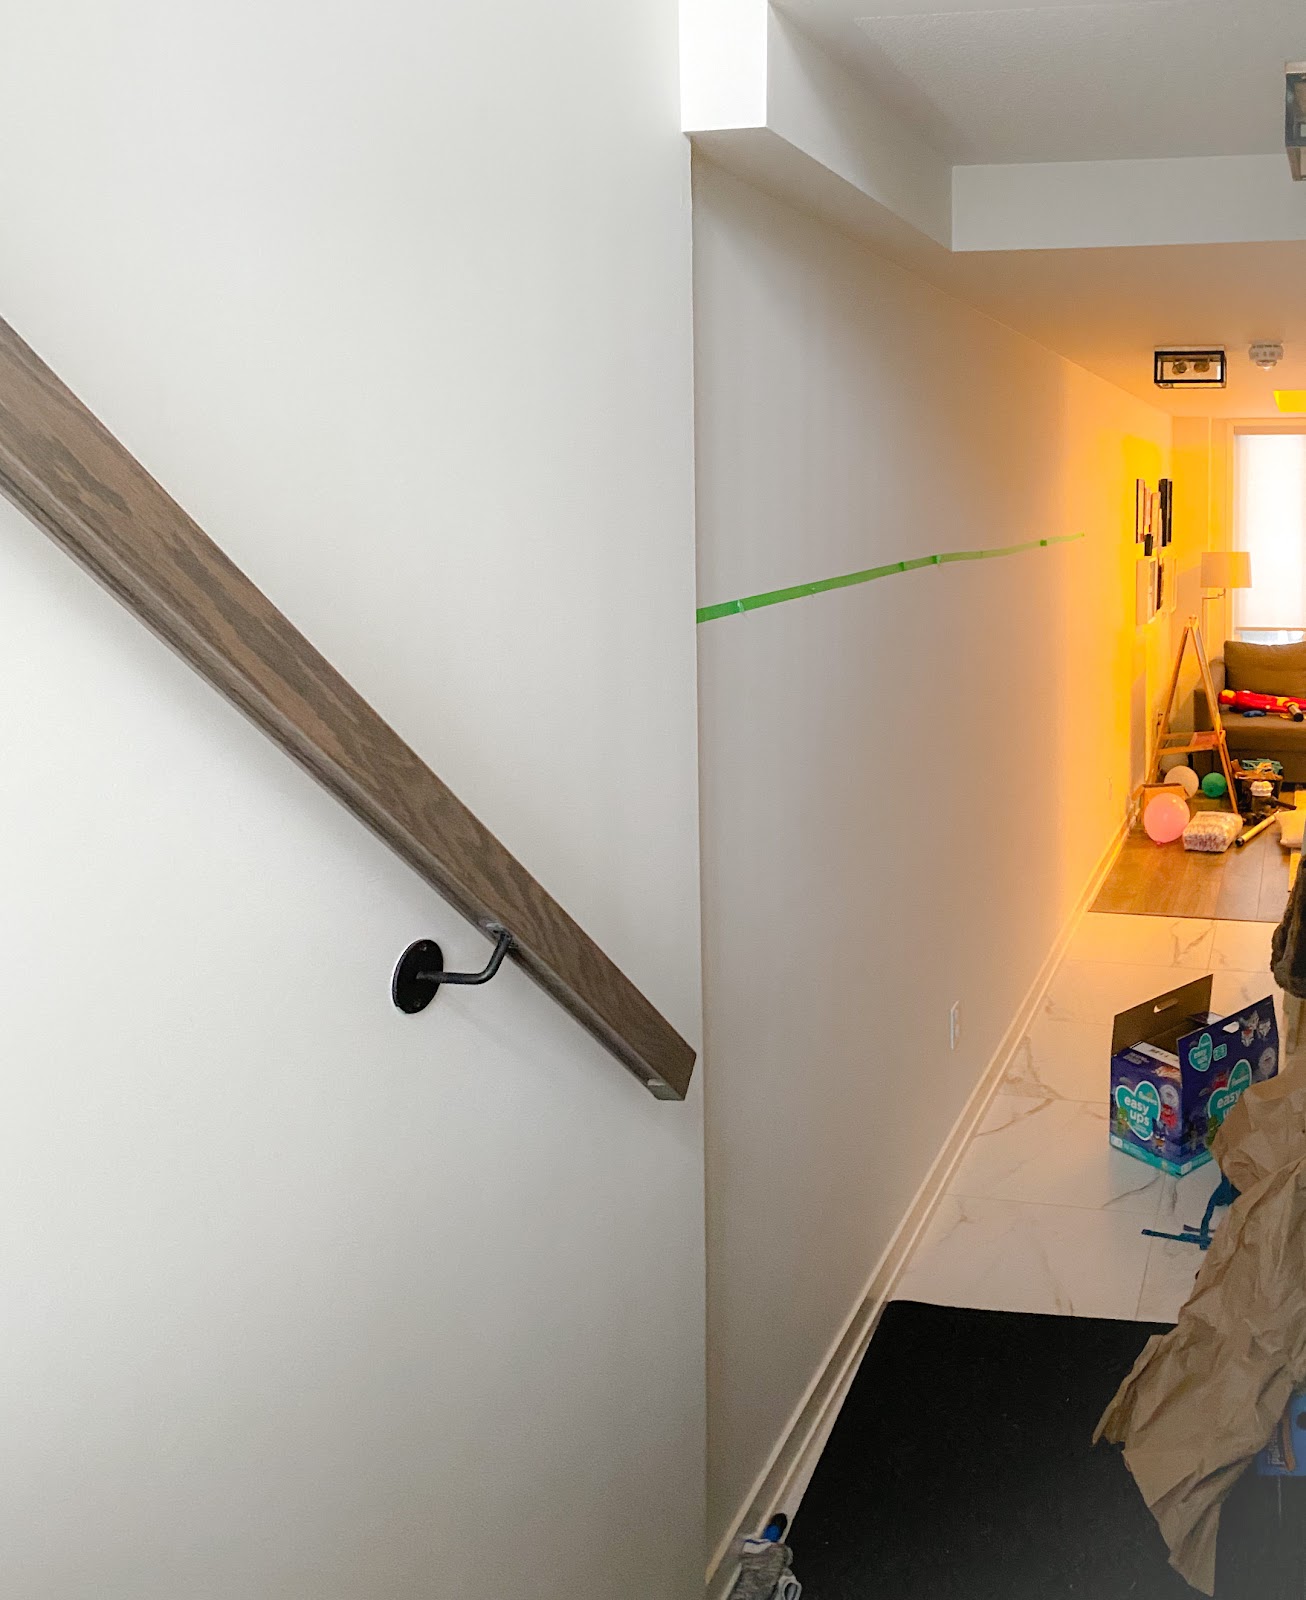
Table of contents
- Materials
- Tools to create a board and batten wall
- Step 1 – Plan your elevated DIY board and batten accent wall makeover
- Step 2 – Cut all your boards and batten boards
- Step 3 – Give your boards a professional finish
- Step 4 – Nail in your vertical boards
- Step 5 – Attach the top board and decorative trim
- Step 6 – All the perfect cuts for a professional finish on this accent wall
- Step 7 – Dealing with obstacles on your accent wall
- Step 8 – Filling holes
- Step 9 – Caulk
- Step 10 – Paint you Board and Batten Accent Wall
- The Grand Reveal of my Elevated DIY Board and Batten Hallway!!!
- More Amazing Accent Walls
Materials
- Primed MDF boards
- 3.5” flat boards
- Decorative trim
- 1 ½” 18 gauge brad nails
- ¾” 23 gauge pin nails
- Drywall spackle
- P220 grit sandpaper
- Caulk
- Caulking gun
- Bowl of water
- rag
- Paint – I used Pewter Green by SW
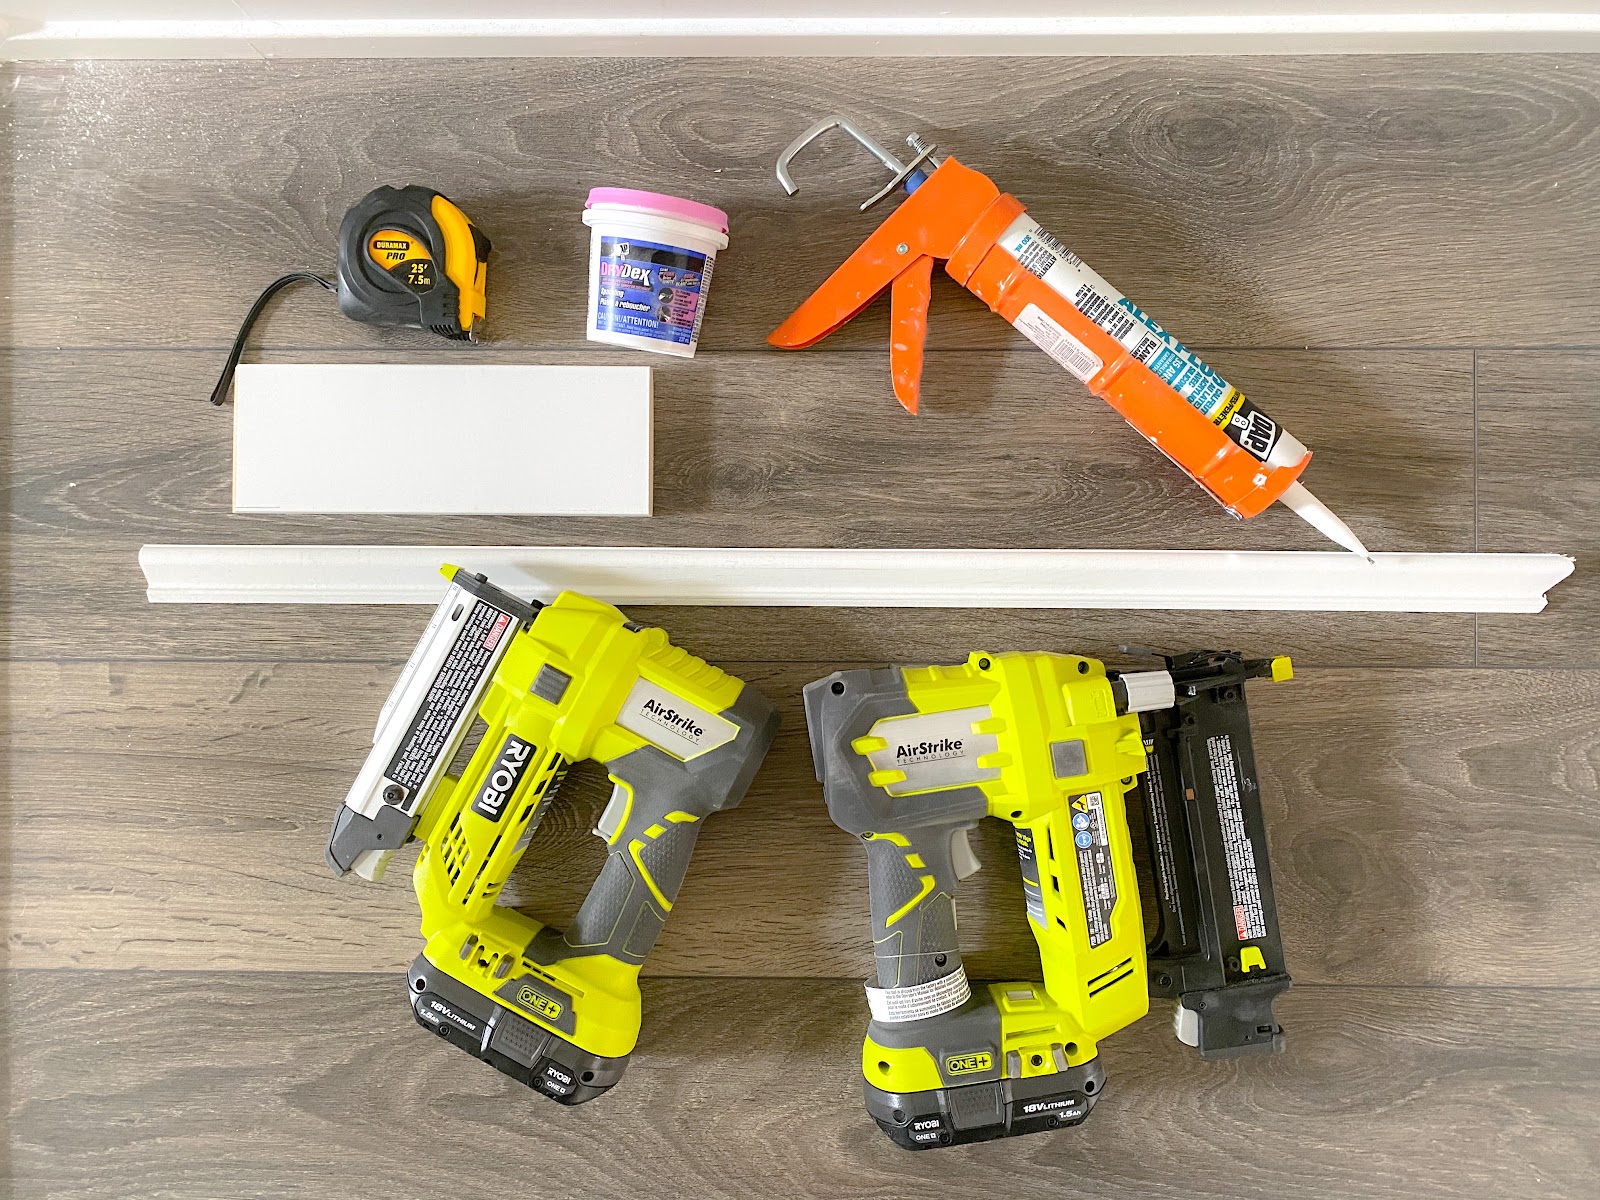
Tools to create a board and batten wall
- Mitre saw. This is a great beginner mitre saw
- More Advanced saw. This is what I use
- 18 gauge Brad nailer. I love this because there is no air compressor required so you can work really fast
- 23 gauge Pin nailer. When using decorative trim, this tool has much thinner nails that prevent the trim from splitting
Step 1 – Plan your elevated DIY board and batten accent wall makeover
You know that saying, if you fail to plan, plan to fail? Well, I live by that! It’s easier than you think with some simple math.
1 – Measure the length of your hallway
2 – Measure the height of your wall
3 – Measure the width of your boards. Most the time boards are ½” skinnier than the size (so 4” boards usually measure 3 ½”)
4 – Take a look at some inspiration pictures and determine what style you like. I personally like a tall board and batten with wide-ish board. However, you will have the adjust the scale to fit in your size. You can also add interest with decorate trim on the horizontal boards like I did! My ceiling is less than 8ft (95″) and the hallway is narrow at 40″ wide
5 – Once you have your measurements use this tool to calculate the width between the battens. There is no “right” answer in how many battens and sections you should have. A wider hallway with higher ceilings can have bigger sections. Spacing for my board and batten is 18” apart.

6 – I taped my board and batten wall treatment design. It only takes a little bit of time but if you’re visual like me, you’ll be thankful you did it. After I taped mine with a wall laser level, I realized the DIY Board and Batten spacing was too wide! I’m glad I learned that before nailing all my boards in!
How tall should a board and batten be in a hallway?
- For this style, a good rule of thumb is that the vertical boards should be in the range of ⅔ of the height of the wall.
- My walls are 95” from the floor to the top of the wall and the vertical boards go up to 63”
- Tape it and adjust. If you want to add artwork or lighting, that may mean a bit lower.
Step 2 – Cut all your boards and batten boards
1 – It is SO easy, fast and precise to cut your boards with a stop block. Don’t skip this step. I promise you will thank me later. A stop block is something you clamp down to your workbench that your wood butts up against. You don’t move it or your saw so that every piece is the same length. It’s really useful for repetitive cuts. You don’t have the measure the vertical pieces after you set up your stop block.
How to set up a stop block:
- Clamp an object to the end of your workbench (like wood or in my case, a case of sparkling water)
- Place your saw on the table and lock the blade down (ensure it’s not powered on)
- Adjust the position of the saw so the distance from the saw blade to the stop block is what you’re looking to cut.
- Make the first cut, measure to ensure it’s accurate. Then cut all the rest of your wood in a flash!

Step 3 – Give your boards a professional finish
If your trim is thicker than your existing baseboard, you can: get a new baseboard, or nail it as is. However, you can take the time to take it to the next level with a beveled cut. I use a 40* bevelled cut, but I also keep the trim flat at the edge (vs angled the whole way through). Use the laser on your saw to ensure you will have a blunt cut at the end.


Use a stop block to ensure each batten will be cut to the same bevel. You should only have to nudge your existing one forward ¼”

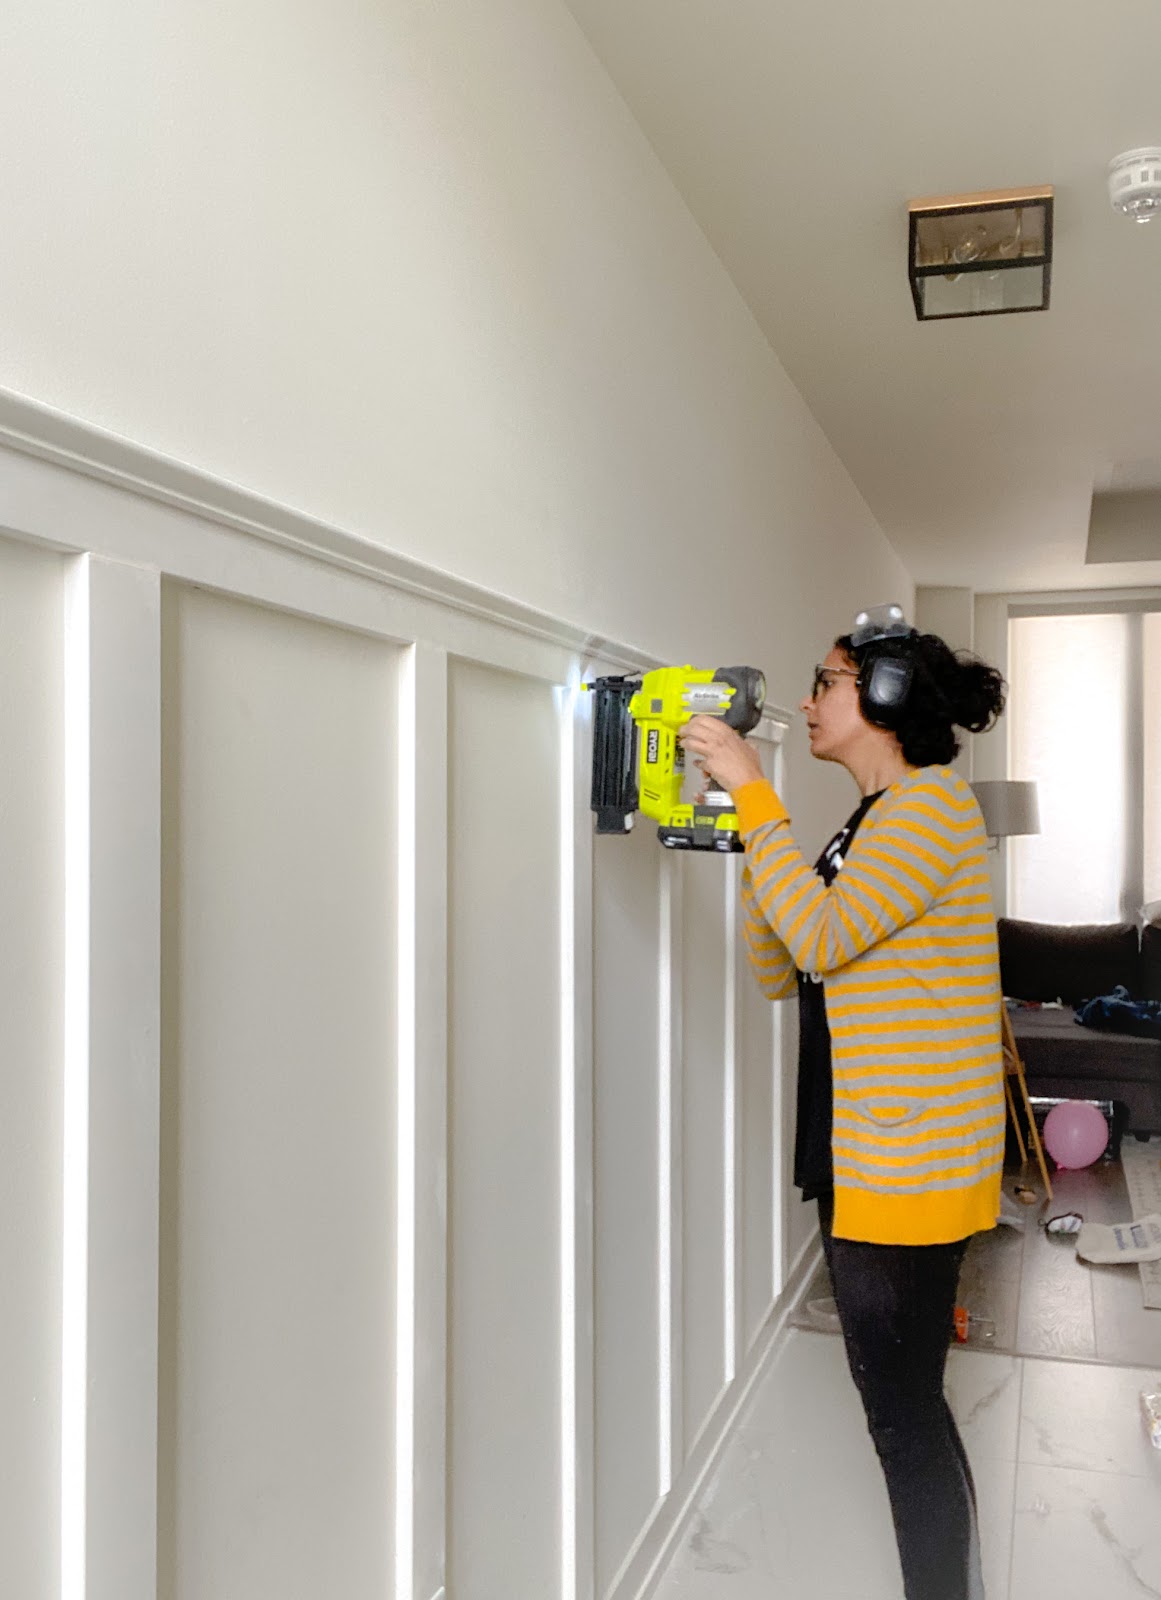
Step 4 – Nail in your vertical boards

1 – Nail your first vertical board at one corner of your wall, on top of the baseboard trim. Your wall may not be level. Nail your batten so it’s level. You can fix any awkward gaps later when we work on the finishing touches.
2 – Cut a spacer the width indicated by your plan (my spacer was 18″). The DIY board and batten spacer should be as big as the gaps between each batten
3 – Line up the spacer so it butts up adjacent to the vertical board already nailed, right above the baseboards
4 – Push the next batten up against the spacer. Use your Nail gun to secure it on the wall.

5 – Slide the spacer to the top and nail the batten
6 – remove the spacer and use extra nails to secure the batten
7 – continue along the entire wall with all your vertical boards
Do you have to use a nail gun for board and batten?
I prefer to use a nail gun. I do not use liquid nails on my accent walls. In the future, if I choose to remove the accent wall, the glue would cause the drywall to rip off. This will result in re-drywalling or a lot of repair to the wall.
Step 5 – Attach the top board and decorative trim
1 – Cut your horizontal pieces and attach them. Ensure they are level before nailing. Don’t worry if you have a few small gaps because in the next step we can fix that!
2 – Attach your decorate trim using a pin nailer. I lined up the top of the decorate trim with the top horizontal board. A pin nail is not essential, but I’ve found in the past, the brad nailer can split the trim because the decorative trim is so thin
Step 6 – All the perfect cuts for a professional finish on this accent wall
Even though these bevelled cuts look hard, it’s doable. It was my first time doing bevelled cuts on decorative trim, but I managed (with a few re-cuts needed!). I hope this gives you confidence for your DIY Board and Batten Accent Wall!
For each inside and outside corner, you need to set you saw’s bevel cut to 45 degrees. On my saw, you release the lock at the back and then swing your blade to either side (having a saw with dual bevel made this easy! You can still make the cuts if your saw only bevels to the left). The two images below are both with 45 degrees (one on left and one on right).
1 – set your blade to the left bevel, make your cut
2- set your blade to the right bevel, make your cut
Once you have both cuts and they fit, then I cut the straight edge (as that’s a lot easier!)


Step 7 – Dealing with obstacles on your accent wall
I had to deal with a few obstacles on my walls:
- spacing for a small irregular wall – I tried to make the spacing as similar on the smaller walls as the longer wall.
- a batten on a vent – I cut the batten to look like the batten continued on top and under the vent.
- vertical battens on an electrical outlets – Extend the outlet out and make the batten look continuous behind the batten
Step 8 – Filling holes
- Spackle will go on any spot where wood meets wood.
- Caulk will run along the edges where wood and wall meet
Filling holes and seams
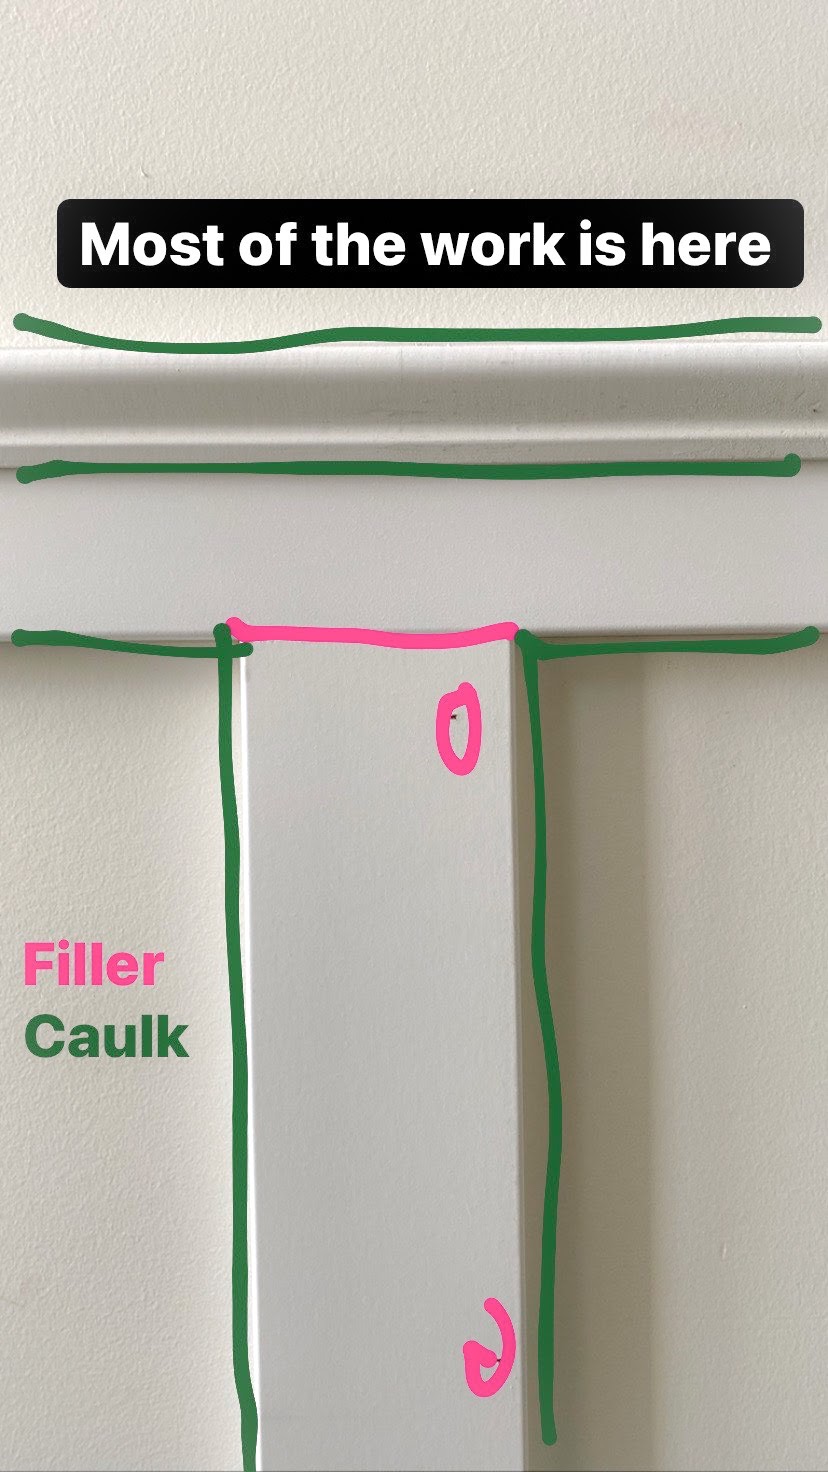
1 – You can use either drywall spackle or wood filler. to fill nail holes. I prefer spackle as it’s white and I don’t have to re-prime my boards.
2 – Use your finger to press a small amount of spackle into each nail hole. I prefer to use my finger as I get more control, and there is less spackle on the wall. Use the least amount of spackle to fill the hole. The more spackle and messy, the more difficult sanding will be later

3 – Once the spackle is dry, you can sand using p220 grit sandpaper. Don’t be alarmed if you need to re-fill some holes and sand smooth. Getting the right finish is tedious, but so worth it
Step 9 – Caulk
1 – Cut the smallest possible hole in your caulk gun. I don’t even cut a hole. I hammer a finishing nail into the tip to puncture my caulk. Load your caulking gun
2 – Run the caulk along the seam of where the trim meets the wall

3 – Use the samosa (or pastry method): dip your finger in the water and then run your finger along the seam. Wipe the excess caulk on a rag to get a smooth finish
4 – Repeat for every seam, plus the seam where the decorate trim boards meets the 3 ½” top horizontal trim pieces
Step 10 – Paint you Board and Batten Accent Wall
Now that you’ve done the hard work, you’re at the last mile! Time to paint

1 – Before painting, wipe all your boards with a cloth and vacuum any dust on the baseboards and floor. It’s a personal preference if you paint the baseboards, door trim and doors. If you browse on pintrest or instagram, you’ll see any combination! At first, I did not paint
2 – Picking a paint color can be so daunting. It can be really helpful to get samples that are stickers. Put them on the wall and move them around to see how the color looks in different light throughout the day. I like these because they’re made with two coats of the actual paint color! I used the paint color SW Pewter Green in the Emerald line, Satin finish. I know my kids will always run their hands along the wall and this makes it easier to wipe them down. I started by cutting in with a paint brush along all the trim work. Then I used a paint roller on the flat surfaces. I always like to paint 3 coats for the best finish. Although I have a paint sprayer I opted not to use it because you have to be very precise with taping. Any small gaps and the overspray would end up in the front entryway.
The Grand Reveal of my Elevated DIY Board and Batten Hallway!!!
Here is my DIY Board and Batten Accent Wall!! All the details that make this long wall in my hallway spectacular! I absolutely think that any level of DIY could do this – this could even be a great first DIY.


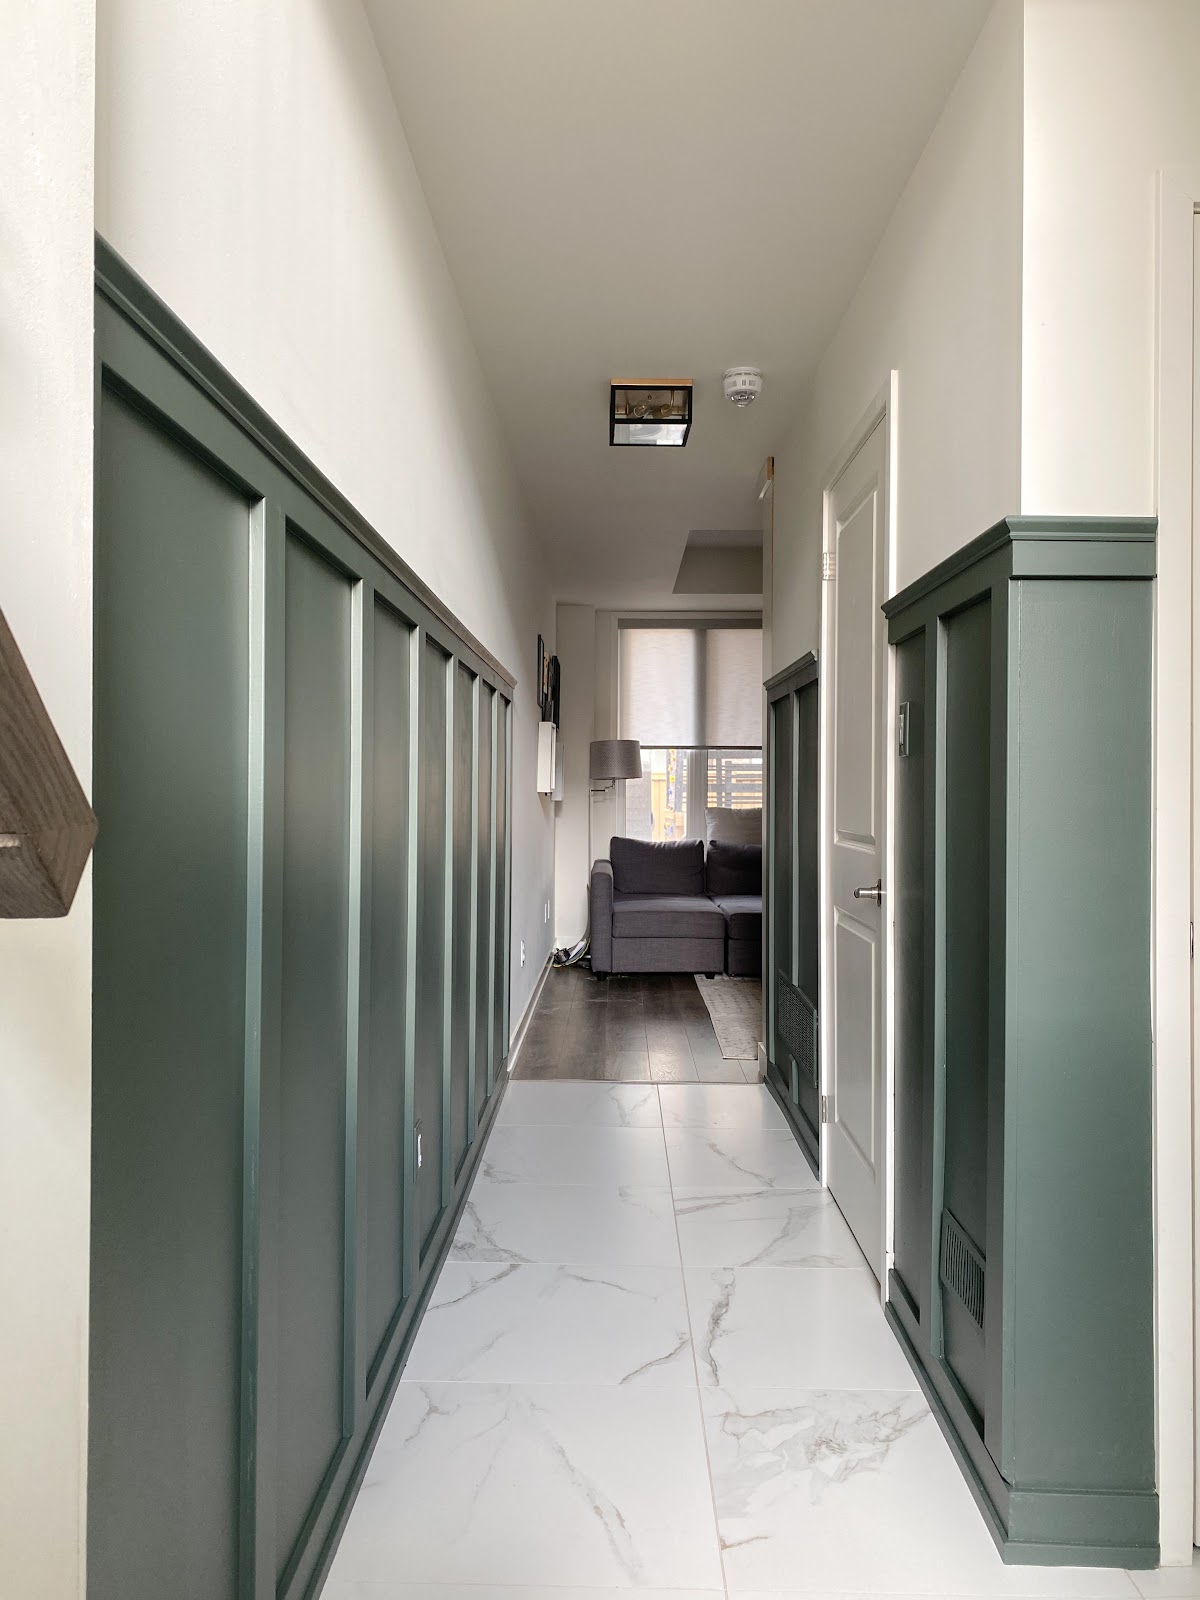

Updates I made to my DIY Board and Batten accent wall: I decided to paint the door and it’s so much more cohesive. Learn how to paint an interior door without brush marks. I also debated between 2 rugs and added art and scones! Follow me on instagram to see more great DIY projects


More Amazing Accent Walls
If you love this accent wall, be sure to check out this modern slat wall that I did for my friends

If your style is more traditional, you could create a beautiful picture frame molding wall

If you have a small home with limited space for an accent wall like me, I made this show stopping door that went viral. I even have a step by step guide on how to cut every piece!

If you love it, Pin it!


Crystal Stidham
This was such a amazing post! I’m new to all of this so the tools, nail type, and finishing touches are all so helpful!
Hana’s Happy Home
I really wanted it to be detailed for any skill level to follow along! Thanks for the feedback.
DIY living room accent wall under $100! - Hana's Happy Home
[…] Now you could stop here and just create a simple box moulding design. If you do you can caulk, fill any mitre seams and paint the trim to your wall colour now. These steps are previously covered in my board and batten accent wall. […]
How to paint a door without brush marks - Hana's Happy Home
[…] room by painting your door. Last year, I updated this boring long hallway by adding this beautiful board and batten. However I didn’t feel ready to paint the door at the time. I painted the hallway this rich […]
Carol
Hana had the best instructions for board and batten on Pinterest! I would leave a picture of our project but I don’t know how😊
Hana’s Happy Home
Hi Carol! That’s so kind! I’m so so glad that you found it useful!! You can share your project with me on IG. Hanashappyhome. DM it to me!
Board and Batten Paint Colors - And Examples to Prove It! ⋆ Growing Up Kemper
[…] Source […]
Juliet
Just came to say that these are the most helpful directions I’ve seen online, and I looked at 27290101 pages lol I already did my wall, before finding your page, but a lot of the info you put was not on other pages and would have been SO helpful to have known! I’m now going to do an entry way walk and will refresh my memory and use your tips! Thank you
Hana’s Happy Home
Hi Julie! I’m so happy to hear that! I really wanted anyone to be able to do this project.
Sara
We are considering doing board and baton in my daughter’s room. Is the wall textured at all? Ours have a light texture and I wasn’t sure if we could just do the board and baton or if we should try to smooth the wall. Thank you!
Hana’s Happy Home
Hi Sara. My walls are smooth. You have 2 options: go ahead and do the board and batten on your wall. Or you can cut down large MDF panels to cover that bottom portion of the wall first. Then apply your board and batten panels.
Entryway DIY Board and Batten Wall - Hana's Happy Home
[…] they enter into my home. This entryway leads into a long hallway in my basement where I did a more traditional style board and batten wall. Check out that post if you’re looking for a more traditional board and batten […]
Mike Earlike
You did a fantastic job; the walls look beautiful. Thank you for taking the time to write up and photograph (and video) a detailed how-to post! I imagine this was a labor of love (both the work on the job itself and also the work of creating this thorough post. You’re giving me the confidence to try this at our home.
Hana’s Happy Home
Thanks so much Mike! I hope you try it out. I’d love to see it!
Jamie
Could you show where it ends and transitions from the board and batten into the other room?
Hana’s Happy Home
Hi Jamie! I’ll try to get some pics snapped and updated within the next week!
Natalie
Hey, I loooove your board and batten. I plan on doing this color as well. I would love to know what is the white color you used?
Hana’s Happy Home
Hey Natalie! Thanks so much. It was painted by the builder but it’s a very close match to Alabaster by Sherwin-Williams
Katelyn Arnold
What color are your hallway walls above the board and batten?
Hana
It’s Pewter Green by SW! I love this color!
55 Best Board And Batten Ideas To Spruce Up Every Room And Corner
[…] Image and tutorial By Hana’s Happy Home […]
55 Best Board And Batten Wall Ideas To Spruce Up Every Room
[…] Image and tutorial By Hana’s Happy Home […]
Christy Hemphill
Great tutorial. Might want to fix that typo about adding scones to adding sconces. I do love a good scone though. 😉
Hana
yum!! haha. Thanks
55 Best Board And Batten Ideas To Spruce Up Every Room And Corner - Fresh Diy Home
[…] image source […]