This DIY fireplace surround is one of my favourite projects!! Look at this gorgeous fireplace that I made for my mom’s living room. A fireplace serves as the focal point of a room, and a modern fireplace surround can enhance its aesthetic appeal, creating a stunning visual impact. I’ve been making over my mom’s living room by adding panel molding and chair rail. As soon as I started, the old fireplace stuck out. I took the leap to remove the old fireplace. The thought of removing the fireplace was so daunting but it was much easier than I anticipated.
I made this stunning fireplace surround using trim. It’s not that difficult. In fact, this is a DIY that looks SO much more expensive than it really is! I used baseboards and 2×4 lumber to create this. I will walk you through the steps to create a modern fireplace surround that will transform your living space into a sophisticated and inviting environment. My mom has a gas fireplace, but you could use a similar technique if you have an electric fireplace insert.

Materials to build your modern fireplace surround
- 2×4 lumber
- 1×2 pine
- Flat stock trim
- Decorative baseboards
- Safety goggles
- Dust mask
- Work gloves
- Measuring tape
- Sandpaper or sander
- 1.5″ brad Nails
- 2.5″ wood screws
- Level
- Laser level
- Paint or stain
- Paintbrush or roller
- Caulk
- Caulking gun
- Wood filler
- Painters tape
Power tools
If you prefer to watch a video, check out my YouTube Tutorial
Step 1: Measure and plan your new fireplace design
Measure the dimensions of your fireplace to determine the size and shape of your surround. Sketch out a design that aligns with your desired aesthetic. Consider incorporating clean lines and minimalist elements that characterize modern styles. Once you have a good idea of the size, use painters tape to map it on to the wall. Make sure it fits with the size of the room and the scale of the furniture. For reference, my fireplace frame from the outside was 51″ tall by 60″ wide
Figuring out what type of trim I was going to use took a lot of time. I looked at a lot of different trim styles before deciding on these baseboards. Also when you’re looking at flat stock boards, look at the edges of the boards. Some have slight softer rounded edges whereas others have a sharp angle. I opted for the rounded edges to match with the style of the decorative trim.
The modern aesthetic of this fireplace does not require a fireplace mantel. I like how clean it looks without it.

Step 2: Cut and mount your outside frame of the fireplace
I used the 5″ flat stock as my guide. I cut the outside pieces first. I cut the edges on a 45 degree bevel cut so that all the edges would align really nicely.
Now, this may sound a bit strange, but instead of building a frame and then attaching it to the wall, I decided to build my frame directly on the wall. Building a frame separately and then attaching it to the wall is harder in many ways than building a frame directly on to the wall. My biggest challenge is getting the frame to be square. I don’t have this issue when I build on the wall.
I used 3 pieces of 2×4 lumber stacked on top of each other for the outer layer of the frame. I found the studs and screwed the first 2×4, then on top of that, the second 2×4, and the 3rd right on top. Then I secured the 5” trim around this frame using my brad nailer. Make sure to hold the edges together to get a tight fit.

Step 3: Attach the decorative baseboards on top of the outer lumber
I cut my baseboards to the desired size, but I used a 45 degree mitre cut on the edges. The mitre cut ensures continuity of the design

Step 4: Build the inner layers of the fireplace surround
I build the next 2 layers together. I used the 5” baseboards, but tucked them behind the top layer slightly. I used 2×4’s and pine to get the desired height of the flatstock. I drilled them into studs. Then I nailed the flatstock on top, cutting the edges where they met at mitre cut. Cutting the middle trapezoid piece was the most challenging to get the right size. It took me a few cuts. I always prefer to get a really good cut and fit. It you cut a board too short, it can be hard to hide the imperfections.

Step 5: Add a base for the tile installation
I had leftover 12” shiplap in my garage so I used that to create a flush surface with my fireplace surround. I wanted my tile to overlap slightly on the fireplace surround. I placed a 2×4 layer of lumber behind to help raise the shiplap to the height of the gas fireplace. It was already looking so professional. I can’t believe this is just trim!

If I was building an electric fireplace surround, I would insert my fireplace here, and do the same – make sure the frame is level with the fireplace insert.

Step 6: Install the marble tile on the fireplace surround
I debated a lot between white, black and charcoal tiles. My instagram community helped me pick charcoal. There is a lot of beige and white in this room, and the charcoal gives the room depth. I wanted to use a marble slab, but both the slab and cost of installation is higher. Instead, I opted for a 24×12” tile. It has minimal lines and looks amazing!

I am going to be honest here. I LOVE wood working, but I am not a huge fan of tiling. I have tilled a few times and everytime, it doesn’t have quite the right professional finish. I opted to hire a tile installer to save me the grief of tiling. I was lucky to find an installer who did a great job and charged reasonably. A few tips I saw from him:

- Use backer board so the tiles adhere
- Don’t use premixed mortar for large tiles
- Allow time for the tiles to set, since they are so heavy
- Use a support bar as shown below to ensure the top row of tiles does not slide down. Leave it for 24 hours to dry.

Step 7: Add finishing touches to your fireplace surround
I caulked around the edges where the fireplace met the wall. I also caulked on the decorative trim. I know many people prefer to use wood filler, but I find caulk much easier to work with. Inspect the surround for any imperfections or rough spots. Use additional sanding, caulk or wood filler if necessary. Cover the nail holes with a wax filler or wood filler
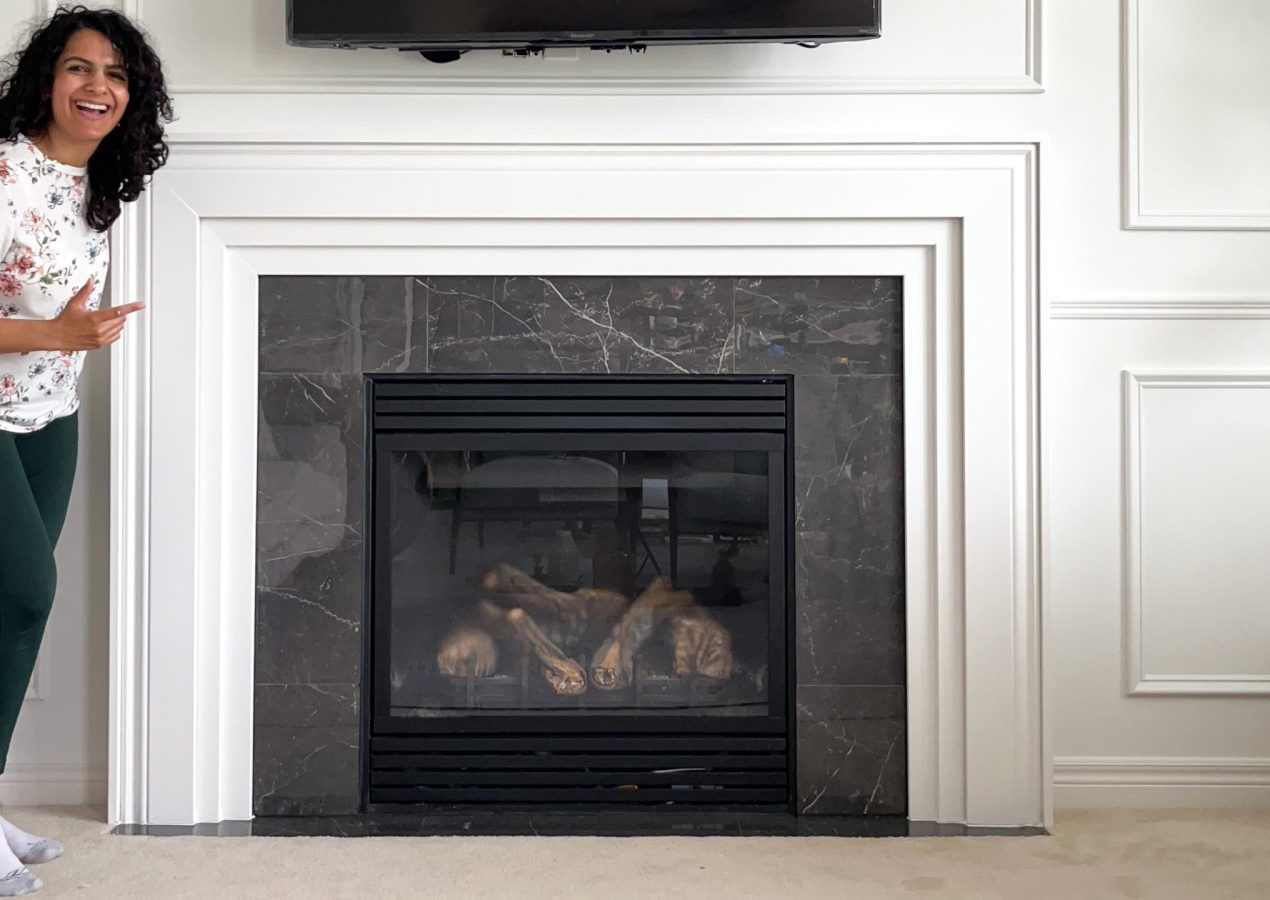
Modern Fireplace Surround Reveal!!
Do you remember how this fireplace began? I knew I could make it SO much better.

I love this DIY fireplace surround project so much! I think the fireplace turned out SO beautiful. Building it on the wall makes this a much easier project. I can’t believe this is just molding used in really creative way!
This fireplace wall is such a beautiful focal point in this room. If you love DIY projects like this, follow me on instagram to transform your home on a budget!

Pin this project for your fireplace makeover


Charles Joseph Wohlgemuth
who do you hang Christmas stockings?
Hana
You can use command hooks!