A budget laundry room makeover is such a fun DIY project. You can add color and style in a small space. I helped my brother and his wife (Neal & Asma) make over this small laundry room. This is a really easy laundry room makeover with no demolition. We worked with what we had. When we started off it was just a basic laundry room but we had a goal to make over this laundry room with only about $300. Here’s what we planned for this space:
- Hide the laundry connection
- Add a punch of color
- Storage for brooms and mops
- Paint the cabinets
- Change the light fixture
- Add a shelf for more accessible storage, since the cabinets are mounted very high

Laundry Room Before
For the new laundry room design, we are not going to do any major renovations. Even though the cabinets and floors are dated, we will work with them. Adding a rug is an easy way to cover up old flooring. We will paint the old cabinets and replace the hardware to make the laundry room cupboards sparkle! Thank you Sherwin-Williams® for sponsoring this post. Read more about my disclosure policy.

We wanted to keep this really affordable, under $300. This is a great project to have fun with paint. We will not be replacing the floor tiles or cabinet as those will be costly and add a lot of complexity to this easy project.
In the moodboard, you can see we are really going for a modern coastal vibe with the color palette of blues, white and wood. Read on to see how we transformed this dated laundry room.

If you’re going to be completing any room makeover, save this coupon code below from Sherwin-Williams®. You can use it to save 15% off paints.
Painting the laundry room trim
There’s a new trend with trim that is painted different colors than the walls. It’s going to be huge in 2023 and beyond. It adds a lot of visual interest without making the space look busy (like with a wallpaper accent wall). The best part is that paint is such an easy DIY for any beginner.
We painted the trim and the crown molding the same color, Storm Cloud. It was challenging to pick the right blue paint color. We wanted a blue that has gray undertones vs purple and Storm Cloud does that. It looks crisp in the daytime. In the evening, the gray tones come out more strongly.

Trim and crown molding need extra durability as they get kicked, hit with laundry baskets, etc. We used Sherwin-Williams Emerald® Urethane Trim Enamel in a satin finish. I’ve used this paint line when I painted my daughter’s nursery cabinet, my black doors and so many more times.

If your trim is painted with an oil-based paint, I recommend deglossing, sanding with p220 grit paper, priming and then painting. I know it seems like a lot of steps, but you don’t want your paint to chip.
Taking a risk by painting the crown molding
My favorite feature in this laundry room is the painted crown molding. Actually, my brother said I could do anything in this laundry room EXCEPT paint the crown molding. Of course, I knew he would come around. Painting the crown molding makes this laundry room so much more detailed and finished. It draws the eye upward and makes the room look even taller.

We painted it the same color and finish as the trim.
Painting the walls to enhance the blue trim and crown molding
We also gave the walls a fresh coat of paint. They were a faded yellow beige. I swear every builder painted homes this color in the early 2000s. We painted 2 coats of Snowbound in the Emerald® line, Satin finish. To keep a cohesive color palette in a home and to save money, use the same white color in multiple spaces, as we did.
A laundry room is usually pretty dusty because of the dryer lint. Make sure to wipe the walls down before painting so you don’t get clumps.
Painting laundry room cabinets to give them a new look
In the beginning we debated a lot whether we would replace the existing cabinets with new cabinets. The biggest challenge was finding a pair of cabinets that would fit in this space. Because there is a window, we were very limited to the depth of the cabinets.
We opted to save money and make this project easier by painting the cabinet doors. In my parents’ laundry room makeover, I installed cupboards and it was really hard because we had to remove the laundry machines. In this tiny laundry room, it was hard enough to maneuver around the machines!
To paint cabinets, start by sanding with p120 grit sandpaper. After wiping them clean, give them 2 coats of a strong adhesive primer. I used Sherwin-Williams Extreme Bond® Primer.


After letting the primer adhere for 24 hours, I used a foam roller to paint the cabinets Storm Cloud. I used the Sherwin-Williams Emerald® Urethane Trim Enamel paint as this is great for painting cabinets. Full tutorial for painting laundry room cabinets is coming soon!

Laundry room backsplash with a subtle accent wall
With so many white walls, I wanted to add something interesting in this laundry room, but I didn’t want to take away from the blue crown molding and trim. So, I installed vertical shiplap behind the laundry machines. I love shiplap because it’s timeless. It adds character without being so obvious.

I installed the shiplap boards with my brad nailer and 1 ¼” nails. I was careful around the plumbing areas as I was SUPER nervous not to damage any pipes. Neal asked me to use construction adhesive right behind the machines. When I added shiplap to my bathroom, I used ¾” nails sparingly behind the toilet. I am not a fan of gluing accent walls. If we opt to remove the boards in the future, it will be a lot of work to patch up the walls. But since it’s not my home, and I didn’t want any mishaps, I used the construction glue.

Adding a shelf versus counter
The cabinets in this laundry room are mounted very high. They are even more inaccessible because of the laundry machines. Asma requested storage for laundry detergent that she could reach.

I stained a piece of plywood and finished the edges with edge banding. I mounted it using two brackets. Finding studs on this wall was difficult because of all the water connections. I didn’t want to puncture any of the pipes, so I mounted the brackets all the way at the far edges of the wall where I knew there were studs.
Another option in this laundry room would have been to add a really nice butcher block counter. However, Asma already uses the machines as a counter, and she preferred to have a shelf because the cabinets are so high. On the shelf, she can add things like laundry detergent and fabric softener.
Hiding the laundry connection
Most laundry rooms have a water connection that is visible. An easy way to hide it is by adding a shelf and then a plant in front of it. I got an inexpensive plant from IKEA and then glued on a few extra vines to make it look more full.

Adding organization to this small laundry room
The mops and brooms were tucked into the corner, but were always flopping over. I used Command Broom hooks to organize them behind the door. Now each has its own spot

Although Asma had this spacing saving ironing board before the makeover, I have to mention it! This is hooked over the door and folds out as an ironing board. I think this is such a clever hidden storage solution for a tiny laundry room.

Lastly, they had a collapsible drying rack. Since this laundry room is so small, they have to set up the rack in the primary bedroom every time. I got a discreet retractable clothes line that I mounted in the laundry room.
How much did this DIY Laundry Room Makeover Cost?
Initially our goal was to update this laundry room for around $300. I am so happy that we were able to keep the cost down with this being mainly a paint project. We spent about $400. Here’s a budget breakdown for this room design. We spent
Paint and supplies: $50 (We used leftover primer and white paint from previous projects! This is a great way to save on projects)
Rattan Light Fixture: $90
Shiplap: $30
Rug: $65
Command broom hooks: $30
Home decor accessories (plant, baskets etc): $20
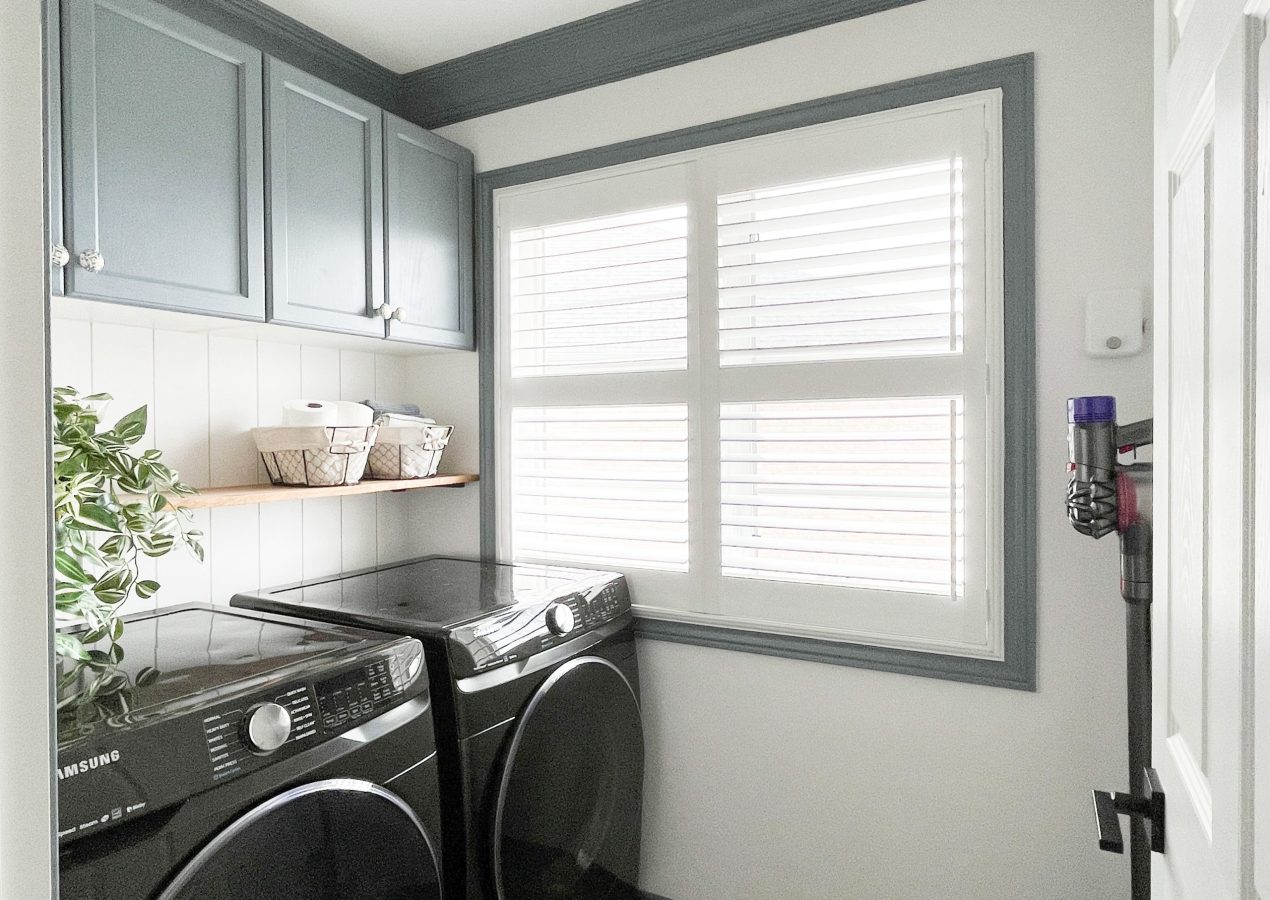
Budget Laundry Room Reveal


This laundry room fits perfectly with the modern coastal vision we had for this space. I absolutely LOVE how the painted trim and crown molding looks! The shiplap adds the perfect modern vibe. I hope you’re inspired by this budget-friendly DIY project. There are so many ideas that you can use in your home like painting the trim and crown molding, and small organization!
I love showing that you don’t need a major gut job to make your home beautiful! If you love this project, make sure to pin it! Connect with me daily on Instagram.


Leave a Reply